Thursday, May 31, 2007
Opto Endstop Boards Arrived!
 The commercially manufactured boards have arrived! These tiny little boards are the guys that tell your RepRap machine where each end is. They are great, except for one tiny defect: I dont know how to place big holes in Kicad, so the mounting holes are too small. Nothing a little bit of drilling cant fix though. Unit cost came out to ~$0.75 / ea.
Anyway, you can read more about it on the RRRF blog, or jump straight to the store if you'd like to buy some. (Is it a shameless plug if its on your own website?)
Monday, May 28, 2007
PLA Darwin Parts From Zaphod
I've run off a couple of PCB clips and a couple of brackets from PLA. You can see the stringing on the X constraint bracket - it looks like it as been enveloped by a spider. The thread can easily be picked off with a sharp point, fortunately.

The blob on top of the constraint bracket is where the software crashed. Fortunately it waited for the last layer...
Vik :v)

The blob on top of the constraint bracket is where the software crashed. Fortunately it waited for the last layer...
Vik :v)
Friday, May 25, 2007
Darwin parts analysis
I thought it'd be interesting to take the BoM and analyse Darwin's parts (so to speak) to see how we did in terms of our part types. Different parameters give different results (e.g. weight, volume), but the most useful is probably part count. Here's the proportions of parts for a Darwin machine including one Mk2 extruder.
Notes:
- each pcb board including all its bits counts as one electronic part
- all the wires counts as one part

The problem with a part count analysis is that it looks at the average fastener as four parts (nut, bolt, 2 washers). Seeing as we're eventually looking to swap fasteners for RP snap fits here's the analysis without the fasteners:

So what's that "others" proportion made up of I hear you cry:
Plastic bag (moulding release)
Timing belt
Capa
Stepper motor
Spring
Grease
Bed (MDF)
Fan
PTFE barrel holder (PTFE rod)
200:1 geared motor
200mm Heater wire (0.2mm nichrome)
Thermistor
Flexible coupling (steel wire)
Silicone tube
Grease
High-temp epoxy (JB Weld)
Plumber's thread seal tape
Half bearing (brass)
I think for our first release we've succeeded with Darwin by keeping this "others" list low, and equally importantly, widely accessible - all in all a solid development platform I reckon. Nice one chaps!! All Mendel's got to do is 'build on this' (heheh. heheheheheh. heh. sorry.)
Thursday, May 24, 2007
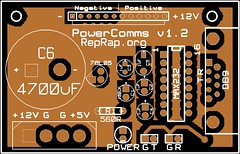
PowerComms v1.2 Build
A few days ago, the first batch of boards arrived from China. I decided to solder up a PowerComms board, and record it as a time-lapse video. It went pretty smoothly, so check it out.
Unfortunately there were 2 problems. First, I placed the wrong component, no big deal. Second, is that I swapped the 5v and 12v inputs on the silkscreen! That means you either have to slightly re-wire your connector, or solder in the header in backwards (the better solution) Its definitely no show-stopper, but I will fix this for v1.3 of the board.
Unfortunately there were 2 problems. First, I placed the wrong component, no big deal. Second, is that I swapped the 5v and 12v inputs on the silkscreen! That means you either have to slightly re-wire your connector, or solder in the header in backwards (the better solution) Its definitely no show-stopper, but I will fix this for v1.3 of the board.
Wednesday, May 23, 2007
Announcing the RepRap Research Foundation
I'm happy to bring you news today that we have gotten our incorporation papers back, and the RepRap Research Foundation (RRRF) is now an official non-profit corporation according to the United States of America. We are now working on the next stage, which is to achieve tax exemption. (If anyone is a lawyer or knows one that would like to help with this pro-bono, please have them contact us!)
So, what exactly is the RRRF? Well, it is an organization dedicated to helping researchers (you!) involved in the RepRap project. The goal is to play a support role by offering research parts for sale at low prices. They will remain separate entities, but will obviously maintain a close relationship.
The main way it will be doing this, is by providing an online store where researchers (yes, that means you!) can purchase various parts at low prices. Things such as PCB's, extruder nozzles / barrels, motors, and part kits that would otherwise be too expensive to order directly / individually. In essence, the RRRF will harness the economies of scale in order to make it easy (and cheap!) to get involved with the project. Also, since it is non-profit and run by volunteers (you/me!) the prices will be super low.
So, please come check us out!
Purchase parts at our online store: http://parts.rrrf.org
Visit the foundation homepage for detailed information: http://www.rrrf.org
Tuesday, May 22, 2007
PLA Darwin part
By raising the extrusion temperature to 165C I've managed to get PLA going through without blowing up the extruder motor - earlier attempts tightened the clamp too much and overloaded the poor little motor (may it rest in peace). PLA strings more than CAPA, but is significantly more rigid. Here is a Darwin bed clamp that I printed off on Zaphod last night:
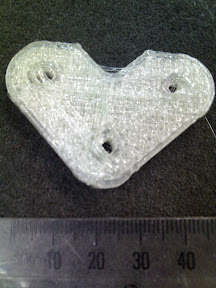
The holes have since been cleared of stringing with a penknife. I'll try some more complex Darwin parts later, but there are some modifications needed to the code to conserve memory for large or complex builds.
I've also got to fit the modified extruder drive - the one with a flexible shaft. Hopefully this will let the rigid PLA filament feed more freely still.
Vik :v)
Labels: bed, clamp, pla, zaphod
Saturday, May 19, 2007
Another support material miracle?
While I was doing some practice prints last night to get used to printing on duct tape something very unexpected happened. Recently, I've been working to get the polymer flow rate coordinated very closely with the extruder head velocity. Last evening I accidently managed to do that with a heretofore unencountered precision in a peculiar situation that produced some very interesting results.
I had laid down an HDPE raft and was trying to print a layer of the Mk 1 polymer pump on top of that. I had had trouble getting the layering interval right and managed to get it about 0.75 mm higher than it should have been. Ordinarily, that would have just made a mess of squiggled extrusions instead of a print.

All the same it made for a rather messy print as you can clearly see. It had been a long day and I had demonstrated that I could successfully print on HDPE, so I nearly just packed it in and went to bed. As I was shutting Tommelise down, however, I reached over to turn off the worktable light and in doing so noticed a very consistent shadow under the right hand side.
I'm very used to seeing that sort of thing when the extrusion doesn't adhere to the raft. In this case, however, the shadow was long and even rather than short and humped. I hadn't seen something like that before, so I used a small metal rule to see if I could determine the extent of this gap.

If I was intrigued before I was astonished when the rule easily slid fully 7 mm under the extrusion.
(Read the full story)
Friday, May 18, 2007
More squiggles...
Lol! If it's support you want, HDPE does a fair job. :-D


Support material miracle
While playing around with the PLA, I (Vik) noticed that the PLA can be formed into loops that would normally require support material. It might be possible to use the rapid hardening properties of PLA to build objects without support material in some cases:


Tuesday, May 15, 2007
Slimline Darwin Designs
Many thanks to Eric Morgan and Bart Anderson, who have laboured past the witching hour unenlightened but for the sepulchral glow of a USB memory stick LED until the first crow of the cock caused the outline of the old ghost in the stable yard to fade softly into the limestone walls*, and who have run all the Darwin STL files through AoI to clean them up and greatly reduce their size.
The new clean ones can now be downloaded from SourceForge at
http://sourceforge.net/project/showfiles.php?group_id=159590
Great work, chaps!
*This imagery may be over the top, but I'm not sure...
The new clean ones can now be downloaded from SourceForge at
http://sourceforge.net/project/showfiles.php?group_id=159590
Great work, chaps!
*This imagery may be over the top, but I'm not sure...
Flask with overhangs in PLA
I've done this nice little flask to test overhangs in PLA. At 40mm high, this is the tallest thing Zaphod can currently make. The extrusion was done at 157-160C and the deposited trail is 1.4mm wide:

Unfortunately is not waterproof. This is because I re-set the bearings, and as they settled in the feed rate dropped. This left a few small gaps in the base. Obviously, a fixable thing. It is durable though and shows no sign of wanting to de-laminate.
If you look inside you can see all these little hair-like threads that got dragged around during the fabrication process. Very pretty :)
Vik :v)
Labels: flask
Monday, May 14, 2007
RepRap needs your JAVA help!
We are looking for someone to help develop and maintain the RepRap control software. This is an essential part of the project that needs to be be easy and intuitive to use for it to ever gain mainstream adoption. Fortunately, its probably the easiest and least groundbreaking part of the system... and yet still exciting!
The software is the main method of interacting with and controlling the RepRap machine. Unfortunately it is hard to install, needs some UI work, could use some more intelligence with auto-detection/configuration, and has some bugs. The software can also be run in a stand-alone mode without a RepRap machine attached. That means you can get involved in a meaningful way even if you have no interest or capabilities to build the machine. One could do development work without ever having a RepRap machine at all.
There are a variety of tasks that range from simple to hard. Even small improvements to our code would be awesome. As an added bonus, if you agree to take on this challenge, the project is willing to provide free development boards to you. If you are interested, please email hoeken@rrrf.org directly, or visit our support forums.
To get started now, check out the RepRap Java development instructions.

Sunday, May 13, 2007
PLA Filament works
Back at the start of the year, plastics suppliers Claraint were kind enough to donate 10kg of polylactic acid (PLA) granules to the RepRap Project. Alan from Imagin Plastics - a welding rod and extrusion specialist in Henderson, New Zealand - then ran these granules through an extruder to produce 800m of 3mm diameter filament which I picked up on Friday. It was dried overnight at 60C and then extruded using a 180C die and 170C feed. Here's there wondrous extrusion machine:

And here's the batch of filament I picked up. It's actually quite transparent.

By running an unmodified Mk2 extruder at 155C and increasing the pressure on the filament - it's much harder than CAPA - I managed to run it well enough to produce this shotglass:

This material definitiely has some artistic possibilities.
Further experimentation is needed, but it does look like it will be possible to make watertight containers with a reasonable degree of strength from PLA in a Darwin. A straight-through extruder would probably have an easier time feeding filament, as the stuff is rather stiff.
Vik :v)
Labels: clariant, extrusion, filament, henderson, imagin plastics, pla, polylactic acid, reprap, zaphod
Thursday, May 10, 2007
Catwalk
Here is the official Darwin-finished pic:

Ed's powering it up the wrong way caused less smoke than my typing an extra zero in the extruder temperature box by mistake...
Here's the very first test.

As you can see, the fibreglass insulation round the extruder makes it look slightly like Cousin It...

Ed's powering it up the wrong way caused less smoke than my typing an extra zero in the extruder temperature box by mistake...
Here's the very first test.

As you can see, the fibreglass insulation round the extruder makes it look slightly like Cousin It...
Labels: darwin, first-test
Wired
Since the time lapse video of Darwin's exo-skeleton, Adrian and I have been working on wiring the beast up and making sure she runs ticketty boo. There's been a few additions and redesigns to fit in all the electronic wizardry, including the homing devices, for the first release. The job's been a shed load simpler than ARNIE was thanks to Adrian's timely suggestion of keeping all the motors on one side... so now its' looking the biz:

After a near miss with me chucking the power down it the wrong way (after Adrian specifically told me not to hit the juice till we'd checked it, and me hitting the juice before we'd checked it [but it was like a waterslide on a hot day!] - I'm still surprise he didn't get physical!!), all the LED's now come on, and we'll be putting it through the traditional shotglass paces tomorrow. The whiskey's on standby.

After a near miss with me chucking the power down it the wrong way (after Adrian specifically told me not to hit the juice till we'd checked it, and me hitting the juice before we'd checked it [but it was like a waterslide on a hot day!] - I'm still surprise he didn't get physical!!), all the LED's now come on, and we'll be putting it through the traditional shotglass paces tomorrow. The whiskey's on standby.
Sunday, May 06, 2007
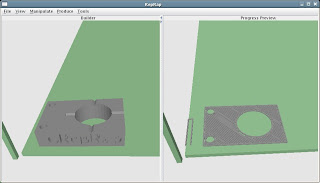
PowerComms & Universal v1.2
 Its taken me long enough, but I've finally gotten around to getting the production ready versions of both the PowerComms and Universal Controller boards done. As a test, I uploaded them to www.batchpcb.com and they both passed DRC.
I'll be doing an order of 25 sets to start things off. There has been alot of interest in the forums and elsewhere, so hopefully that will be enough to get boards for everyone. If the demand is high enough, I'll be doing another order soon afterwards.
 If anyone notices any glaring errors or omissions, please let me know. The boards are in subversion under electronics/PowerComms and electronics/UniversalController if you'd like to take a look in KiCad.
Tuesday, May 01, 2007
Opto-endstop cutie pie'd
After ARNIE, Adrian and I have been cooking up better ways to fit the optoswitch for the axis endstops. We've designed this 50mm long assembly for Darwin so that it comes with its own PCB and clamp (as standard).

Assembly instructions have been wikified here.
Flags for the axis have been fitted and, although there's a couple of mods to do, Darwin is on its way to being wired

Assembly instructions have been wikified here.
Flags for the axis have been fitted and, although there's a couple of mods to do, Darwin is on its way to being wired
Labels: datum, endstop, opto, optoswitch, switch
![]()