Friday, September 09, 2011
A Tipping Point of Print Quality (Open Source for the win)
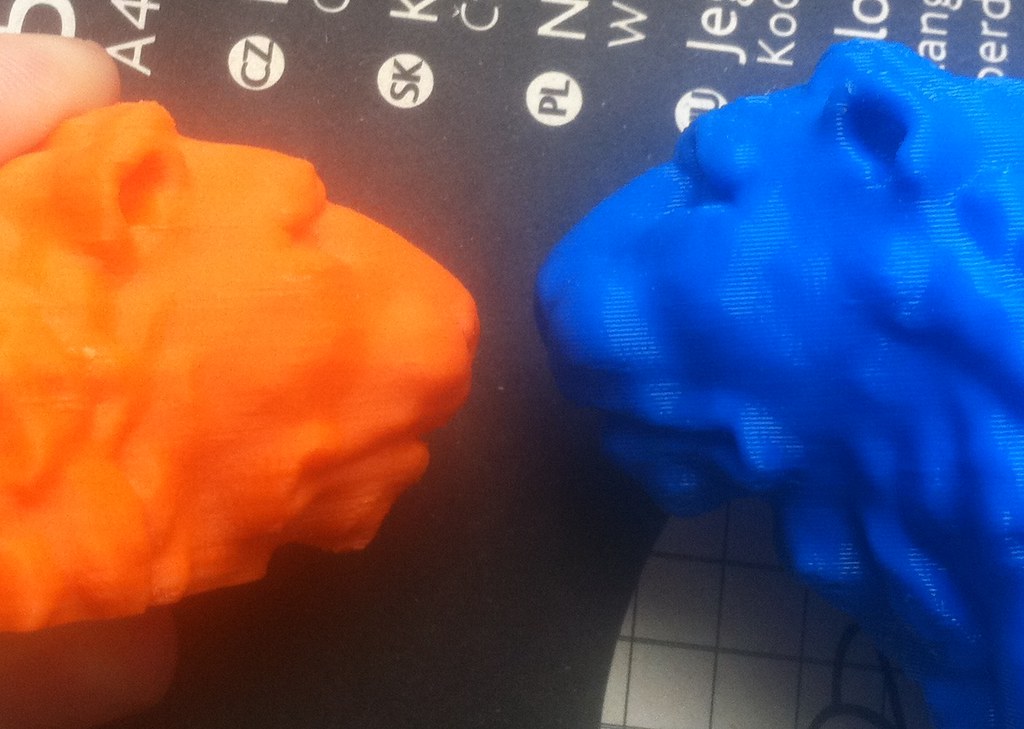
On the left is the Venetian Lion by Tony Buser printed by Prusajr on a $550 to assemble RepRap Prusa, on the right is the same model printed on a Stratasys uPrint+.
Its official, RepRap has now surpassed the commercial Fused deposition modeling 3d printers in machine affordability, price for filiment, and NOW build quality.
To be specific the machine that Prusajr used to do this was a RepRap Prusa, with a Makergear Plastruder, Felt bearings on the Y axis (yes normal clothing felt), Brass on the X axis, and LM8UU on the Z axis for the hardware. On the electronics/firmware end he was using Sprinter Firmware, on Ramps Electronics, sliced by Skeinforge and hosted by Pronterface Host software, and printed onto a PCB build plate. So basically nothing more than a standard run of the mill RepRap.
Of course we have always had some people who had epic build quality for years now (See Nophead), the big change is that the barriers to entry have dropped significantly:

Thanks the the new Volumetric Skeinforge (Skeinforge 41), and the fork of Skeinforge called SFact by Action68 (Ahmet Cem TURAN ) even makes the slicing of the models straight forward. As an example:

I did these on my Makergear Prusa after only changing 1 LINE in the Sfact setup, and that was just to tell Sfact the diameter of the filament I was using, everything else was handled by the Skeinforge back end and Sfact front end in Sfact.
Again, as an Administrator with RepRap I want to thank all the developers out there around the world, for helping use reach this milestone. We will continue to get cheaper, easier, faster, higher in quality, and more common through your hard work, thanks for all you do.
Thursday, September 08, 2011
Michael S. Hart, e-book inventor and Project Gutenberg founder, dies at 64
Michael was also a long-term core team member and supporter at Reprap.

He will be missed.

He will be missed.
Being in a 3D world, with a 3D printer? what do I need? A 3D scanner!
It turns out that I've well and truly been beaten to the punch when it comes to reprapping 3D scanners and such, so this post isn't about hardware, but more the software / workflow I've been playing with. I'm standing on the shoulders of giants here, none of the tools are mine, I'm just trying to build a workflow for a 3D "photocopier"! one_object->scan->[stuff]->print->two_objects = awesome!
In my case this is:
SpinScan - laser scanner hardware and point cloud generation
- by tbuser, awesome
http://www.thingiverse.com/thing:9972
On my mac, I installed the following to make this work ( it's Processing based, so should work anywhere very similarly ) :
Processing 1.5.1 http://processing.org/download/
OpenCV Framwork http://ubaa.net/shared/processing/opencv/download/opencv-framework.1.1.dmg
and then downloaded these extra libraries:
OpenCV Processing library: http://ubaa.net/shared/processing/opencv/
ControlP5 library: http://www.sojamo.de/libraries/controlP5/
( unzip the libraries, and copy the zip contents as-is to /Applications/Processing.app/Contents/Resources/Java/modes/java/libraries/ )
I then opened the spinscan.pde from GIT ( github.com/tbuser/spinscan ) with the Processing.app, and it loads, and runs ( press play etc ).
Once it's setup and working right , the SpinScan software generates a .ply file.
for more, read here:
http://en.wikipedia.org/wiki/PLY_%28file_format%29
 meshlab for point cloud -> stl / triangulation , ( by many many people smarter than me) :
( use the latest meshlab ) .
once you have a .ply file, convert it to .stl with meshlab using these hints...
or here's one possible method:
summary:
subsampling , normal reconstruction, surface reconstruction / triangulation, cleaning up and assessing.
1. open meshlab ( starts with an empty project )
2. File -> import mesh -> [browse to and locate the .ply file you generated in spinscan or similar ]
3. Open Layer view (7th icon from the left , looks like a pile of papers)
3. SUBSAMPLING: Filters > Sampling > Poisson-disk Sampling: Enter the Number of Samples as the resulting vertex number / number of points you want. Good to start with about the same number as your vertex to maintain resolution, or if you have a very large file, choose something like 10000 or so to reduce your point cloud to something easier to work with ) - you MUST tick the "Base Mesh Subsampling" tickbox or you'll get an error here.
4. COMPUTE NORMALS: Filters > Normals/Curvatures and Orientation > compute Normals for Point Sets [set neighbours = 10 or 20]
5. TRIANGULATION : ( try any of these, and see which works best for you ) :
a. Filters > Point set -> Surface Reconstruction: Poisson, set octree to 11 (ish) [you should now see a new layer in the Layer Dialog to the right] but really strange border! ( increase this to 12 or 13 if you loose too much resolution on your object at 11. )
b. Filters > Point set -> Marching cubes RIMLS. Set Grid resolution to 1000 for a detailed mesh, or approx 200 for less details.
c. Filters -> "Remeshing , Simplification and reconstruction" -> Alpha Complex / Shape ( might work, not sure )
6. Fill holes by Filters -> "Remeshing , Simplification and reconstruction" -> Close Holes , picks out number automatically
7. SAVE MESH !
save often as program crashes a lot!

here's a way that someone else did it:
http://www.instructables.com/id/Using-Meshlab-to-Clean-and-Assemble-Laser-Scan-Dat/
In my case this is:
SpinScan - laser scanner hardware and point cloud generation
- by tbuser, awesome
http://www.thingiverse.com/thing:9972
On my mac, I installed the following to make this work ( it's Processing based, so should work anywhere very similarly ) :
Processing 1.5.1 http://processing.org/download/
OpenCV Framwork http://ubaa.net/shared/processing/opencv/download/opencv-framework.1.1.dmg
and then downloaded these extra libraries:
OpenCV Processing library: http://ubaa.net/shared/processing/opencv/
ControlP5 library: http://www.sojamo.de/libraries/controlP5/
( unzip the libraries, and copy the zip contents as-is to /Applications/Processing.app/Contents/Resources/Java/modes/java/libraries/ )
I then opened the spinscan.pde from GIT ( github.com/tbuser/spinscan ) with the Processing.app, and it loads, and runs ( press play etc ).
Once it's setup and working right , the SpinScan software generates a .ply file.
for more, read here:
http://en.wikipedia.org/wiki/PLY_%28file_format%29
( use the latest meshlab ) .
once you have a .ply file, convert it to .stl with meshlab using these hints...
or here's one possible method:
summary:
subsampling , normal reconstruction, surface reconstruction / triangulation, cleaning up and assessing.
1. open meshlab ( starts with an empty project )
2. File -> import mesh -> [browse to and locate the .ply file you generated in spinscan or similar ]
3. Open Layer view (7th icon from the left , looks like a pile of papers)
3. SUBSAMPLING: Filters > Sampling > Poisson-disk Sampling: Enter the Number of Samples as the resulting vertex number / number of points you want. Good to start with about the same number as your vertex to maintain resolution, or if you have a very large file, choose something like 10000 or so to reduce your point cloud to something easier to work with ) - you MUST tick the "Base Mesh Subsampling" tickbox or you'll get an error here.
4. COMPUTE NORMALS: Filters > Normals/Curvatures and Orientation > compute Normals for Point Sets [set neighbours = 10 or 20]
5. TRIANGULATION : ( try any of these, and see which works best for you ) :
a. Filters > Point set -> Surface Reconstruction: Poisson, set octree to 11 (ish) [you should now see a new layer in the Layer Dialog to the right] but really strange border! ( increase this to 12 or 13 if you loose too much resolution on your object at 11. )
b. Filters > Point set -> Marching cubes RIMLS. Set Grid resolution to 1000 for a detailed mesh, or approx 200 for less details.
c. Filters -> "Remeshing , Simplification and reconstruction" -> Alpha Complex / Shape ( might work, not sure )
6. Fill holes by Filters -> "Remeshing , Simplification and reconstruction" -> Close Holes , picks out number automatically
7. SAVE MESH !
save often as program crashes a lot!

here's a way that someone else did it:
http://www.instructables.com/id/Using-Meshlab-to-Clean-and-Assemble-Laser-Scan-Dat/
![]()