Sunday, December 26, 2010
Pretty outside, ugly inside
I think we are now at phase, where easiest improvement of quality can be made by tweaking settings and software. So I did. I've done little hack to Skeinforge 37, so it can now generate perimeter (outside) at better resolution then infill. Dont get it wrong, we were able to print at the better resolution before too, but it took ages to print the object.
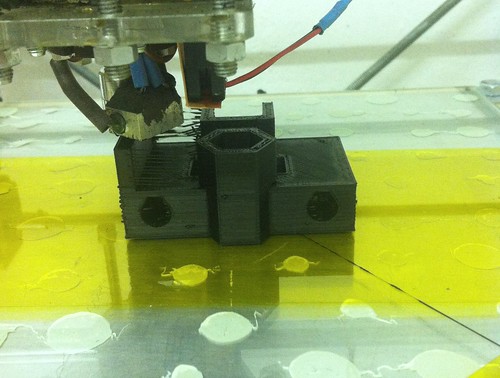
For now I tried printing infill at 0.4 and perimeter at 0.2 since I don't have my tweaked mendel here and only not very good printer which name will remain unspoken :-) I cant wait to be on my Mendel with 0.35 nozzle and 0.1 perimeter layers and 0.3 infill, aka printed porn :-)
Some data:
Print time of object at 0.4: 106min (100%)
Print time of object at 0.2perimeter 0.4infill: 144min (135%)
Print time of object at 0.2: 244min (230%)
On the other hand you have same quality object as from full 0.2 in just 59% of time :-)
If you want to try it, heres the hacked Skeinforge http://dl.dropbox.com/u/8967423/37_reprap_python_beanshell.zip Its not easy to set it right now. It's still hacking, don't forget it. But I have few hints: Set carve at 0.2mm layers if infill should be 0.4. Counted line width has to be same as for 0.4 so set Width over thickness variable accordingly to it (just mutliply by two) and set perimeter flow rate to half. That should be good starting point!!
I even uploaded my skeinforge settings here http://dl.dropbox.com/u/8967423/settings.zip so you can look it up. Original setting is TestRapMan04 and hacked one is RapMan04. BTW you can sneak peek my settings for other printers ;-)
Remmember this is not fool-proof, please share ideas under, what to be aware of etc. so Enrique can take it and all implement in official Skeinforge :-)
First tweak: last one 0.4 infill layer replace with 2x 0.2infill layers to smoother finish :-)
Friday, December 24, 2010
A proper conductive polymer mix?

Thursday, December 16, 2010
ABS Multicolor Printing
Chris Olah, a fellow RepRap hacker from Hacklab.to, has been experimenting with multi-colored prints on our Makerbot by loading differently colored ABS segments into the extruder. So far this has resulted in at least one extruder burn and a couple of really nice parts.
Full details in Chris's blog posts:

Tuesday, December 14, 2010
Reprappable Inkjet Head

This is an inkjet head that is completely makable in a RepRap machine. It was inspired by Johnrpm's Scratchbuilt_Piezo_Printhead.
It has only three reprapped parts. The other parts are standard easily-obtainable items. There is no machining involved in making it - the only tools needed are scissors, a scalpel or razor blade, a hammer, a short piece of 3 mm steel rod to use as a punch, and a glue gun.
It uses a piezoelectric buzzer to drive the ink.
It is experimental, so it's reliability is not yet perfect... But it does work. Here's the video:
Reprappable inkjet head from Adrian Bowyer on Vimeo.
I need to do more development on the driver electronics. Then I'll see if I can add heater elements so we can inkjet waxes and wood's metal...
Details are on the RepRap Wiki here.
Labels: inkjet, material deposition
Wednesday, December 08, 2010
ReplicatorG for RepRaps: Beta testers wanted
Over the past couple weeks Erik de Bruijn and I have been working on a new and improved RepRap 5D driver for ReplicatorG over on github and I think it's safe to say that it's ready for some serious testing. That is to say download it, burn it to zip disk (or whatever you kids are using these days) and give it to everyone you know.. oh and file bug reports! We need those.
Any 5d firmware should be compatible. So grab a copy at https://github.com/Ultimaker/ReplicatorG and try it out! (make sure to select Mendel with Gen 3 Electronics from the machine => Driver menu or add a configuration for your baud rate, etc. in machines.xml.dist and post your patch)
But wait, why should I use ReplicatorG you ask? Well if you've got a RepRap then ReplicatorG gives you a simple but powerful user interface to your 3d printer. It has manual control for your extruder, each axis, the heater and a heated build platform (if you have one). It also allows you to rotate, scale and auto-align your STLs before you generate GCode which comes in useful when you don't want to mess around with Blender to position each part. Finally it is integrated with skienforge and has some built-in settings for Mendels included to get you started (thanks Paul!).
What we're looking for now are beta testers to find the bugs we haven't found in testing it on our machines.
So heres the link: https://github.com/Ultimaker/ReplicatorG
Just click the download button. Once you have unzipped it on your computer you can use ant run from the command line from the folder you've unzipped it to in linux/windows/mac to automatically compile and run the ReplicatorG RepRap 5D Beta.
If you have any troubles compiling or running it check out the ReplicatorG help page on that: http://replicat.org/building-from-source.
And remember to check for updates as we bug hunt.
update:
To everyone wondering, this is a vastly-improved update of the version in 0022.. I forgot to mention that crucial nugget, sorry for the confusion.
Linux users can use dist-linux.sh to compile an executable.
Ok, on to specific install problems:
Problem: A warning message pops up saying machines.xml not found using machines.xml.dist instead.
The .dist warning is expected and a result of using the ant run method, please ignore it.
Problem: Mendel doesn't show up in the machines list
Solution: To get mendel to show up in the machines list turn on experimental machines in file => preferences to get Mendel. If it still doesn't show up delete the .ReplicaorG folder in your home directory and try enabling experimental machines again. If that doesn't work post a bug which brings me to..
Bug Reports can be posted at https://github.com/Ultimaker/ReplicatorG/issues
Thanks to everyone who commented on these! Next time I'll proof the instructions a bit more before posting so we don't end up with another screen of updates on all the critical things I completely missed ;)
Cheers,
Rob
[D1plo1d]
![]()