Saturday, April 28, 2007
Aluminum Barrel Success!
After letting the JBWeld cure, I was ready to get down to business and try some extrusion tests. I had my nozzles arrayed before me, my power supply ready to rock, and some alligator clips ready to clip. I knew the 0.7mm and bigger ones would extrude, so what I was really interested in was how the 0.4mm and smaller ones would perform. I had my doubts... but they were completely wrong. I usually try to save the best for last, but I cant. All nozzles (including the 0.25mm nozzle) extruded beautifully and at a good rate. I took measurements with my cheapo digital calipers. They may be a bit off, but they were close enough.
this was all done with HDPE.
0.40mm nozzle = 0.75/0.80 diameter thread
0.35mm = 0.60-0.70
0.30 = 0.50
0.25 = 0.40
those last two were very surprising for me. i honestly didnt think the 0.25 one was going to work at all. boy was i wrong. they all extruded very well. the smaller ones werent even very slow. the HDPE came out fine, and in a nice even stream.
next, i wanted to try some of the more advanced polymers that Sebastien sent me. first up was ABS. i cleared a barrel, loaded up a length, and started to heat it up. i waited a few minutes and tried some extrusions. it just wasnt having it. i may have been impatient and gave up too early, because when i pulled the ABS out to examine it, it was definitely malleable and soft. i dont know if it goes transparent like HDPE does when its melted, but it looked like it was nearly there. perhaps i need a hotter barrel, or to wait longer. i'll find out soon =)
after that, i decided to try the UHMW HDPE (this is basically a *very* nice version of HDPE). i loaded some up in a fresh barrel, turned it on, and waited a few minutes. this stuff extrudes like a DREAM! it came out faster, and better than regular HDPE. i dont have any hard numbers to back it up, but I have a feeling that this stuff could become my polymer of choice (until i can get ABS to work.)
i dont have any pics for this one as it is really hard to photograph the filament. anyone know where i can get reverse graph paper? (black paper, white lines?) i suppose i could just use normal black paper, but i like the way the graph paper gives you scale automatically. picked that habit up from Adrian =)
Friday, April 27, 2007
i <3 aluminum
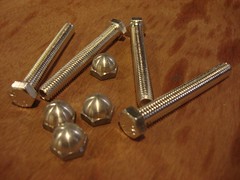
since i live practically across the river from mcmaster, i get FAST delivery times. they had my aluminum nuts and bolts here the next day. so once i got my aluminum, i went straight to the shop.
first, i started by drilling the aluminum bolts out with a long series 1/8". unfortunately my cheapo drill press only has a 2" travel, so i had to finish it with a hand drill. also, i dont have a decent clamping setup yet, so it was with a vicegrip.... not a good solution. (cross slide vice = ordered)
however, things worked great! the drilling of the aluminum was super easy, slightly slow on my part. the bit had no problem handling it. there is probably a better way to do that, but it was actually pretty simple.
after i warmed up with the bolts, i approached the main issue: the nozzle. unfortunately, i broke all my 0.5mm nozzles, so i used the random ones. first i tried 0.90. piece of cake. it made cool spirals of tiny aluminum. then came 0.7mm. also really easy. it melted like butter. i had an untouched grab bag of 0.15 - 0.40, so i decided to see how low i could go.
i loaded up the 0.40, brought it down on the aluminum, and it snapped! aargh. first try and its busted. well, i was actually just a bit over eager, because that was only one of two bits i broke drilling holes. i tried again and easily got a 0.40 nozzle.
then i went down the sizes: 0.35 went well... just slow and careful. same with 0.30, 0.25. then i got to 0.15 which is an insanely small size of a hole. unfortunately the bit broke... i think my drill press is just too loose to handle it. it certainly could've drilled through the aluminum.
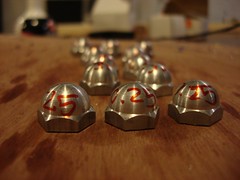
i drilled a couple of each size, just to see how it went... the nozzles were very easy to drill. infact, the acorn nozzles are practically perfect for an extruder head. heres why:
1. the inside of the nut tapers up into a point near the top. its actually very thin. thats why its so easy to drill through... i dont know how to measure it, but its very thin.
2. the bolt screws all the way in. there is only a small gap between the end of the bolt and the cone area. i dont know the physics behind polymer flow, but it seems right to me.
3. the aluminum conducts good heat, not as good as copper, but still very good.
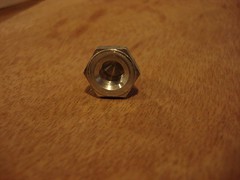
so, after that, i rushed back to the lab at home. i had to try extrusion! i already had a steel extruder barrel worked up, so i wired it up and screwed a large mm aluminum nut on... there wasnt enough thread, so the nut only went halfway on. even with that large chamber of plastic, extrusion still worked.
i got a decent stream of 0.7, and 0.4 also came out pretty well. i got tired of manually feeding it, so i stopped for the night. i want to wait until i hook up one of the new aluminum barrels i got to see how it works.
Sunday, April 22, 2007
RepRap wasn't built in a day
At the end of last week I assembled our first RepRap Version 1.0 "Darwin" from scratch and shot a time-lapse video of the entire thing at one frame every three seconds. It took me four and a half hours spread over two days (I have to teach sometimes...).
Annoyingly, Ed appears from time to time to hinder proceedings using something that I understand is called a "sense of humour", so it is through gritted teeth and with a dark heart* that I have to say that he has done a truly outstanding design job. This is the first time that I have built the machine (all my work so far has been on extruders), and it went perfectly from his instructions on the RepRap Wiki here. Also, the way that he uses bits of the part-constructed machine as jigs and templates to allow one accurately to build and align other bits is, frankly, inspired. You will notice that the only measurements that I make are with an ordinary tape measure.
(*Metaphors getting out of hand here, AB. Steady.)
Wednesday, April 18, 2007
Printing HDPE on copper.
You're just not doing it right, Vik. Mind, I tried to do exactly the same thing with Tommelise a few weeks ago with identical results. I didn't blog it at the time but when I read your blog entry this morning I realised what I did wrong.
There is a way to make it happen, though it may be more useful for what I have in mind than for your idea of using CAPA for photoresist.
(Read the full story)
There is a way to make it happen, though it may be more useful for what I have in mind than for your idea of using CAPA for photoresist.
(Read the full story)
Tuesday, April 17, 2007
You can't spread a bit of CAPA on your copper
Yesterday I bought a piece of copper-clad board and tried sticking it under Zaphod. The idea being to deposit a trail of CAPA on the copper and then etch the exposed copper. Unfortunately, it looks like copper makes a nigh on perfect non-stick surface for CAPA extrusions. Even after cleaning with contact cleaner and cranking up the heat, I couldn't get any CAPA at all to stick to the copper.
Looks like time for plan B; the etch resist pen.
Vik :v)
Looks like time for plan B; the etch resist pen.
Vik :v)
Labels: board, capa, circuit, etch, pcb, polymorph, track
Saturday, April 14, 2007
Tommelise joins Zaphod and A.R.N.I.E.
There are now three open source 3D RepRap printers that have passed the "print a shot glass" milestone.

That's a standard British 25 ml short shot glass. I was halfway through my second shot before it occurred to me that it was 1000 in the morning, I'd had 3 hours sleep the previous night and hadn't made breakfast yet. I've been hammering getting the shot glass print done, you see.
You can read a complete account of the adventure here. Be sure and click on the "Continue reading" link at the bottom of the blog entry to get the complete account.
Labels: "3D printer", HDPE, RepRap "Clanking Replicator", Tommelise
Wednesday, April 11, 2007
Congratulations to ArtOfIllusion
The free and Open ArtOfIllusion 3D graphics studio - the one we use to build our parts - gets the Sourceforge "Project of the Month" award for its slick features and friendly GUI. Details at http://sourceforge.net/potm/potm-2007-04.php
Congratulations to Peter Eastman, Nik and all the other contributors on their achievement. May they continue to produce excellent software.
Vik :v)
Congratulations to Peter Eastman, Nik and all the other contributors on their achievement. May they continue to produce excellent software.
Vik :v)
Labels: 3d, art, artofillusion, cad, illusion, month, project, sourceforge
What happens when a US National Laboratory tries to make a RepRap

You Look Like My (proto)Type
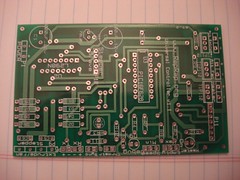
I was really worried about the prototype boards, since they were due to be delivered to my work the DAY we were scheduled to move uptown to Union Square. Luckily, they still got delivered okay. Boy do they look sweet!! I got a couple sets up on Flickr on them and heres a pic of the universal board.
I'll be making the bulk order later this week. I want to test everything and also need to do a few tweaks to the layout.
PowerComms Pics
Universal Controller Pics
Tuesday, April 10, 2007
Another time lapse - the logo (almost)
I had a go at printing the logo, whcih adequately exercised the boundaries of our software's stability. Erm, cough, yes, well.
However, eldest daughter (who today arranged some form of novel time-delayed laundry detergent dispenser to explode in my workshop) reckons it is officially "cool" and therefore worthy of mention on the blog. I give you our Logo, RepRap'd in one piece:

Also, there is a video of it here as a 2.5sec/frame time lapse. Of course, Dorkus here filmed it upside-down...
Vik :v)
Monday, April 09, 2007
Darwin assembly instructions
The parts list and how to put them all together is now on the wiki: in the 'How to build it' section, under "Cartesian Assembly".
![]()