Thursday, November 29, 2007
Resin paste-extruder valve

The valve mechanism in the experimental paste extruder was a bit difficult to make as it needed some machining. I've now done an alternative that uses rapid prototyping to make a blank and then soft casting in a silicone mould to produce the final item. You can't quite use rapid prototyping for the whole thing because RP is not good at threads, and this has an M14 one.
The advantage of this approach is that once you have set it up you can make a lot of these devices quickly and easily by repeated casting.
It uses the trick of trapping nuts in the resin to give good retention of screwed-in parts - see the soft casting page again for details.
Labels: casting, resin, soft tooling
Tuesday, November 27, 2007
New z flag adjuster
Those of us in the tweaking stage will appreciate the level of control needed over the position of the first layer. Here's a gizmo I made to get better control on the z flag using an M5 bolt. I've uploaded the part files onto the latest SVN release of the bot.
.jpg)
.jpg)
Producer/LayerProducer code changes
Hi, just committed some important changes to the code:
- Important: First layer now prints @ z=0 i.e. home position (previously @ z=extrudate height).
It's quicker and easier to tweak the nozzle to home position to the right height for the first layer, which was previously a bit of a hit and hope. Plus it's safer, at the home position the nozzle doesn't have to physically touch the bed, which it just about has to if first layer printing starts at z=extrudate height.
- Bruce's bug fix to stop extruding on dry segments! Hurrah!
- Included commented code for horizontal and vertical hatch vectors.
- Streamlined warm-up sequence.
Friday, November 23, 2007
Thank You MAKEzine!
I was honored and very excited today when I loaded up one of my favorite blogs and saw a podcast about the RepRap project. This is the first podcast in a series of podcasts, and I'm very excited to see how the rest of them turn out. Makezine has been a source of inspiration for me, and I'm sure it's been inspiring to others on the project as well. It feels fantastic to see the stuff I've worked so hard on to be featured there.
If you are wandering in here in search of instructions on how to build each board, then look no further. Here are direct links to the wiki pages of each of the boards used in the podcast:
Keep in mind that these are the experimental (and hopefully next-generation) versions of the RepRap electronics and you're treading into territory that is *not quite* fully documented nor supported by software. We're working on this as hard as possible, and its likely that the rest of the software will be written in the next week or so.
Wednesday, November 21, 2007
PowerComms v1.3 Released
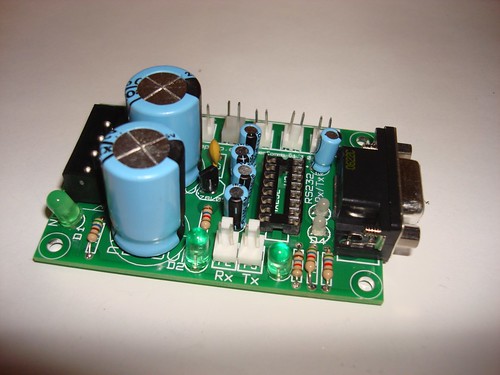 Our new Power and Communications board has now been fully tested and documented. It features many improvements, most notably diagnostic LED's for Tx and Rx (yay blinken lights!) It also has a better layout, more reasonable capacitors, and more power outputs.
Check out the documentation (now with lots of pictures).
We also have it fully stocked in the RRRF store.
Thank you to everyone who helped out to make this happen. This is an excellent incremental improvment over our previous board and takes us one step closer to having an awesome robot that prints us out cool things. Keep up the good work guys!
Friday, November 16, 2007
Amazin' Saddles

Ed was kind enough to run off some saddles that grip the X axis rails and stop the carriage rotating when there is a little slack in the carriage's bearing inserts. I'd made some from CAPA earlier, but they were a little ugly and not machine fabricated so they had to go...
Yes, I did try making them out of PLA on my Darwin, but this exposed the software bug that Adrian is beavering away on, with some success. I'll just wait for confirmation from another source that they're worth putting on the RepRap and then I'll wiki them. Meanwhiles, if any cowpoke finds their carriage a little rattly on the rails, go git yerself some amazin' saddles.
(The blue wire in the photo goes to my diagnostic thermocouple, and the big black screw in the lower right corner belongs to the clamp giving extra pressure to the PLA extruder.)
Vik :v)
Thursday, November 15, 2007
Postscript: RepRap goes home from the USA

Right. How the *!*? am I going to get my shirts and this lot in my suitcase?
(Thanks again to Steve Carll for the photo.)
Wednesday, November 14, 2007
New Firmware Release
Thanks to Andreas Unterluggauer we have a new firmware release. This improves the communications functions and reduces (indeed, on the Bath Darwin eliminates) comms errors.
You can get the .hex files from Sourceforge here:
https://sourceforge.net/project/showfiles.php?group_id=159590
or get the sources using subversion at:
https://reprap.svn.sourceforge.net/svnroot/reprap/trunk/reprap/firmware
You can get the .hex files from Sourceforge here:
https://sourceforge.net/project/showfiles.php?group_id=159590
or get the sources using subversion at:
https://reprap.svn.sourceforge.net/svnroot/reprap/trunk/reprap/firmware
Extruder output profile
Trying to nail the parameters on the Bath Darwin, I realised that the only factor I'm flying slightly blind on is the output of the extruder. Here's an output profile for Capa using a target temperature off 100 °C and a ø 0.4mm nozzle for a variety of motor speeds.

WARNING: 12V motor used in this test. (i.e. Don't put 12V through the standard issue 6V motor!)

WARNING: 12V motor used in this test. (i.e. Don't put 12V through the standard issue 6V motor!)
Sunday, November 11, 2007
Thoughts on printing at ambient temperatures
I hit a technical problem back in September and you haven't heard much from me since then. I've been able to print in HDPE and am well on my way towards sorting out the problems with using brushed gearmotors to run both the extruder and the Cartesian positioning system of Tommelise. I'm publishing in the main blog rather than the builder's blog this time in that the issues that I am addressing impact on both Darwin and the various repstrap machines that are abuilding.
As you are all aware by now, I am sure, HDPE and to a lesser extent CAPA tend to curl when extruded at ambient temperatures.

This curling tends to happen at corners when the aspect ratio of the object being printed approaches 1. When you have long objects you tend to get curling in the plane of the longest dimension. Nophead published some really compelling photos of this effect over in the builders' blog last month.
I got very discouraged about the warpage issue and resolved not to share my misery with the rest of you if and until I came up with a viable solution to the problem.
(Read the full story)
Saturday, November 10, 2007
RepRap User Groups
Looking for people who also want to build RepRaps? Want to band together on group buys for a supplier to save on costs? Have a machine shop but not good at soldering pcbs? Live outside the US and don't know where to buy stepper motors? Already building a RepStrap and want to show it off? Just want to make the cognitive and emotional leap from "Boy, a machine that makes copies of itself!" to "Damn, I'm going to build one! Is there anyone in my town working on this too?"
Find or start your local RepRap User Group!
We've created a dedicated set of subforums, which you can also get to by going to our forum site, http://forums.reprap.org/index.php, and drilling down to to RepRap User Groups.
If you don't see a subforum dedicated to your town in question, don't panic! Log in to:
Request a Local RepRap User Group,
and tell us where you live, and we'll set one up.
Wednesday, November 07, 2007
DC Motor Driver v1.0 Documented
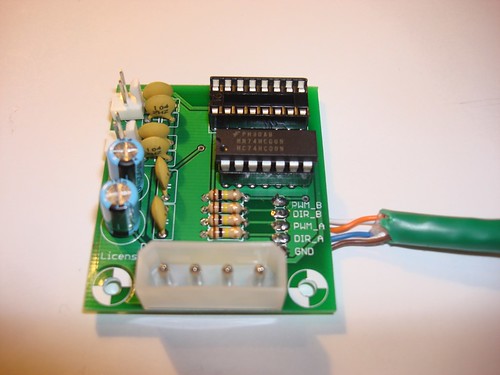 Just wanted to give a heads up that the new DC Motor Driver board has been fully documented with full build pics, information on the board, and even some cool hacks you can do with it like drive a (small) stepper motor.
Please note, that this is a prototype board for the next generation of Arduino based RepRap electronics, and is not currently supported by our software. I'm working hard on getting the Arduino firmware up and running, but if anyone wants to help out just drop a line in the comments or email me.
Tuesday, November 06, 2007
Extruder Casting Photos
 I recently got a set of molds for the extruder from Adrian. After acquiring the proper casting goop, I decided to spend a day learning how to do it and see if its something I could do myself. Turns out, its really easy!
The basic process is this:
* insert cores into proper places
* spray with mold release (this definitely helps)
* mix and pour in liquid plastic
* wait til plastic hardens
* remove cores
* remove cast parts
* trim/clean up cast parts
* clean cores
* repeat
casting a set of parts from beginning to end takes about 30 minutes, although 15 of those are waiting for it to cure. this is good for someone like me who multitasks alot. i'll setup the molds in the lab, cast them, and while they are curing, i'll work on something else.
i plan on trying to make my own mold as well, because then i'll be able to double my production while only slightly increasing the time it takes. its pretty much just as easy to setup and pour 2 molds as it is to do 1 mold. i have an old, non-straight extruder that i should be able to get a mold of, so eventually people will be able to choose between old and new if they want.
there are pretty much only 2 or 3 major hurdles keeping these out of the RRRF store:
1. brass bearings. i dont have a supplier for these yet, but i do have an idea for how to make them rather easily from brass 10-24 nuts. i'll be trying it out this week, and if it works, then we'll be in business!!
2. assembling and testing it. i still need to fully assemble a cast version and test it just to make sure that it works 100% as advertised. this is still a research project and sometimes things wont work, but i certainly don't want to sell stuff to researchers that hasn't been tested yet. hopefully the resin i'm using is strong enough. we'll find out soon enough =)
3. get the final part list. i need to double check the part list in order to create the kits to sell on the store. this will also be helpful for people who want to order them directly from McMaster, etc. specifying the right nuts, bolts, washers, etc. will really help out alot.
we're close to having extruders generally available!!
More pix on Flickr.
Saturday, November 03, 2007
RepRap at Linuxconf Australia 2008
 Lucky me gets to present on the RepRap at Linuxconf Mel8ourne 2008, with the fancy title of "The Replicators Are Coming!" I'll be bringing along a RepRap Inna Box and they'll probably rope me into the Open Day as well. Pia can be very persuasive...
Vik :v)
Labels: 2008, lca linuxconf, mel8ourne, melbourne, reprap
Friday, November 02, 2007
RepRap Part Lister
One of the unique things to RepRap, and open source hardware in general is the fact that we're dealing with real, physical objects. Instead of having library dependencies in order to 'build' our 'software', we have parts needed to build our hardware.
A simple example: the opto endstop needs a PCB, a couple resistors, the optical switch, and some wires. In the software world, settling dependencies is fairly easy: download and install the right software. In the physical world, you need to get your hands on the real part.
Thats where the part list generator comes in. We have all (or most) of the required parts for the RepRap project stored in a Google spreadsheet. This gives us an easy way to store, update, and show the parts required for any individual module. However, it becomes a pain to try and figure out how many nuts or bolts one needs to construct a Darwin.
The parts list generator takes this google doc, and transforms it into a MySQL database. It can then generate aggregate part lists for any combination of modules you'd like. We've even taken the time to enter part numbers from a variety of manufacturers. From there, we can do nice things for you like generate unique part lists by manufacturer. We've even taken it a step further to allow you to order all the parts you need from Amazon in one click, or to copy and paste a part list into Mouser to make it super easy to buy the electronic components needed to build the circuit boards.
As always, this software is all 100% open source. You can browse the source if you want. I'm pretty happy with how it turned out, but I'd love to incorporate more code contributions or have more parts from more part manufacturers.
![]()