Tuesday, November 24, 2009
Bugs Brew PLA Direct
A team from South Korea’s KAIST University and the chemical company LG Chem, have developed a one-stage process which produces our favourite fabrication material, polylactic acid, and its copolymers through direct fermentation of starch. They've genetically engineered E.coli to do the job, which makes the production of PLA cheaper and more "commercially viable."
There are undoubtedly patents on this, and I don't know how the separation process works, but cheaper biodegradable feedstock for the current generation of RepRaps and the ability to basically brew the stuff in a vat will doubtless have an impact on both RepRap technology and our greed for oil.
Vik :v)
Labels: kaist, pla, polylactic, polylactic acid
Saturday, November 21, 2009
Moving towards production

The Java driver software now handles multiple part printing reasonably well, though wrinkles remain. This tray of Mendel parts was printed on my old Darwin in six hours (my new Mendel is still, as web pages say, Under Construction...). Erik and Nophead's experiment of reversing the extrude motor at the end of each write has led to minimal PLA string.
Ages ago Zach defined an XML multi-part file format for RepRap (and Fab@Home) that should be pretty easy to implement that would allow one to store a whole tray of parts like this in a single file. (The G-Code file generated to build all of them is also a single file of course.) I have a few immediate things to do on the software/firmware front (like having an M code that sets the temperature and waits till the extruder gets there, as opposed to returning immediately - one needs both), then I'll implement that. That in turn should mean that Mendel is represented by between four (Mendel) and six (Darwin) files that one just has to load and print...
Labels: factory, fast production, reproduction
Mac Goes RepRap (one day...)

Mac|Life magazine recently approached Mark Frauenfelder and others to envision a future product from Apple. Mark's entry was based on RepRap (left). More details here.
Of course, if Apple do that, they'll have to GPL all its designs.
And I'm guessing it'll be a RepStrap, not a RepRap...
Labels: Apple, Mac, predictions
Monday, November 16, 2009
Pathetic Fallacy
My old Darwin in my home workshop has just finished printing me my personal set of Mendel parts:

Like any proud parent, it was uncomplaining about the chore, even though - for all it knows - it is printing its own replacement.
(I fact I shall keep the old machine so I can double my production rate; and besides it has tremendous sentimental value.)
It's taken me a relaxed couple of weeks, just queuing up prints between experiments, and not leaving the machine running while I was at work. I'm sure it would be OK, but I'm not 100% certain what the insurance company would say in the unlikely event of being confronted by a smoking ruin:
IC: What are all those chemicals in that charred cupboard?
AB: Oh, fertilizer, weedkiller - I do a lot of experiments on plants; various volatile organic solvents. But they weren't the cause.
IC: Uh huh?
AB: No - I have a self-reproducing machine, and I left it running while...
IC: You left a self-reproducing machine running?
AB: Yes, but it's quite safe. It can't reproduce without human assistance, and...
IC: But you left a self-reproducing machine running on its own?
etc. etc.
Anyway, now off to hack the documentation as I build...
Printing the Rapman
Yesterday, klaszlo, a member of the Rapman users' group wondered how he could get spares for the gear pair on the Rapman 3.0. For many of us, the whole point of Reprap machines is to print our own spares rather than tormenting Ian at BitsFromBytes every time we break something.

Do you want to read more?
Bogdan's acid test
After having proved that we could print long beams in both HDPE and polypropylene, Bogdan suggested that we give the method an acid test.

Do you want to read more?
Sunday, November 15, 2009
More printing large objects with HDPE

I pushed the length of the 5x20 mm beam out to ~180 mm this time. I got a little bowing because the tension plates began to uproot the raft during the last few layers of the print. For more...
Saturday, November 14, 2009
Revisiting HDPE
Once I established that using pads and guy flanges suppressed warping in large dimension objects printed in ABS I decided to see if the same method with HDPE. Basically, I printed a 5x20x145 mm bar guyed to pads on the raft.
Some years ago, when I was working with HDPE on my Tommelise 1.0 Repstrap printer the big problem with HDPE, aside from a tendency to warp profoundly, was finding a surface that it could be printed on. I found that I could print on art store foamboard. This material is about a quarter of an inch thick, typically and consists of plastic foam sandwiched between two sheets of plastic coated paper. HDPE would stick to that quite nicely. Unfortunately, however, this material tended to perish when exposed to the hot extruder head of Tommelise 1.0. It also lacked the structural strength to resist the tendency of HDPE prints to curl at the corners.
Recently, Bogdan Kecman, a Rapman user in Belgrade, has been making a serious effort at working through the problems presented by HDPE and polypropylene as printing materials. Yesterday, he was kind enough to offer me advice about what sorts of materials that he found HDPE would stick to. In the list he gave me it appeared that polypropylene sheet offered the best option for printing HDPE. I happened to have a few sheets of 9.5 mm polypropylene left over from my milling work with Tommelise 2.0 earlier this year, so I quickly converted one of these into a print surface for my Rapman 2.0 printer and got to work.
Guying HDPE prints from Forrest Higgs on Vimeo.
After a few false starts and a careful go at leveling my print surface, I managed to print my guyed beam successfully with no peeling of the raft and NO subsequent curling or warping of the beam.

The beam was printed using Skeinforge with a 40% hexagonal fill. the raft was printed at 220 C and the beam at 225 C. The extruder head speed was set at 16.8 mm/sec and the feed rate at 46 rpm. I am not completely satisfied with the surface quality of the beam. I suspect that I am extruding a bit too cool. I will be exploring these kinds of settings in coming days.
One of the most important discoveries of this exercise is Bogdan's discovery of polypropylene as a printing surface for HDPE. It is sticky enough to keep HDPE rafts solidly on its surface and strong enough, in thick pieces to successfully resist HDPE's tendency to curl and warp during the printing process. Without Bogdan's discovery, guying would have been impossible with HDPE. Polypropylene sheet is also readily available and cheap as well. I shaped it into a print surface for Rapman with ordinary hand tools. It behaves a lot like acrylic plastic except that it isn't brittle at all, a characteristic which makes it much less risky to work with.
HDPE has several advantages over more conventional plastics like ABS and PLA. It is a single polymer and not a witches brew like ABS. When you print with it you can, if you get close to the print head, detect a mild, pleasant odor from the hot HDPE. Try the same thing with ABS and you get a very different experience. HDPE also can be had for about $5.50/lb {~$12/kg) compared to $9.75/lb for ABS {$21.50/kg} and $10/lb for PLA {~$22/kg}.
HDPE also constitutes a very large fraction of plastic waste worldwide if we ever get around to developing small scale plastics grinding and filament extruding equipment that will get us into recycling.
Please understand that I am not suggesting that everyone run out and buy lots of HDPE right now. We have a lot of practical experience using PLA and ABS and we shouldn't dump that. Different plastics have different uses. What is nice, however, is that it looks like we have another one to add to our list, which, like PLA, has not heretofore been used in commercial equipment.
I am very excited because Bogdan Kecman is going to be testing the pads and guying technique with polypropylene in the next few weeks. If he succeeds, we will have a printable plastic that costs about $4/lb {$8.80/kg}. THAT will be a brilliant development for the Reprap endeavour.
Thursday, November 12, 2009
Continued guying
I went down to my hardware stockists and acquired a piece of 5.56 mm acrylic sheet to replace the 3 mm sheet that came with my Rapman. That done, I printed my guyed, 5x20x150 beam again using ABS and printing at 16.8 mm/sec. I processed the STL using Skeinforge and used a 40% hexagonal fill.
I removed the beam immediately after printing it...

... and stripped off the raft.

I am not able to detect any bowing in the resulting beam. The raft on which the beam was printed was rather coarse as you can see in the pictures in the previous guying blog item. It may be that there is some very small amount of bowing that is lost in the roughness of the bottom of the print caused by the raft. If there is, I suspect that it is much less than 1 mm over the 150 mm length of the beam.
The STL for the beam with the guyed flanges looks like this...

I would appreciate it greatly if others would try to print this beam in ABS on other Reprap printers so that I can confirm my results. If you are interested in trying this you can get the STL from here.
Thanks.
One thing in passing. If you are going to print ABS onto an acrylic print base, something I can recommend highly, I'd strongly suggest you get one of these.

It is a scraper used by professional house painters to clean enamel off of windows. It separates ABS rafts from your print base very quickly and cleanly with a minimum of drama.
Wednesday, November 11, 2009
Guying long prints
I'm an architect by training with a keen interest in the history of building technology. In the Middle Ages, architects compensated for the lateral thrust generated by domes and vaults with butresses. In the 20th century architects dealt with inflatable buildings by using guy wires to anchor them to the ground.
When you print long, tall objects in most polymers the ends of the object tend to try to lift off of the print surface. Ordinarily, one uses a raft to more tightly secure a printed object to the print surface. For objects up to about 40 mm that method works nicely. When one goes beyond that, however, the printed object tends to peel the raft off of the print surface.
I spent a lot of time working with HDPE several years ago. HDPE has terrible tendency to curl at the edges. At that time, I thought it would be a good idea to print pads next to the ends of a long printed object and guy the ends down. This spreads the force generated by the upwardly curling printed object. You can see a first effort at this here.

I was trying to print a beam 150 mm long by 5 mm wide by 10 mm high. You can see the details of the pads that spread the tension force and the plates that carry that force down and spread it onto the raft in this closeup.

The idea worked, so I increased the height of the beam to 20 mm and tried it again.

That appeared to have worked, too. What was interesting was that I could easily peel the raft off of the acrylic printing plate and was able to easily peel the raft off of the printed part. The guy flanges and pads can easily be removed with a mat knife.

After I removed the beam I noticed that the curling force during printing had actually bent the rather flimsy 3 mm acrylic printing plate provided with the Rapman printer. The downward bowing amounted to 2 mm over the 150 mm length of the beam.
It seems likely that if I use a thicker acrylic printing plate that I can reduce the 2 mm bowing on the bottom surface of the beam. I will see if I can purchase a heavier print plate tomorrow at the hardware stockist's.
I will also measure the bowing of the beam over the next several days to see how much it ultimately distorts.
Wednesday morning: I measured the bowing again a few minutes ago. It is still 2 mm.
I found a bug!
 A New Zealand cicada by Rhys, Bronwyn and myself. CC-BY-SA licence. Hope to put the files up soon.
No, it didn't print in one piece. It's kinda like an Airfix kit, requiring some superglue and a blowtorch. But it comes out pretty darned well.
Vik :v)
Tuesday, November 10, 2009
Reprapable Solar Power

We've discussed reprapping solar panels for a long time, and - of course - our semi-conductor printing capability isn't quite up to that yet.
But it should be possible to reprap a small-scale solar array like a miniature version of the industrial one at Daggett above.
It would use reprapable solar-powered steerable mirrors. Those would be an autonomous motorized gimbal mirror support with a tracker that keeps the sun's reflection pointing the same way at all times (onto a solar boiler, say). The idea is you'd reprap out a load of these, then walk round a field putting them down. They'd all align themselves and start delivering solar power...
I think the trick is to black out a corner of the mirror except for a small circular spot in the middle of the black. Each steerable mirror has a detector on a flexible arm that you place where you want the reflection of that spot to be. Feedback keeps the spot-reflection on station, and hence the main mirror also on station. A really clever design would combine the spot detector with the local solar cell that provides the motor and controller power.
I look forward to the first version on Thingiverse...
Monday, November 09, 2009
Rack and pinion
I've wanted to build a Reprap machine that didn't include a lot of ironmongery for a long, long time. Indeed, I developed a tool script for designing involute profile gears way back in 2006. Last year I milled gears and racks. This year I'm printing them.

You can see the completed rack with the pinion here.

Oddly, though the rack was 190 mm long, it didn't warp significantly.

Thursday, November 05, 2009
An end to ooze II

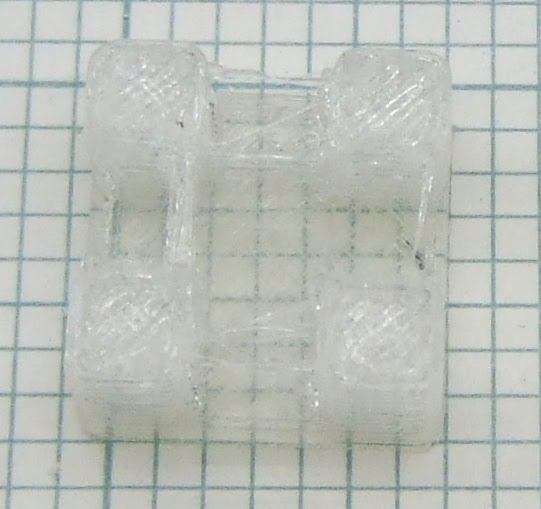
Ages ago, I put code to reverse the extruder at the end of plotting a sequence of line segments into the Java host software, thinking, "That might be useful someday." I set the default so that it reversed the motor for 0ms to turn the feature off, and forgot about it. Seeing Erik and Nop's post below, I thought I'd better finally try it out...
Above is the result - perfect! (Ignore the dark splodge in the middle of the square; that was crud on the extruder falling into the build; I should have cleaned it first.) Normally there'd be loads of string between the L-shaped nozzle-wipe bit and the block being made. Now there's none.
I'm running at an XY feedrate of 3000 mm/minute. At that rate setting ExtruderN_Reverse(ms) to 200 and ExtruderN_ExtrusionDelayForPolygon(ms) to 400 seems to work nicely.
The delay figure is how long the extruder runs before starting an XY move; this allows the polymer to move back down the barrel to take up the slack.
Tuesday, November 03, 2009
An end to ooze and support material found ...
... a successful days collaboration, see hydraraptor.blogspot.com/2009/11/hacking-with-erik
Before:
After:

PLA on ABS on PLA:

Before:

After:

PLA on ABS on PLA:

Labels: ABS, ooze, pla, support
![]()