Tuesday, September 30, 2008
Meshlab Discovery - The Origins
 The Meshlab utility I recommended to Forrest was something that I'd hunted down while trying to find a PLY to STL file converter that was Open Source. I was trying to import free animal models in to the RepRap GUI to see how the RepRap did at sculpture, and to show off at the New Zealand Open Source Awards. In the end I found this cat, but it had eye-holes and the base was open. Fortunately Meshlab has a very intelligent filter for closing holes that creates Euler-valid solids (unlike the "close boundary" option on ArtOfIllusion).
As you can see, the RepRap (a standard Darwin extruding PLA) did a fair job of the cat, and that's at a resolution of 2,000 facets. Note also that it did a very nice job of the cat's chin, even though that was overhanging by considerably more than 45 degrees!
Vik :v)
Labels: cat, mesh, meshlab, reprap, sculpture
Monday, September 29, 2008
Meshlab
In which your narrator, unable to find the "simplify mesh" command in a newly downloaded copy of Art of Illusion rashly asks the rest of the core Reprap team where it is to be found these days... read more
Ponoko Lasercut Prototype Strike 3
 The Ponoko-inspired lasercut RepRap is now hopefully in its final iteration. I've built most bits at least twice, and I have tried to remain compatible with Ian Adkins' lasercut RepRap at BitsFromBytes as well as the original Darwin. I've taken the best from both in true Open Source manner, so we have:
- No routing needed. No hand-tooling of any of the plastic bits, in fact (if I've got it all right).
- The extruder is now swappable and is compatible with the Darwin swap design (if I've got the measurements right on this one too).
- I have put 2 extruder mechanisms on the sheets so you have something to change.
- The Z motor can be replaced by a GM3-type gear motor and rotary encoder. I've made the Z motor bracket so it can use opto sensors and a variety of other gear motors too.
- There is now a capstan that can be fitted to the top of one of the Z driver rods. This can be moved by the head, allowing the carriage to move the Z platform up and down at <0.1mm>
- The DIY bearing races have been put in. You can still use the skate
bearings if preferred. - Ball-chain is used in place of all belts. The larger 4.5mm chain (either of 2 variants) is used for the Z axis, X and Y can use either 3.3 or 3.5mm ball chain.
- X & Y axes can be fitted with NEMA17 steppers.
- The Y opto flag can be placed on either side of the X carriage so we remain compatible with Ian's design.
- The X carriage may be removed without disassembling the carefully-aligned frame.
- The corner bracket parts that Ian reported his clients broke a lot are now cut from 8mm acrylic instead of 4.5mm - and I've included a spare.
Just submitting them for the Final Cut (thank you Pink Floyd).
Vik :v)
Labels: ball chain, lasercut, ponoko, reprap
Saturday, September 27, 2008
Sanguino RepRap

I stuck my stripboard Sanguino (red S) on my RepRap machine to see if it would fly. I want to do this so I can play with more than one extruder at once, for support material and so on.
Getting it to start working was pretty simple - I redefined the pins in init.dist.h for the Single Arduino Snap code, and the RepRap Java software started talking to it straight away.
With a bit of messing about I got the axes moving, then - when I put the wires on the pins I'd actually defined in the header file - the zero opto-sensors worked too.
But I got a lot of comms errors. These were much reduced by adding:
for(int i = 1; i < 32; i++)
{
pinMode(i, OUTPUT);
digitalWrite(i, LOW);
}
to the initialisation code, then letting the classes set the pins they actually use as they want. (Incidentally, the Arduino code doesn't do this for all the pins it uses - maybe it should...)
I suspect we have some stray interrupts from somewhere (like noise on unconnected pins), and also some code in there that switches off interrupts for too long, and so it loses bytes from the input stream.
The comms errors are still too bad to make the extruder go properly, though the temperatures are being measured fine.
If you want to play it's all at: http://reprap.svn.sourceforge.net/viewvc/reprap/trunk/reprap/firmware/Sanguino/
The pin assignments are in the OpenOffice spreadsheet here.
Tomorrow, if I have time, I'll see if Zach's upgrade just below cures some of the problems...
Labels: Sanguino
Friday, September 26, 2008
Sanguino Software v1.2 Released
Just a quick bugfix release here. I fixed some bugs with the software that rendered it incompatible with Arduino 0012. Added some #ifdefs and brought in the new and improved timer code.
Download it from Google Code.
ps. If the Servo error bugs you, change line 43 in arduino-0012/hardware/libraries/Servo/Servo.c to:
#if (defined(__AVR_ATmega168__) || defined(__AVR_ATmega644P__))
Download it from Google Code.
ps. If the Servo error bugs you, change line 43 in arduino-0012/hardware/libraries/Servo/Servo.c to:
#if (defined(__AVR_ATmega168__) || defined(__AVR_ATmega644P__))
New Board: Sanguino Breakout v1.0
 This is a breakout shield for the Sanguino. Similar to the Arduino Breakout Shieldthis board provides screw terminal access to all the pins on a Sanguino.
The board itself is designed for both new Sanguino users, as well as people with a pre-existing Sanguino. There is a full Sanguino footprint on the board. You can either populate all the components and have a single board, or you can populate only the pin headers + screw terminals and plug your Sanguino into the board. Since the space underneath the Sanguino is unused anyway, its like getting a free Sanguino!
Anyway, I sent it off to the board fab today, and will have boards back in about a week. They'll be available on the RRRF store, and kits will follow shortly.
Designs posted to Google Code.
New Board: GM3 Noise Suppressor v1.0
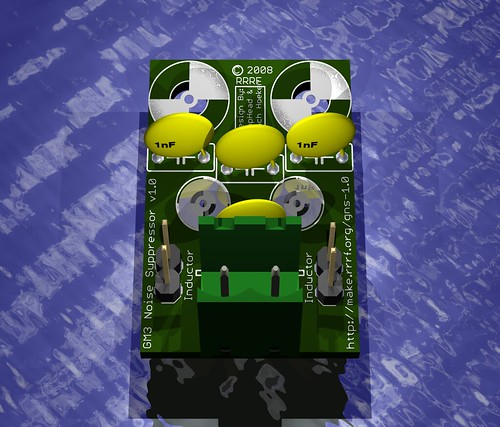 One of the things I'd like to improve upon is communicating whats happening in the project and new developments, even if the are not immediately available yet. So, today I'd like to announce a new board that we're sending off a new board to the manufacturers: the GM3 Noise Suppressor.
The GM3 motor is our dc motor of choice for our extruders: its small, fairly cheap, and fairly powerful. It also has dual outputs which is nice. Unfortunately its also a cheap brushed DC motor that generates noise as it runs. One of our team members, Nophead solved this all the way back in October 2007. I'm just now getting around to making a board out of his circuit.
This board will do some cool things in addition to being a noise suppressor:
* It will provide a secure place to attach wires to your motor (either via soldered wire + strain relief, or via screw terminals)
* It will also provide support for the fragile metal tabs on the motor. (The board is intended to be zip-tied to the motor, then the tabs soldered.
* It will provide an easy way to mount/unmount the motor (via screw terminals)
Anyway, we should get prototypes back in 10 days, at which point they'll be available in the RRRF store, shortly followed by kits.
Cheers,
Zach
Update: board files released to SourceForge.
Thursday, September 18, 2008
Sanguino Software v1.1
In tandem with the Arduino 0012 release today, I'm proud to release a new version of the Sanguino software as well! Its a pretty minor release, but here's whats new:
* New and improved bootloader with 'Ladyada' mods contributed by Brian Riley
* fixed bootloader path in boards.txt
* added missing support for Serial.flush()
Also, I'm happy to say that you can now buy Sanguino kits from both the RepRap Research Foundation as well as Wulfden. Hopefully we'll have a European supplier soon.
Monday, September 15, 2008
Phoenix Gets A NEMA 17

While reassembling rrChild into Phoenix, I fitted it with a NEMA 17 motor from Lin Engineering. These bolt on to the modified X carriage just fine and even fit the old belt gear moulds reasonably well. I wired up an Arduino driver and got it pulling a heavy acrylic extruder mechanism at just under 1A. The shaft is a little short, but things seem to run smoothly.
Also, I fitted new diagonal braces (the TSA killed most of the originals), using Ed's idea for a slotted diagonal bracket that needs no trapped nut or bolt. It simply used the M8 nuts to compress the bracket onto the 8mm rod. Works so far.
Oh, a Kiwi lasercut RepStrap is taking shape next to it. Hopefully using local suppliers where possible will reduce shipping costs for those in the Oceania region.
Vik :v)
Friday, September 12, 2008
Off to Italy

I'm off to CStem 2008 in Turin, who've kindly invited me to speak on RepRap. If you're in those parts next week, drop in!
They also wanted me to bring a working RepRap Darwin to demonstrate. What followed says something interesting about the cost of rapid prototyping. We looked into the amount we'd have to pay to transport the machine from Bath to Turin (it's not too heavy, but is bulky and delicate). It turned out to be both more expensive and more troublesome to do that than to buy and ship a RepRap electronics kit from the RRRF and a Bits From Bytes Silver RepStrap kit to Turin direct. So that's what we did. The CStem people have built and tested the electronics already, and are putting the laser-cut kit together as I type. When I arrive I'll help them with the last stages.
Mark you, last week we bought a whole working lathe for my University lab that cost less than a single RP polymer cartridge from a well-known RP machine manufacturer. How fortunate that it is possible to build all the RP parts of a RepRap machine from two such cartridges and still have quite a bit left...
Labels: conference, Costs, travel
Thursday, September 11, 2008
All these parameters? WTF!?
There are, I will admit, quite a few parameters that the Java host software uses to control a RepRap machine when you select File -> Preferences...
I have (I hope) improved the documentation of these at:
http://reprap.org/bin/view/Main/RepRapSoftwarePreferencesDocumentation
I have (I hope) improved the documentation of these at:
http://reprap.org/bin/view/Main/RepRapSoftwarePreferencesDocumentation
Stripboard Sanguino
I have been asked to blog pictures of my stripboard version of Zach's Sanguino. Here goes:

The cable top-right is the USB <-> TTL serial lead. The double-row 6-way connector top left is the ICSP connector, which you'll need to put the bootloader into the machine before you use the USB connection.
If you flip the board around a left-right axis in the middle of the above picture it looks like this:

If someone has time (unlike me... sorry) to do a proper set of stripboard connection diagrams that'd be really helpful.
Labels: arduino, electronics, Sanguino, stripboard
Friday, September 05, 2008
Ball-chain for X axis
This movie shows an X axis using ball-chain instead of drive belt. I built it on a design based heavily on Ian Adkins' lasercut RepRap, which I decided to attempt to simplify a little bit. As you can see, it appears to work. I'll do another run and tidy up the X axis - I just subverted part of Ian's design that looked handy.
One fly in the ointment is that I can't yet print the neat little lasercut toothed gears on my RepRap, though the new Arduino boards should help.
You can't see it here, but I had to elongate the holes for mounting the X motor into Ian's bracket. I'll do a quick redesign so that it can take the motor Ian is using and the ones I've got - plus anything between.
Vik :v)
Labels: axis, ball chain, lasercut, reprap
Wednesday, September 03, 2008
Announcing ReplicatorG 0001
 Hello All,
One of the many side projects I've been working on lately has now come to fruition! Its name is ReplicatorG, and it is an open source RepRap controller based around GCode. It is designed to solve many of the problems that I've run into when working with the current state of the art RepRap control software.
1. It is easy to install. Its forked from Arduino, so it comes with the simple installation.
2. It is easy to use. It comes with a gorgeous user interface, again courtesy of the Arduino project.
3. It is modular and expandable: It is built from the ground up with a Driver system to make adding support for new electronics systems and new protocols to be very simple.
4. It takes GCode as input, so you can use any one of the awesome GCode generators out there.
5. It is generalized, so you can use it for more than just RepRap: you could easily control a CNC machine with it.
6. It does one thing, and one thing only: control a RepRap machine. It doesn't try to do everything, and leaves the hard slice/dice work to smarter programs.
The first version is being released today, so please download it, give it a try, and let me know if you find any bugs. You can find out all sorts of into on the Replicat.org website.
Monday, September 01, 2008
RepRapped Screw Thread
I needed something to pack part of my camera in to take it on holiday tomorrow, so I made a small pot with a screw top in HDPE: -

More details here hydraraptor.blogspot.com/2008/09/screw-top-pot.

More details here hydraraptor.blogspot.com/2008/09/screw-top-pot.
Labels: screw thread
![]()