Tuesday, January 30, 2007
Now a motor-holder part
Monday, January 29, 2007
Mk 2 Extruder part made on Zaphod
Last night I left Zaphod printing out a slightly modified poly-holder part for a Mk2 Extruder. This morning it had finished - 7 hours of printing. Sadly, a software bug means that the vertical holes are filled in in some places, but I've drilled those out so I can I test the part. As the holes were mostly there, and quite visible on the underside of the part, this was very easy to do.
Here's a shot from the top, showing the new part on the right, and a similar part that came out of the Stratasys on the left:
The horizontal line across the face here is where the head skipped printing a line. It does this sometimes - not figured out why yet. The lines show up in the GUI, but it's not that fatal and the objects generally recover (hopefully I will too - not feeling at best this morning).
Here's a shot of the GUI after the poly-holder had finished printing:

Once the hole-filling software bug is sorted, I'll print one for 2.5mm filament. Meanwhile I have some hand-rolled 3mm luminous polymorph...
Vik :v)
Here's a shot from the top, showing the new part on the right, and a similar part that came out of the Stratasys on the left:
Below is a photo of the part viewed from the attachment end. Looks like I should be able to get an M3 bolt in those holes without trimming or drilling:
The horizontal line across the face here is where the head skipped printing a line. It does this sometimes - not figured out why yet. The lines show up in the GUI, but it's not that fatal and the objects generally recover (hopefully I will too - not feeling at best this morning).
Here's a shot of the GUI after the poly-holder had finished printing:

Once the hole-filling software bug is sorted, I'll print one for 2.5mm filament. Meanwhile I have some hand-rolled 3mm luminous polymorph...
Vik :v)
Tuesday, January 23, 2007
RepRap 1.0 "Darwin" Communications and Power Distribution
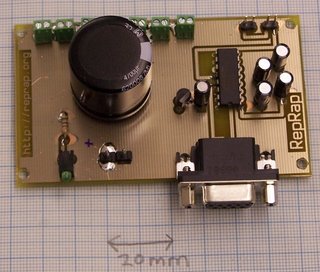
The communications and power distribution board for Darwin (above) is now finished and tested. Details can be found here.
This means that the design for all the electronics for the machine has been finished except for the opto-interrupter end-stop for the axes (which will just consist of a slotted opto-switch and two resistors, so it shouldn't take long).
All the designs are in the RepRap subversion repository here.
Wednesday, January 17, 2007
RepRap at Linuxconf Australia 2007
For those lucky enough to be at the Sydney LinuxConf (follow link or google for "best linux conference") RepRap is being presented on Wednesday at 4pm in Mathews A.
For those not there, but are nearby, RepRap will be at the LinuxConf Open Day on Thursday.
Just a note for the confused: RepRap is not exclusively for Linux, it's just that Linux is a very convenient development environment that fits the Open philosopy of RepRap. Basically, it lets us give the whole development kit away for free including the operating system.
Video of the presentation is now available here.
Vik :v)
Saturday, January 13, 2007
More on PVA as a support
I did an experiment. Apparently glycerine is the stuff to use as a plasticiser with polyvinyl alcohol (PVA), so I weighed out four samples of Evo Stick wood glue (which, as far as I can tell, is just PVA dissolved in water), added different weights of glycerine, and let them set. They didn't, so I put them on a 60 oC hotplate to evaporate the water.

The left hand numbers are the weight of PVA from the glue tube, the right are the weights after the glycerine was added.
Result: it's really easy to control the mechanical properties of PVA by adding glycerine through from brittle (top left) to a pretty solid gel (bottom right). The consistency that seems about right for feeding through the Mk II Extruder is the top right one, which is about 20% by weight of glycerine to Evo Stick (a number that doesn't make much sense as it stands because of the original water, but if I add that the dry weight is 1.47g that means there's 0.6g of glycerine and 0.87 of PVA).
I have no way of telling the degree of hydrolisation of the PVA in the glue, of course. For low melting point we need that to be low. But I put a piece of my glycerined PVA on a piece of aluminium foil on a hotplate next to a similar piece of polycaprolactone. I prodded them as the hotplate warmed up. They both melted at about the same temperature, and exhibited about the same sticky consistency.
Now to see if I can cast a 3mm rod of the stuff...
Reference: Plasticizer effect on the melting and crystallization behavior of polyvinyl alcohol by Jyongsik Jang and Dong Kweon Lee
Thursday, January 11, 2007
Support material
I had a sudden thought about support material (apologies if someone already suggested this and I've forgotten...).
Why don't we just run a 3mm rod of PVA through the Mk II extruder? The partially hydrolysed stuff has a low melting point and is water soluble (especially if you deposit it with small gaps to allow water ingress). Two birds - one stone...
See this DC Chemicals site.
Why don't we just run a 3mm rod of PVA through the Mk II extruder? The partially hydrolysed stuff has a low melting point and is water soluble (especially if you deposit it with small gaps to allow water ingress). Two birds - one stone...
See this DC Chemicals site.
Monday, January 08, 2007
Darwin's first cut
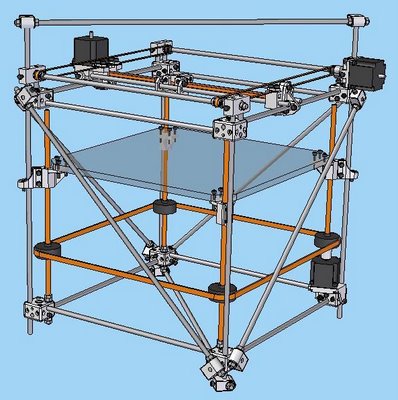
Sorry for the delay, our broadband cable had a run in with a hedge cutter. Here's the first cut at Darwin. A nod to Simon as it's come out pretty close to his RepStrap! I've tried to export it as VRML but Solid Edge won't export it for some reaon (might be an academic licence thing) - if there's any backdoors to sharing this virtually I'm all ears. Hopefully there'll be some shots of it in the real world soon...

Saturday, January 06, 2007
Cheers!
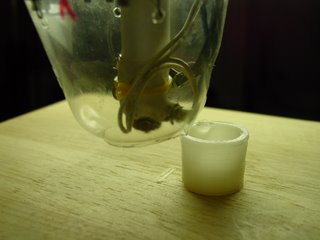
"To the RepRap!" That's my toast, made with a very small fabricated shot-glass. The shape is vaguely reminiscent of a leather tankard, and its dimensions are 25mm dia. (average as it deliberately tapers), 2.3mm walls, 21mm high. Production took 5725 seconds (95 minutes) and used a notional 3cc of polymer. Oh, and it is watertight (even holds schnapps for a while). The "bubble" around the deposition head is the neck off a plastic drink bottle and keeps the cooling air off the head.
I claim first RepRap'd utilitarian object!
Seriously though, if we can manufacture watertight containers, we're not too far off making bioreactors and some medical equipment.
This was the second attempt. On the first, the swivel on my feeder bottle (see below) became stuck, and the filament wouldn't de-kink. This slows the passage of the filament down, and the output thins out to nothing over a couple of layers. I now have two swivels on the feeder bottle, and I've replaced the croc lead with an old MP3 player strap.
Vik :v)
Filament supply line & belt drives
A double one for you. I've fixed the problem of twisting filament supply by just stuffing the filament into a 3l juice bottle. It self-organises inside, though there are probably more optimal configurations :)
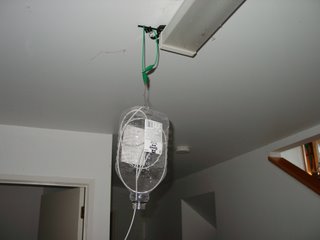
The bottle is attached with a bulldog clip and screw-in swivel. This then goes by a spare croc clip lead (what? what? Look, it was the first thing to hand...) to a clamp on the ceiling. Saves making a hole and upsetting Suz. There is a surprisingly large effect on the throughput of the extruder if you don't allow the feedstock to unkink. It becomes much slower and the output fades out.
The second thing is a belt drive gear. I put a joined strip of belt into a lid and pummelled in polymorph with a battery (flat, round, right size, to hand). This moulded one gearwheel that fits the belt perfectly. The impression of the gap had to be trimmed, re-melted, and run over with a belt a few times, but it went smootly in the end.
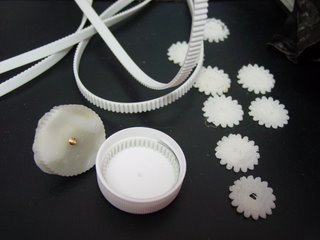
On the right side are a number of gears made at different deposition speeds and layer thicknesses.
Vik :v)

The bottle is attached with a bulldog clip and screw-in swivel. This then goes by a spare croc clip lead (what? what? Look, it was the first thing to hand...) to a clamp on the ceiling. Saves making a hole and upsetting Suz. There is a surprisingly large effect on the throughput of the extruder if you don't allow the feedstock to unkink. It becomes much slower and the output fades out.
The second thing is a belt drive gear. I put a joined strip of belt into a lid and pummelled in polymorph with a battery (flat, round, right size, to hand). This moulded one gearwheel that fits the belt perfectly. The impression of the gap had to be trimmed, re-melted, and run over with a belt a few times, but it went smootly in the end.

On the right side are a number of gears made at different deposition speeds and layer thicknesses.
Vik :v)
Friday, January 05, 2007
Java anyone?
I was working with the slice and dice code that generates extruder tracking instructions for Tommelise when I ran across what may well be a problem of interest to the mainstream development community as well. When I sized a 13 toothed gear on a mm scale, this is what I got.
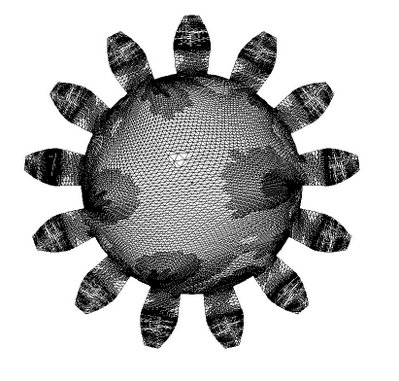 When I extruded it and exported it as an STL it took 44 megs and had over 100,000 facets (my programme crashed at that point). I then reduced the scale to cm and got this.
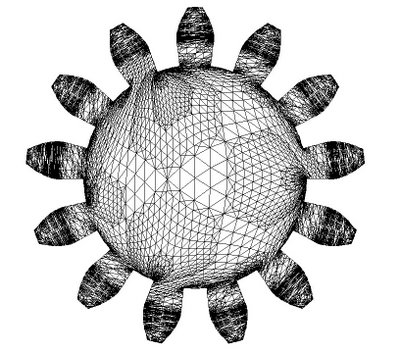 Which, when extruded and rotated looked like this.
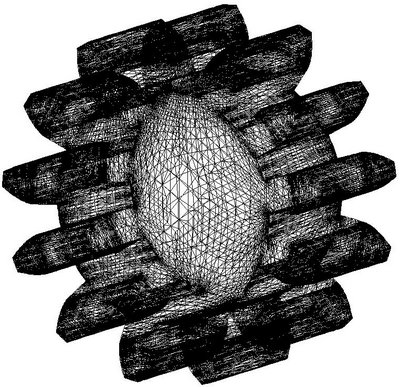 That little monster had just over 71,000 facets.
Is it just my imagination or could we use a triangle mesh routine that is a little brighter, or perhaps we ought to extend the gear routine to generate itself as an importable OBJ file and mesh it ourselves.
Is this worth doing? Is anybody up to taking on such a Java challenge?
 When I extruded it and exported it as an STL it took 44 megs and had over 100,000 facets (my programme crashed at that point). I then reduced the scale to cm and got this.
 Which, when extruded and rotated looked like this.
 That little monster had just over 71,000 facets.
Is it just my imagination or could we use a triangle mesh routine that is a little brighter, or perhaps we ought to extend the gear routine to generate itself as an importable OBJ file and mesh it ourselves.
Is this worth doing? Is anybody up to taking on such a Java challenge?
Tuesday, January 02, 2007
Experimental gear train
Happy New Year!
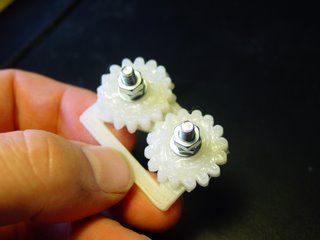
I've printed out a couple of polycaprolactone gears and an impromptu plate to hold them in place. We're laying down about 4cc of polymer/hr using the 2.5mm filament that Forrest sent me. I've upgraded my Mk2 extruder to Adrian's revision with the 2.5mm holder. Probably needs more calibrating but goes for now.
Here is a 2M MPEG video of the gears meshing taken using my decent Sony cam and a tripod.
The "Darwin" design doesn't use gears per se., but as they're bound to be desired in some mechanisms I thought I'd print them out as a learning exercise. The teeth do distort as they get higher, something that thinner layers or an improved deposition algorithm may solve.
Vik :v)


