Saturday, May 31, 2008
Come and see RepRap!
Come and see RepRap at the Cheltenham Science Festival. It's on from the 4 - 8 June. There's a map here. We'll be in the Cheltenham Town Hall in the Discover Zone. Times: it's open 10 in the morning to 6 in the evening.
Labels: exhibitions, festivals
Tuesday, May 27, 2008
Quality development
I saw these door handles on the bench today from Adrian and Nophead and thought 'photo'. From left to right: old to new. Its exciting to think about where this trend leads!


Labels: build quality, Door handle
Arduino Firmware v1.3 Released
Changes:
SNAP:
* overhauled stepper motor timer interrupt routines
* updated stepper speed to completely emulate PICs
* added thermistor table support
* added support for extruder valves
GCode:
* moved to init file for configuration
* overhauled message receiving system
* add stepper disable safety check
* overhauled and improved gcode string parsing
* added support for G2/G3 arc codes
* added support for averaging temp readings
* added support for thermocouples
* initialization process is much better
* removed need for external libraries
* added experimental support for an extruder encoder
Download it from SourceForge
Friday, May 23, 2008
TRADITIONAL flyswatter :-)

Ha! None of this laser nonsesnse... Here's a traditional flyswatter that I made last night. Like Vik, I'll put this in the repository as soon as I can. I shall be No 1 in the flyswatter download chart...
Labels: fly swatter, utility items
Laser-Sighted Flyswatter
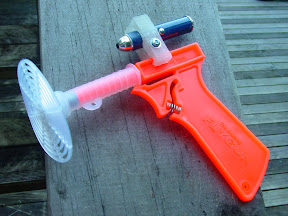 In the never-ending battle between man and fly, the flies have the edge in manoeuvrability and speed. What you need is a system that takes them down first time, every time. The Flyblaster 3000 (not TM, no patent pending) brings you that capability by combining the latest in laser technology with the most effective non-chemical anti-fly system available.
Simply use this reprapped fixture to clamp a cheap 12mm diameter laser pointer onto a spring-loaded flyswatter with an M3 bolt and watch your winged insect problems fly out of the window.
Design of a RepRappable spring-loaded flyswatter is left to the diligent student.
Full diagrams for the clamp will be available when I can edit the Items Made page :)
Vik :v)
Labels: flyswatter, laser
Thursday, May 22, 2008
ABS Door handle
Adrian asked me to try his door handle design in ABS. Here is how it turned out: -


It took 2 hours to make (not including the raft) with a 25% fill. It seems like it would be plenty strong enough.
I added a 4.2mm hole for tapping for an M5 grub screw. I didn't teardrop it because below a certain size that is not necessary. It came out slightly under 4mm so I ran a 4.2mm drill through it and then tapped it M5.

Here it is with the screw fitted: -

ABS is a bit soft for tapping, so I think a captive nut would be a better design. We don't have any compatible doors so I did not try it out.
I think it came out very well, but being a perfectionist, here are a list of the defects: -
- The faceting on the cylinder is noticeable because it seems to be made of only 32 segments. I think this is just a setting in ArtOfIllusion rather than being due to simplifying the mesh to 0.1mm resolution. AOI is intended for rendering, where surface shading normally interpolates the normals to get a smooth effect. In real life you need a few more line segments.
- There is scarring where I removed the strings with a knife. The anti-ooze mod should solve that.
- There is some brown discoloration, which is also indirectly due to ooze. When the extruder ends a filament run it turns off, lifts slightly and moves quickly to the start of the next run. Sometimes that leaves a string, sometimes it snaps and leaves a peak of filament sticking up. That rubs against the nozzle and picks up burnt plastic from it. Hopefully the anti-ooze valve will fix that as well.
- The start of the first filament came unstuck. That is because I do the first layer at a low temperature to allow it to peel from the raft. I raise the temperature for subsequent layers but I don't wait for it to heat up before I start the second layer because of the ooze problem. I stuck it down with a bit of super glue.
- It is slightly warped along the length, but it does not matter in this design. I am hoping post heating in an oven before removing from the bed will reduce that significantly. Using PLA would also reduce it.
Labels: ABS
Then there were two...

Tuesday, May 20, 2008
Shoe


I lost count of how much I spent on shoes when my daughter was growing up.
I just reprapped a left shoe. It cost me 30 pence...
And, should your child be as financially inconsiderate as mine, and also grow, a quick click on the scale transform in Art of Illusion solves that problem. And scaling by -1 in any single dimension turns left into right...
Here are the parts as they came off my RepRap machine; I used PCL:

I simply welded them together using a coffee cup full of hot water to melt the edges a bit. I'll post the design in the repository shortly when I've made a few final tweaks.
Now for the right foot...
Labels: shoes, utility items
Monday, May 19, 2008
Progress with ABS
I have developed peelable rafts and a reusable bed for ABS: -

That has enabled me to make these Darwin parts before my extruder broke again: -

Details here: hydraraptor.blogspot.com/2008/05/stepping-up-production.

That has enabled me to make these Darwin parts before my extruder broke again: -

Details here: hydraraptor.blogspot.com/2008/05/stepping-up-production.
Labels: ABS
Thursday, May 15, 2008
Inter-layer cooling?

Now Adrain's got the polymer extruder valve tuned, we've got loads more control over the extrudate. Which begs the question, why nozzle wipe? From experience this procedure ups the risk of what we affectionally call "nozzle crap" - unwanted bits of filament getting attached to the nozzle. So now there's the option to skip that and move straight to the next layer. The only side effect is cooling is eliminated, which might be a problem for small parts, we shall see...
Sunday, May 11, 2008
Freeduino is free.
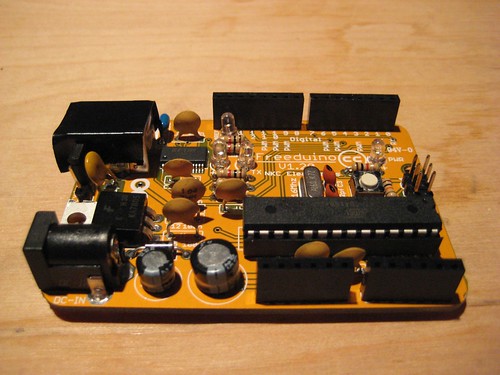 I recently acquired and built a Freeduino kit from nkcelectronics. The freeduino board is a clone of the Arduino and is 100% compatible, right down to the pin placements. It was a painless build, and the board worked right away. If you want to have a machine where you've built all the boards yourself, or you want to save $10 and buy a kit, this board is for you. Or, if you just want a board that is as free as free can get.
From the Freeduino website:
Freeduino is a collaborative open-source project to replicate and publish Arduino-compatible hardware files. The Freeduino Eagle SCH, BRD and Gerber production files allow users to create boards that are 100% functionally, electrically and physically compatible with Arduino hardware.
Wednesday, May 07, 2008
Bug fixing

Inspired by some of Nophead's experiments, this is a water filter insert made in RepRap. Actually, it's a bit of a cheat: the model for it is a simple disc. But I've enhanced the host code so that you can plot multiple outlines of an object one inside another. Add that to the fact that you can set the infill width to whatever you like and the part becomes trivial to make. It took about 20 minutes in my home Darwin to build.
In general these enhancements mean that you can make the boundary of an object thicker (therefore stronger) and do a sparse infill, thus both saving material and reducing build time overall.
If you set
Extruder0_NumberOfShells(0..N)=1
in the properties file you get a single outline as normal. Setting it to bigger integers gives that number, one inside another. Setting it to 0 suppresses outline plotting altogether.
Also, if you set
Extruder0_ExtrusionInfillWidth(mm)
negative that suppresses infill hatching.
Anyway. Here it is filtering some non-potable water as input. (Mark you, I wouldn't drink the output, either...)
RepRap water filter from Adrian Bowyer on Vimeo.
Despite all evidence to the contrary, the noise on the soundtrack is not a Sopwith Camel that has just received the coup de grâce from the Red Barron. It is my neighbour's lawnmower. I'm glad to say that he has removed the Lewis gun...
Tuesday, May 06, 2008
Open sesame...

...using a reprapped door handle.
This was printed on top of the latest mod to my Darwin, which I recommend as it
- Is simple to add, and
- Saves lots of messing about with the Z-axis screw drives and zeroing.
The trick, of course, is not to raise the Z Bed too high; then the head doesn't collide with it when you're moving the head about. Being cleverer than I, you should be able to manage that...
This is just a little test one. I shall replace it with a piece almost as big as the base below it. It'll have two screws in the front corners, and one in the middle at the back.
Oh. And now we can go out to the scullery:
Reprapped door handle from Adrian Bowyer on Vimeo.
(Well. We could before. But not using a cool reprapped door handle...)
To get the door handle design, see the RepRap objects library here.
Saturday, May 03, 2008
Economics (n. pl.: the management of a household)
Here's a reprapped coat-hook:

It took me 12 minutes to design in Art of Illusion, then I set it running in my home RepRap machine. The quality is a bit splodgy because, since I upgraded to the Arduino, I've been trying to maximize my build speed, and I have overcooked the outline printing rate a bit; I'll back it off for the next one.
Anyway. I went out for the afternoon, then I came back. Now I have a coat-hook that I didn't have before. Utterly trivial, except:
1. I have somewhere in my lab to hang my lab-coat, as opposed to draping it over my camera tripod:

and
2. An economist once told me that the world market for coat-hooks is bigger than the world market for gas turbines...
The design for the hook is in the RepRap repository here.
Labels: coat hook, products, utility items
PLA Corner bracket failure mode
 Looks like we have a failure mode for PLA corner brackets. This picture shows a relatively recent bracket torn apart by the forces of fitting an 8mm rod into it and over-tightening one of the grub screws.
As you can see, the break is hardly a neat delamination, and the line of separation is at the apex of a teardrop-shaped hole. The corners also have little plastic in them, even after being squared off so they parted easily too.
As a temporary solution I am putting bolts through empty holes to hold things together. We'll see how it goes, but I think we may need to remove some of the unwanted honeycombing from the design and beef it up a little. I'm also installing the next one upside-down, so the apex of the teardrop is at the bottom of the bracket.
Vik :v)
Labels: corner bracket, failure, pla, reprap
Friday, May 02, 2008
PLA & Stepper Drivers in NZ
I've got a 30kg test batch of PLA filament ordered up in New Zealand, which I'll distribute at cost. So if you'd like a 100m roll or two, shout up. I'll dispatch overseas, but do check the swingeing NZ Post overseas rates first. A roll is 420mm diameter and about 30mm thick, weighing approx 800g. If you want larger quantities, I'll put another order in for you no problemo.
Also, PMB Electronics of New Zealand now have the L298N and L297 stepper driver chips in stock at reasonable prices and low volumes. Tell 'em Vik sent ya. No, I'm not on commission. I've asked them to consider stocking Arduinos too, but mentioning it again wouldn't hurt :)
Vik :v)
Also, PMB Electronics of New Zealand now have the L298N and L297 stepper driver chips in stock at reasonable prices and low volumes. Tell 'em Vik sent ya. No, I'm not on commission. I've asked them to consider stocking Arduinos too, but mentioning it again wouldn't hurt :)
Vik :v)
Thursday, May 01, 2008
Anti-ooze - the first design
Untitled from Adrian Bowyer on Vimeo.
Here is the new polymer valve in operation.
A solenoid pushes a short length of piano wire across the flow. This stops it instantly, giving a much better finish to constructed objects, and also stopping the polymer oozing from the nozzle when it is idle.
The AoI files for the design are in the subversion repository here. The solenoid I used is from RS: 250-0827.
I have also checked into the repository the changes to the host Java code and the firmware for the Arduino needed to drive the device. Note that, in the latter case, the new firmware disables the maximum (but not the minimum/zero) optoswitches on the RepRap machine's axes. Few people use these anyway, and - as pins on the Arduino are tight - it is better, I think, to use them to add new functionality.
Exactly the same code will drive the metal deposition head that I blogged here.
Labels: polymer extruder, valve
![]()