Saturday, March 31, 2007
ETech 2007
My son Adriaan and I just got back from San Diego. The presentation at ETech Thursday afternoon went VERY well. The audience was between 75-110 or so. The high ~$1,500-odd registration fee seemed to serve as a good filter for filling the audience with highly qualified, very motivated people from just about everywhere.
Adriaan tried to take pics of the presentation with his digital camera. Unfortunately, the hall was quite dark for the presentation which made his attempts dicey at best. This one is, however, my personal favourite.

I especially liked the vampire eyes thing. There were several business and technical media folks there. One American who writes for a Japanese business journal had much better digital camera equipment that we did and did extensive photography of the presentation. I'm hoping that I will be able to borrow a few of his pics for our archive.
I made the pitch for self-replicating printers, RepRap and Tommelise and we got good applause and very good questions in return. Afterward we had about a dozen of the people who'd attended stay over. Most of them had already been on both the RepRap and the Tommelise websites and one Brit there had even been down to Bath to meet Adrian.
There were people who were selling 3D printers, design engineers, product engineers and the lot. We've got a couple more product design firms that are probably going to be hammering for Darwins.
I also heard an excellent and interesting rationale for why a professional firm would want a self-replicating printer. It goes like this. They're paying $4.50/cubic inch for filament and if they don't use the filament that comes from the vendor they have their warrenty voided. They resent that a LOT.
As well, they'd like a printer that they could try different things with and fix if it broke. What we're working on fits that to a "T". As it is, the machines they have typically can only deal with one kind of plastic. The product design firms would like to do printing with a machine that wasn't a black box like the commercial machines.
One thing on the reprap site that really impressed the the people who are using commercial 3D printers was when both Vik and Adrian and Ed made shot glasses. You apparently can't make waterproof glasses on a stratasys. I heard about the tendency of stratasys prints to delaminate on the z-axis again, too.
Anyhow, the talk was well-received and O'Reilly was happy with it so we'll probably be asked again.
I noticed that several blogs had picked up on my talk. We got pretty good reviews.
Tuesday, March 27, 2007
Untimely Lapse Movie
I've had a go at printing one of Ed's Darwin corner brackets. On about the 5th layer, the output detached itself from the stage and got pushed around a bit. While this wasn't exactly a huge success, it does look very much like we're on the right track so I've been persuaded to post the video. As per the last one, there are approximately 2.5 seconds between each frame.
Right at the end you can see the deposited part start to detach and go springy before it gets pushed around. You can also see the second head appearing in the right of the frame in the latter half of the movie. The camera moves around a little as the USB lead was dragging on things, but I fixed that with some tape about half way through; not a problem as it actually gave a better camera angle!
Adhesion to the stage (or lack thereof) is my big bugbear, and I'm going to try a light coat of varnish as previous tests have shown molten CAPA sticks to it like glue. If that doesn't work, I'm onto foam bases like the rest of 'em.
Vik :v)
Labels: bracket, capa, darwin, detached, fails, reprap, stage, zaphod
Monday, March 26, 2007
Darwin's X axis repeatability
Appologies, this has been a bit slow coming - I've had the lurg. The final repeatability test for Darwin: here we're looking at the performance of the x-axis after mouding a gear diectly on to the motor (see the previous "Darwin's X-axis toothed pulley" post). Results are, again, looking promising with repeatability to ±0.025. Again, a further test is needed at a later date to understand how asymptotic the trends are, but as with the other two axes, we're in the right ball park here.

Next on Darwin's todo list.. home sensors, wiring & documentation.

Next on Darwin's todo list.. home sensors, wiring & documentation.
Labels: darwin, gear, performance, repeatability, reprap, x-axis
Sunday, March 25, 2007
Time-lapse video of test hexagon.
A few people have asked me if I would make a short time-lapse movie of something being RepRapped. So, thank you for the inspiration. I finally got round to it on the second attempt, after earlier borrowing a higher quality camera that unfortunately lacked macro focus:
The object is a standard 20mm (approx) test hexagon, 5mm (quite accurate) thick, extruded from CAPA. There are approximately 2.5 seconds per frame. I used a Linux script of my own devising and a Logitech 320x240 webcam clamped to the base board, which I will document and GPL if anyone is interested. Donations of higher quality equipment greatfully accepted!
Here's what that lot looks like:

Vik :v)
Labels: capa, extrusion, fast, hexagon, polymorph, reprap, sped up, test, time lapse, video, zaphod
Friday, March 23, 2007
Bendy extruder gets things straight

I've done an alternative to the polymer extruder design that allows the 3mm diameter input filament to run straight down the drive screw without bending. This should allow us to use more brittle and stiffer materials in addition to CAPA. It should also make it easier to drop short lengths of filament down it from an automatic magazine at the side of the machine, for materials that can't be put on a long roll.
I drilled a 5mm-deep 3mm hole in the top of the M5 drive screw and soldered in a length of 3mm steel hawser that I bought at the local hardware shop. I had to grind/file down the hawser end a bit to get it to fit; I also added a little solder flux to get good surface wetting. It was important to be parsimonious with the solder, lest it soak up the wire and make it go rigid. On the other end I soldered another short piece of M5 studding, then soldered an M5 nut onto that.
I modified the motor mount to move it back from the line of travel of the filament being extruded, and made a small drive with an M5-nut-shaped hole.
Rather convieniently the predominant drive direction (anti-clockwise) tends to tighten the hawser coils, though the thing does drive perfectly well in both directions.
There's a video of the first mechanical test on the RepRap videos page.
Labels: new extruder design, stiff brittle extrudate
Friday, March 16, 2007
Darwin's X-axis toothed pulley
The last gear problem for Darwin, casting a 12 mm gear to fit on a 6.35 mm motor shaft. A flat was needed to ensure no slippage on such a thin shaft. Final solution was to use the same kit used to make the Y gears (see previous post). The collar was prepacked again, but this time, becasue there was a bit more wall thickness, the hole was simply started by working a screwdriver into the capa. The collar was then put into the pot with a new blade part which fitted the motor shaft profile. The motor shaft was then poked in from the back. Worked first time.
This was then complemented with Vik's superb idea of a washer + bit of capa for the second lip.

Next: a repeatabiltiy test for the X. Though I need to solder up a universal PCB first...
This was then complemented with Vik's superb idea of a washer + bit of capa for the second lip.

Next: a repeatabiltiy test for the X. Though I need to solder up a universal PCB first...
Labels: casting, darwin, gear, toothed pulley, x-axis
Darwin's Y-axis repeatability
Firstly, I've been issued with IE7 which means Blogger actually works properly on my computer... I cannot express the joy!
Secondly and more importantly, the toothed pulleys from the previous post were put on the Y-axis. Big thanks to Adrian for sorting out the electronics and the repeatability programming!

Super glue was used to lock the little gears into position on the 8 mm drive bar. [Incorporating flats are on the development list]. The same repeatability test used on the Z-axis (see previous post) was re-used, results below:

After the first ten runs the repeatability appears to be in the ball park of ±0.04 mm. I think that the first few runs balance the tension: this is important because the transmission isn't symetrical:

It's worth stressing that this is not bad, we're still within our targets, but we need more data to pin down excatly what's going on. The next test will need 100+ runs.
Labels: darwin, performance, repeatability, y-axis
PowerComms v1.1: Success!
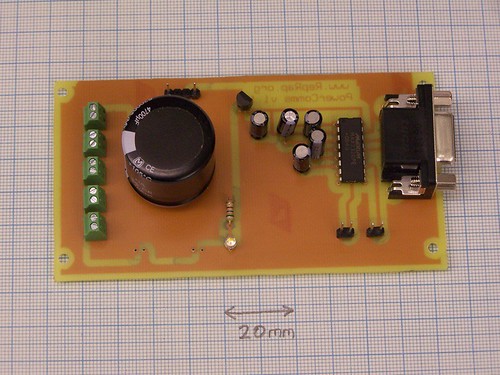
Adrian has successfully etched and soldered up one of the new one-sided Power / Communications boards for Darwin. Apparently it went really well, and I think he may even be picking up my vernacular. In his email he described it:
it's really sweet - whole thing took me 2 hours from cutting the bag round the virgin PCB to finishing testing (plus a 30 minute etching break when I ate supper). Tested out A OK first time
Updated instructions w/ the new pictures will be up on the wiki shortly.
Monday, March 12, 2007
Moulding thin walled gears, succeeds (!)
Moving the X & Y on darwin to resoultions of 0.1 mm directly from a 400 step motor equates to drive gear diameters of about 12mm. For Darwn's Y, these need to sit on a ø8mm shaft. This means very thin walled gears. Vik's idea of moulding the capa into the belt to create the toothed gear has worked brilliantly in the past so I was trying to do that again. But this time things got tricky because stuffing the capa into such a small volume was extremely tricky (see pic).

The final solution was to pack the capa into a former section wich held the teeth, mount that on a blade section with a ø8mm hole, hold the two concentrically in a pot and ram a file'd-up 8mm spike through the lot. Pre-packing the former guarantees the toothed impression, as does the angle of the spike, the blade nips off the excess, and the whole lot is easy to break apart after the capa's set.


After a bit of trimming, Bob's your uncle, as we say over here. (And, if your from the wrong part of over here, bob can also be your dad).

Friday, March 09, 2007
BBQ paint fails
Just a note in passing. While I was checking out Tommelise so that it will be ready for printing tests this weekend now that the PC-side software to let it print real things is operational I noticed that the insulation on the extruder barrel heating coil had gone white. That means that we're looking at the glass insulation left after both the paint and much of the silicone insulation has boiled away.
I did a careful check and noticed as well that in places it was no longer stuck to the BBQ paint on the extruder barrel. While the heating coil was loose, it was not standing away from the barrel. I used only 175 mm of #32 nichrome 80 on this barrel in a single strand, so the loops in the coil are well away from each other.
Just to note I've had about 14 hours of hot operation on the this barrel to date. When I talk about "hot" operation, I'm talking about measured extruder barrel temperatures in the vicinity of 200-205 degrees C. I've had about the same number of hours of operation on my old test barrel which has been operated at about 140 degrees C. until very recently when I started trying to extrude ordinary solder. The BBQ on that one is still as good visually as the day I built it.
What that means is that if you use this approach with CAPA don't expect to encounter BBQ paint failure like I have.
Right now I'm in the process of putting another six coats of BBQ paint on the barrel to tack down the heating coil again. It's a sunny day out in my shady little patio where I'm doing that and that's going well.
Tuesday, March 06, 2007
Sebastien's polyethylene glycol

Sebastien mailed me a couple of kilos of polyethylene glycol. This is a water-soluble wax-like polymer that melts around 70oC. We have been thinking of using it as a support material.
I've been playing with it, and on its own it's much too fluid when molten - it has a viscosity similar to water. It thickens as it cools, but in order to get an extruded filament that way one would need far too fine a temperature control.
So I melted some and mixed it (2:3 by weight) with icing sugar. That makes a paste which is the ideal consistency. And it sets to a material that is like candle wax, but is water soluble (because both the sugar and the polyethylene glycol are).
I used the same trick as I used the other day to make a 3mm rod of Wood's metal - squirting it from a syringe down a 3mm silicone tube, letting it freeze, then splitting that off with a scalpel. It's a bit brittle (as you can see its broken in two). This is good for support material removal, but for other tasks it would help if it was more flexible.
I tried miking it with glycerin as a plasticiser (medically, polyethylene glycol is often mixed with glycerin), but it seemed to react with the sugar to curdle and form lumps. This itself was interesting, but not quite what I wanted. so I'll see if I can find another compound that will make it more pliable. If I can do that it will definitely go through the standard extruder.
The Extruded Extruder Extrudes!
I tidied up the bearings and rammed a pin through the top of the screw thread to join it to the coupler. It now extrudes! Yay! Can't say for how long because it's strong enough to split the nozzle, or at least blow out the weak parts on it. Closer inspection shows where I cut things just a little too fine drilling the nozzle out, and a bit of soldering is required to patch it.

The extruded extruder is the one with the red light on. The black thing on the board is just to allow a bit of contrast so you can see the extruded stuff. I've used an ABS clamp off the Stratasys to hold the PTFE part of the nozzle, but I aim to replace that when the software is running happily again.
Zaphod now has two heads.
Vik :v)
Labels: capa, extruded, extruder, reprap, zaphod
Monday, March 05, 2007
Darwin makes a move
I tested a bit of Darwin today. I asked the Z to go up and down 20 times, putting the motor through 1000 steps for each stroke. This, in theory, would only move the bed up and down by 3 mm, but there was some timeout error going on in my code, so that's as far as I could push it today. Testing over a big range is on the list, but it's repeatability I'm interested in, so 3 mm will do for now.

The motor torque was at 100%, speed 200 (see exerciser scale - approx 80%), and the results on the caliper bolted to the bed were... well... the graph can do the talking:

Happy days! I guess that puts the resolution at ±0.01 mm. There's still the X&Y to get moving yet, but it's good to know they're on solid foundations ;-)
Labels: darwin, performance, z-axis
Sunday, March 04, 2007
PowerComms Board v1.1

We've updated the design on the Power and Communications board. The parts are all the same, but now its a one sided board, and much easier to fabricate. All the files have been added to subversion, and the wiki entry will be updated with new pictures later this week once I actually make one.
In the meantime, here is a shot of the schematic from Kicad:
Changes
- single sided. makes it much easier to fabricate, and cheaper too. (no more alignment issues)
- fatter tracks on power circuits
- component silkscreen included for easier reference.
Labels: electronics, pcb, powercomms
CAPA vs. ABS bodies extruders
I've hit a temporary snag with the PC software, so I'm going for the firmware while fixes happen by magic. Well, sweat & swears - er - tears from Simon and Adrian, I suspect, but let me carry on in ignorant bliss...
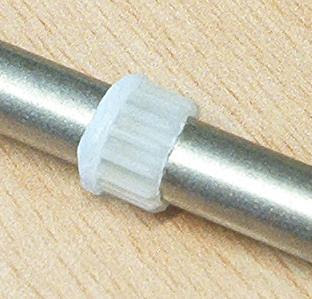
I've noticed that my half-washer bearings slip a bit (crappy job of smoothing the lands on the screw, I suspect), so I've packed a little bit of CAPA on top of them. This prevents exposed sharp edges engaging with the filament from dragging things around. In short, it stops your half-washers from popping out. I hope. Here's an old ABS one compared to the freshly-minted CAPA part. The CAPA part is the one on the left. The slightly fuzzy appearance of the bearing is due to Vaseline.

I've taken advantage of the squishy properties of CAPA a bit, I know, but it seems to work. Now we just hope the bearings don't heat up enough to melt the CAPA when you run them fast.
Keep on reading for our shameless fund-raising plug...
Vik :v)
Labels: bearing, capa, darwin, extruder, polymorph, reprap, washer
Saturday, March 03, 2007
Shameless publicity and cash seeking

All you RepRap fans out there may care to improve the profits of your laundry of choice (and to help RepRap along) by buying a RepRap T-shirt plus a RepRap mug so you can spill coffee down it. Visit
for details. There's also a link from the RepRap pages.
![]()