Saturday, July 08, 2006
Peristaltic pump go after all!

Gave up too soon (see blog right below)...
Jonored's neat idea (see the comments on that blog entry) prompted another experiment. Instead of having the extruder nozzle right after the pump, I put a length of the flexible tubing after it. That acts as a pressure reservoir, and evens out the flow beautifully. (The beaker of water is just so I can park the nozzle in it, turn everything off, and go for coffee without it clogging; on a RepRap machine it would probably be a piece of damp felt in the write head's parking place.)
Now, of course, turning the pump on and off doesn't turn the flow on and off - there is a huge time delay that would be impossible to allow for in software. But I already have a really simple solenoid valve design that works by pinching a soft tube like the one in the peristaltic pump. All I need to do is to install that just before the nozzle and use that to control the flow.
The soft tube swells perceptibly under the pressure. This, of course, gives a really simple way to switch the peristaltic pump on and off - just use the swelling to trip a microswitch. No computer needed...
I'm extruding "Fine Surface Polycell Polyfilla" which seems to have near-perfect characteristics for this (including being really cheap and being available at every DIY shop). Many thanks to my Final Year student James Low for all his work on that, which is really paying dividends. The syringe at the top of the picture is the reservoir of Polyfilla. An obvious design change is to junk this and just to run the peristaltic tube to the screw-on cap of the Polyfilla tube (which is like a giant tootpase tube).
Here is a shot of the bits of the pump.
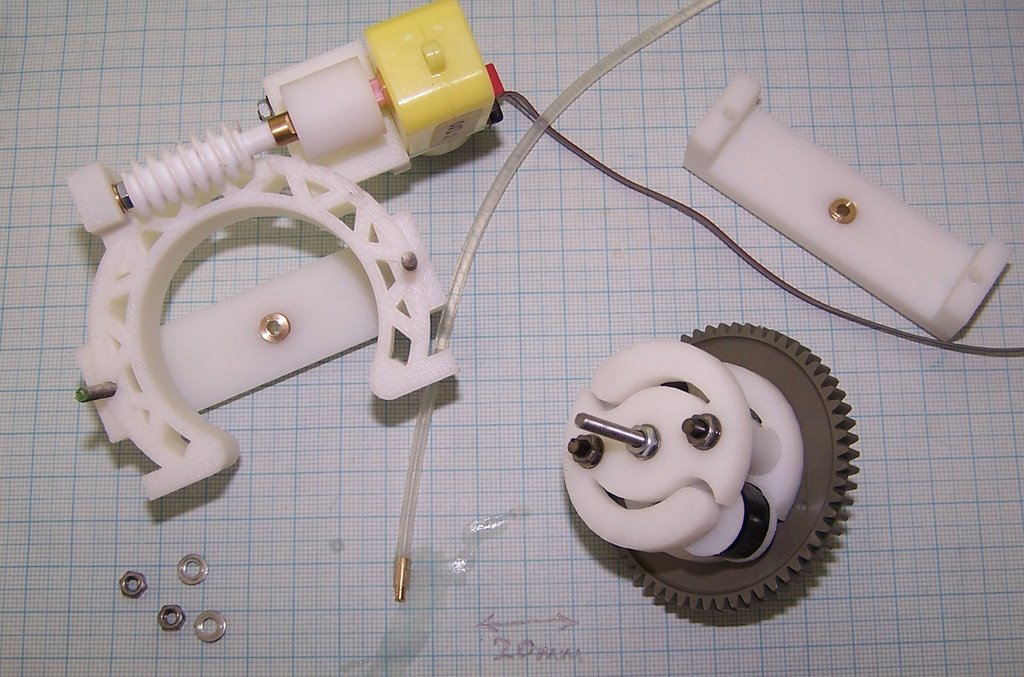
The gears are two that I happened to have lying around. But now that Vik and Forrest have sorted out how to RP gears (see here) they should be easy to replace. The nozzle is made from brass in just the same way as the bigger one on the Polymorph Extruder. Apart from those the only non-RP parts are the motor, a couple of brass bushes, and some lengths of threaded M3 bar.
It has the ability to take one or two tubes. Two tubes could be used, for example, to carry an epoxy and its catalyst. They would be mixed in the nozzle. If two different diameters of tube are used it's easy to change the volume ratio of the mix.
The nozzle could be disposable - the first thing the RepRap machine would do at the start of a build would be to make one or two new nozzles for next time...


Monday, June 19, 2006
Peristaltic Polyfilla
Zach suggested using a peristaltic pump for room-temperature RepRap extruders. This is nice because it should be very easy to make one using rapid prototyping. But I thought that a problem might be that the flow would be too pulsed.
Time for an experiment:

I stole an old peristaltic pump (temporarily) from colleagues in Biology & Biochemistry, filled a syringe with the same Polyfilla that James used for his experiments, and set it running. Here's a (slightly out-of-focus) close-up:
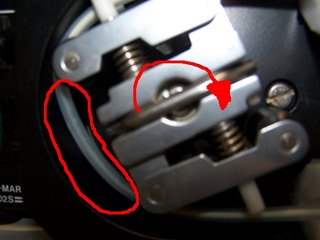
The direction of rotation was as the red arrow indicates, and you can see a void behind the roller ringed in red. The suction created caused some of the liquid in the Polyfilla to vapourise. Unsurprisingly, the stream out was very intermittent.
Then I put a pressure on the syringe (in a real design, this could easily be done with a weight):
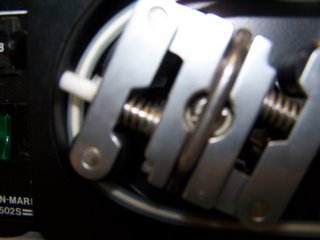
The result was a smooth flow with no interruptions. The soft tube did tend to drift round the pump in the direction of rotation, but in a real design it should be easy to anchor.
So. Off to design an RP peristaltic pump...
Time for an experiment:

I stole an old peristaltic pump (temporarily) from colleagues in Biology & Biochemistry, filled a syringe with the same Polyfilla that James used for his experiments, and set it running. Here's a (slightly out-of-focus) close-up:
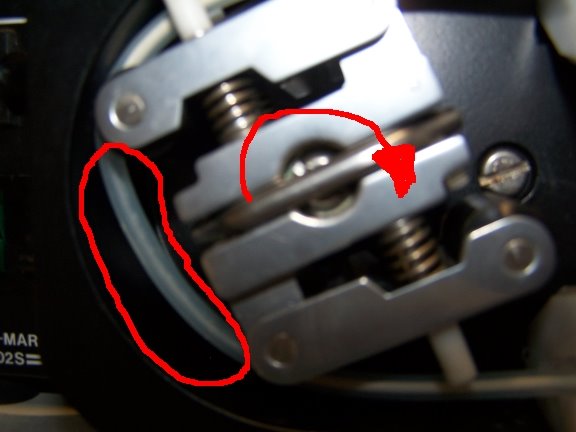
The direction of rotation was as the red arrow indicates, and you can see a void behind the roller ringed in red. The suction created caused some of the liquid in the Polyfilla to vapourise. Unsurprisingly, the stream out was very intermittent.
Then I put a pressure on the syringe (in a real design, this could easily be done with a weight):

The result was a smooth flow with no interruptions. The soft tube did tend to drift round the pump in the direction of rotation, but in a real design it should be easy to anchor.
So. Off to design an RP peristaltic pump...
Saturday, July 08, 2006
Peristaltic pump no go
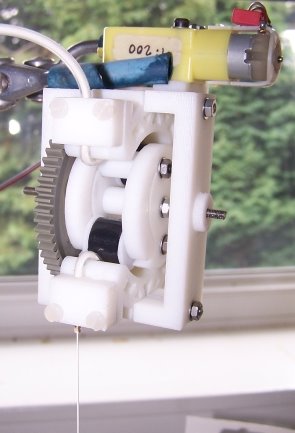
The peristaltic feeder pump for cold pastes (like Polyfilla) has a fundamental problem. Here it is working, and you can see that it produces a clean stream of paste (about 0.5 mm in diameter) at the bottom of the picture.
But the tube that forms the pump has to be flexible. This means that, when a pinch wheel goes out of contact with it, pressure is released and the back pressure from the nozzle causes the paste to rush back up the tube (which expands a little to accomodate it). So the device produces an intermittent stream - it's off half the time, and on half the time. The problem could be reduced by having more pinch wheels (my design uses two), but can never be eliminated as far as I can see. A bit of a pity, because the pump is compact and easy to make.
Back to James's driven syringe (which works...).
Monday, August 14, 2006
Under pressure
On Saturday, July 08, 2006 I blogged a start at a design for a peristaltic pump for driving pastes and the like through RepRap deposition heads. One of the adjuncts that this needs is a pressure sensor so the microcontroller can tell when to turn the pump on and off.
Here's a thing:
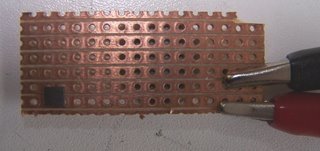
The little grey square on the left is a quantum tunnelling compound pill, which you can find out more about here, and buy here (product id: N18BU). But all you really need to know is that its resistance drops when you squash it, and it costs £0.50.
If you place it on some stripboard as above, then put a soft silicone tube over it, then clamp them together you get this arrangement:
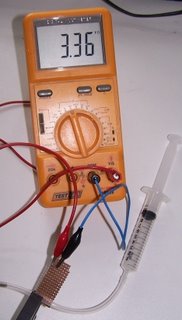
The tube is blocked at the left, and the hypo will (in a moment) apply pressure. As you screw the clamp jaws together the resistance goes down - in the picture it's 3.36K.
Now depress the plunger:
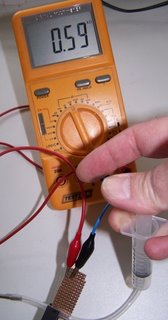
The resistance drops gratifyingly smoothly to 590 ohms. Better yet, if you pull on the plunger to create a partial vacuum, the resistance rises above 3.36 K...
It should be very simple to design a little RP screw clamp to hold a small piece of stripboard, the QTC pill, and the soft tube. It might be better to use gold flash on the stripboard contacts, to avoid oxide contamination problems over time. The device could be placed in any pressure line, or attached to a blind tube as above.
Here's a thing:
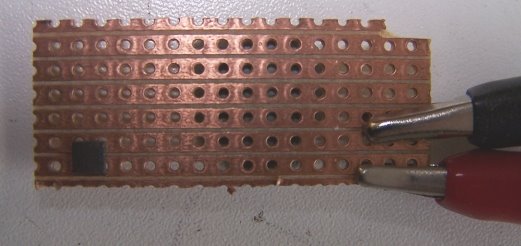
The little grey square on the left is a quantum tunnelling compound pill, which you can find out more about here, and buy here (product id: N18BU). But all you really need to know is that its resistance drops when you squash it, and it costs £0.50.
If you place it on some stripboard as above, then put a soft silicone tube over it, then clamp them together you get this arrangement:

The tube is blocked at the left, and the hypo will (in a moment) apply pressure. As you screw the clamp jaws together the resistance goes down - in the picture it's 3.36K.
Now depress the plunger:
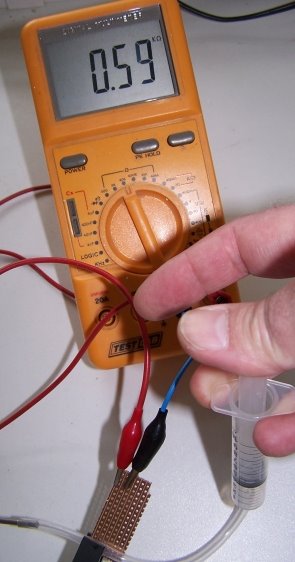
The resistance drops gratifyingly smoothly to 590 ohms. Better yet, if you pull on the plunger to create a partial vacuum, the resistance rises above 3.36 K...
It should be very simple to design a little RP screw clamp to hold a small piece of stripboard, the QTC pill, and the soft tube. It might be better to use gold flash on the stripboard contacts, to avoid oxide contamination problems over time. The device could be placed in any pressure line, or attached to a blind tube as above.
Sunday, July 09, 2006
Printing a real part
So I had to cap Ed's Z-axis, Adrian's peristaltic prototyped polyfilla pumper, and Forrest's working opto interrupt. It was tough. May I present my first attempt at printing a bona fide RepRap component, the 6mm stage linkage (known as a "gripley" locally, in honour of Terry Pratchett):

For those who suffer more delusions of grandeur than I, the top one was made by a Stratasys from ABS and I did the skeletal one from Polymorph (must've rolled a metre of it so far today). The bottom part was extruded using the Da Witch prototype. The extrusion was made using a 0.8mm nozzle at 80C, fan-cooled by manual intermittent fan operation. The deposition was halted at 3mm, and the wall thickness is a very constant 1.0mm - at long bleedin' last!
The deposition surface was a cheap Vietnamese wooden chopping board (NZ$3, The Warehouse), from which I had sanded off the varnish. I knew all that sandpaper would come in handy :) The old varnish, whatever it was, stuck to the polymer like glue. This might be useful, and I might get some cheap spray-on varnishes to experiment with as a light spraying on glass may provide enough adhesion. The adhesion to the base wasn't what I'd call excellent, but it was a freshly-sanded surface and some dust may have been present. We'll see how it goes; it'd rather steer clear of wood due to its tendency to warp.
Please excuse the tatty and somewhat sparse infill, but this is only the second complex object ever to have been printed and the filling algorithm needs a bit of tweaking. Nevertheless, I'm really happy with this lot. It shows we're definitely on the right track.
I suspect we may be able to make depositions like these using a ducted fan for continuous cooling. There is still lots of experimenting ahead. But time to sit back with a Cointreau & vodka, and relax for the evening I think.
Vik :v)
