Sunday, December 26, 2010
Pretty outside, ugly inside
I think we are now at phase, where easiest improvement of quality can be made by tweaking settings and software. So I did. I've done little hack to Skeinforge 37, so it can now generate perimeter (outside) at better resolution then infill. Dont get it wrong, we were able to print at the better resolution before too, but it took ages to print the object.
For now I tried printing infill at 0.4 and perimeter at 0.2 since I don't have my tweaked mendel here and only not very good printer which name will remain unspoken :-) I cant wait to be on my Mendel with 0.35 nozzle and 0.1 perimeter layers and 0.3 infill, aka printed porn :-)
Some data:
Print time of object at 0.4: 106min (100%)
Print time of object at 0.2perimeter 0.4infill: 144min (135%)
Print time of object at 0.2: 244min (230%)
On the other hand you have same quality object as from full 0.2 in just 59% of time :-)
If you want to try it, heres the hacked Skeinforge http://dl.dropbox.com/u/8967423/37_reprap_python_beanshell.zip Its not easy to set it right now. It's still hacking, don't forget it. But I have few hints: Set carve at 0.2mm layers if infill should be 0.4. Counted line width has to be same as for 0.4 so set Width over thickness variable accordingly to it (just mutliply by two) and set perimeter flow rate to half. That should be good starting point!!
I even uploaded my skeinforge settings here http://dl.dropbox.com/u/8967423/settings.zip so you can look it up. Original setting is TestRapMan04 and hacked one is RapMan04. BTW you can sneak peek my settings for other printers ;-)
Remmember this is not fool-proof, please share ideas under, what to be aware of etc. so Enrique can take it and all implement in official Skeinforge :-)
First tweak: last one 0.4 infill layer replace with 2x 0.2infill layers to smoother finish :-)
Comments:
<< Home
The next step is to keep alternating shells on the discarded infill layers and remove those shells from the full infill layers so that the shells interlock as described by zaggo here: http://pleasantsoftware.com/developer/3d/2010/12/08/the-rack/
Also, when you throw out infill layers, are you losing all the ones that print at 90° so that they don't cross, or did you account for that?
Also, when you throw out infill layers, are you losing all the ones that print at 90° so that they don't cross, or did you account for that?

When the outline changes abruptly from one layer to another the infill from one will not be compatible for both. I think what you actually need is more complex. The double height outline would have to follow the inner contour of the two outlines superimposed and you would need some single layer infill to fill the gaps to the outer contour.
@nophead Technically true, but the extruded filament already does a lot of stretching and squeezing into gaps. There's an outside chance that your prints are high-enough quality for this to make a difference, but nobody else's are.
Keep in mind that the behavior changes when the angle between layers is more than 45 degrees or so, and it prints solid layers on top and bridges on the bottom. You'll have to account for this in your settings, but your .2mm surface detail should always be better than the .4mm print, even if they're not quite as good as a print in which all layers are .2mm throughout.
Keep in mind that the behavior changes when the angle between layers is more than 45 degrees or so, and it prints solid layers on top and bridges on the bottom. You'll have to account for this in your settings, but your .2mm surface detail should always be better than the .4mm print, even if they're not quite as good as a print in which all layers are .2mm throughout.
whosawhatsis?: you can set skeinforge to generate 90° infill even now.
nophead: yes, valid point. Good compromise is to simply duplicate the perimeter for two layers. It would lose some detail but not the nice surface finish. Im not that good with Python tho :-(
nophead: yes, valid point. Good compromise is to simply duplicate the perimeter for two layers. It would lose some detail but not the nice surface finish. Im not that good with Python tho :-(
But are you throwing out every other infill layer (the ones that are rotated 90°), or are you just adding perimeter layers between the existing ones?
@whosawhatsis,
I think it is more than "technically true". Imagine simply a small cube on top of a large cube. If the odd layers of infill are missing and the even ones double height, then if the small cube starts on an even layer the odd layer below will have an outline for the big cube but no infill. Then we get the outline for the small cube in mid air and then its infill.
I think it is more than "technically true". Imagine simply a small cube on top of a large cube. If the odd layers of infill are missing and the even ones double height, then if the small cube starts on an even layer the odd layer below will have an outline for the big cube but no infill. Then we get the outline for the small cube in mid air and then its infill.
I know that. What I'm saying is that for all but the most finely-tuned machines like yours, and possibly even for them, the extruded filament droops or squeezes to fill gaps like this all the time. What you will end up with is an unsightly but usually harmless .2mm wall around the edge of the top surface of the large cube, and the wall of the perimeter of the small cube will end up slightly thinner for a couple of layers (which again, needs a finely tuned machine to even be visible).
I'm not saying that further tweaking isn't warranted, but the properties of the extruded filament will cover up most of these errors in most cases.
I'm not saying that further tweaking isn't warranted, but the properties of the extruded filament will cover up most of these errors in most cases.
@prusajr,
Duplicating the outline is trivial in my host software so I tried it. I do each outline twice with half the flow rate and half the height, then I do the infill as normal. That works but as you say you don't get any better resolution, just smoother sides, and at half height the filament doesn't do corners as well. It would work much better with two extruders as 2:1 ratio from one nozzle is not great for quality.
Duplicating the outline is trivial in my host software so I tried it. I do each outline twice with half the flow rate and half the height, then I do the infill as normal. That works but as you say you don't get any better resolution, just smoother sides, and at half height the filament doesn't do corners as well. It would work much better with two extruders as 2:1 ratio from one nozzle is not great for quality.
@nophead well dont forget you can set the perimeter accordingly to its layer height, entirely independent on the infill settings. If you dont have to worry about spanning the gaps (not many cases in perimeter) you can set really low flow rate > get better corners since the fillament wont squish that much. Its lot of tweaking and hacking but can imrpove results. I usually set the perimeter flow rate smaller even during normal prints to get better resolution :-) (dont forget to set perimeter width over height accordingly)
I find higher flow rates give better corners because the filament isn't being stretched as much, so doesn't cut the corner.
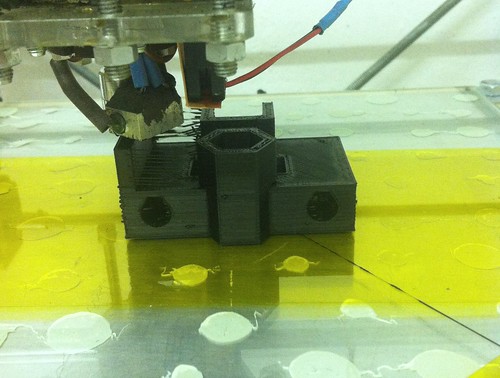
Great job! I can't wait to see more work done to help improve RepRap build quality. Even with the "poorly tuned" Mendel the sides are starting to look a lot better - I'd say at least as good as an UP!, maybe a Dimension at lower quality.
I noticed some bloobs in the pic. It's hard to tell what's going on with the black plastic, is this ooze or burn? Any potential work to lower these? I've noticed the UP! also seems to get this - http://www.pp3dp.com/index.php?option=com_content&view=article&id=130:cathedrals&catid=49:art--photo&Itemid=70 In this photo they're darker than the white plastic, so I assumed this was burn.
What would the maximum quality gains with this type of method? Could sub 0.1mm be achieved? Maybe with a different nozzel? Can something be added to help with the flat ends (i.e. the bottom and top of prints, not just the sides)?
I'll also second some kind of 2nd nozzle for finer detail. For many that would be higher priority/ return than having a 2nd material.
Again, awesome job!
Post a Comment
I noticed some bloobs in the pic. It's hard to tell what's going on with the black plastic, is this ooze or burn? Any potential work to lower these? I've noticed the UP! also seems to get this - http://www.pp3dp.com/index.php?option=com_content&view=article&id=130:cathedrals&catid=49:art--photo&Itemid=70 In this photo they're darker than the white plastic, so I assumed this was burn.
What would the maximum quality gains with this type of method? Could sub 0.1mm be achieved? Maybe with a different nozzel? Can something be added to help with the flat ends (i.e. the bottom and top of prints, not just the sides)?
I'll also second some kind of 2nd nozzle for finer detail. For many that would be higher priority/ return than having a 2nd material.
Again, awesome job!
<< Home
![]()