Friday, December 18, 2009
Steampunk stepper control
A very retrograde I2C controlled stepper controller which is, at the same time, very powerful and easy to build.


It seems to be able to push a 2.4 amp NEMA 17 at 4 KHz and a 0.5 amp tin can stepper at 800 Hz.
Do you want to read more?
Labels: I2C Reprap SN754410 PCF8574 stepper controller
Thursday, December 10, 2009
ABS works, too.
Segmented aprons work just as well in ABS as they does in HDPE. I didn't even bother changing the Skeinforge settings. Just make sure that the first layer tracks for your raft measure 2 mm wide {so that it sticks to your acrylic print surface} and you're good to go.

Mendel part x-carriage-lower_1off in HDPE {left, white} and ABS {right, amber}
You can read a little bit more.
Wednesday, December 09, 2009
Mendel part z-leadscrew-base-bar-clamp_2off
I treated Mendel part z-leadscrew-base-bar-clamp_2off in the same way, viz, a segmented apron. You can see what this looks like in Netfabb.

Do you want to read more?
Tuesday, December 08, 2009
Got it!
I'd heard that people printing Mendel were having trouble printing the largest pieces of Mendel in anything but PLA. Since PLA filament is hard to acquire in the US at this point I thought it would be nice if those hard-to-print parts could be printed in some other plastic. Since I am working with HDPE right now, I decided to have a go with HDPE.
The trial part I've begun with is x-carriage-lower_1off. I've discovered that a segmented apron positioned 0.5 mm away from the perimeter of the part does the job of successfully suppressing warping. Here you can see the spacing between apron and part.

Do you want to read more?
Got it!
Monday, December 07, 2009
RepRap'd Art Exhibition

I'm very happy to announce the opening of an exhibition of RepRapped artworks collated by Bronwyn Holloway-Smith, Rhys Dippie and myself. The exhibition is at Massey University in Wellington, New Zealand. Most of the 10 exhibits are resurrections of lost items from the Te Papa collection. It was great fun setting this one up and my particular thanks go to Bronwyn for setting everything in place.
The sperm whale's tooth in particular has a curious aesthetic charm, and the tapa beater is the largest thing I've ever seen RepRap'd.
Vik :v)
Labels: art, exhibit, exhibition, museum, reprap, te papa
Saturday, December 05, 2009
Killing flocks of birds with one stone

Do you want to read more?
------------------------------
These research notes are also in the wiki, for people who want to hack on the idea:
http://objects.reprap.org/wiki/Powder/Plastic
It's a wiki, so go crazy. (It takes 90 seconds to create an account and start editting.)
Can we print belts?
Yes, if we step back and look at what a belt does instead of simply trying to replicate existing ones.

Do you want to read more?
Metal bits from a RepRap
I took one standard-issue Mighty Reprap Power Ring in PLA as a test subject, and stuck on a few bits of 3mm PLA where I thought it looked useful. At the highest point, I stuck a simple printed cone of PLA to act as a filling hole. Then I painted it with thinnish plaster of Paris mix. While that dried off a bit, I mixed up more plaster and snipped into it about 30cc of uncompressed household fibreglass insulation. They only need to be about 5mm long, and are mixed in to disperse as well as you can. This will help stop the mould cracking (or, more to the point, hold it together if it does). This stiff mix is packed smoothly around the object, taking great care to not trap air bubbles like I did.
 I wrapped masking tape around the bottom of a jar (initially sticky-side out) to make a disposable paper casing for our test subject. It looks black in the photo 'cos it's well-baked. Then, a couple more spoonfuls of plaster bedded said plastered bundle into place in this little paper pot. The pot was dried overnight in a desiccator, then baked at 150C for 15mins to drive off moisture. Next, the pot was inverted over a wire stand and foil drip-tray - out of deference for me not being in trouble for mucking up the oven. The temperature was raised to a scientific "11", and stayed that way until the conical filler hole looked absolutely clean, though slightly browned.
During that time, I fired up the ol' furnace (renewable fuels, etc.) and melted a load of pewter. With the mould still really hot (and thus safely dry) I poured in the pewter and left it for a 1/2 hr or so to cool off gently. I definitely did not impatiently have-to with a can of "Freeze Spray."
 With the aid of tongs, the flat side of a 160g pein hammer was strategically deployed multiple times (Adrian will remember my skill with this tool from an earlier occasion) to reveal an amazingly faithful reproduction of the ring. The pegs sticking up are where pewter got into the vent holes. You want this to happen - just trim the excess off and file down. Same goes for the filler hole, just pop the scraps back into the clearly-labelled "Scrap Pewter" box.
 After a stiff brushing under hot water, I was allowed in the house - no, I mean the ring was cleaned up and presentable. An air bubble was trapped inside the ring, resulting in a blister of pewter. But pewter is soft stuff, and you can easily correct problems like that with woodworking tools and a file.
If you do all this, do take basic safety precautions. Also be wary of using metals that melt at a higher temperature like aluminium. They cause plaster of Paris to decompose in undesirable ways and you need to research it properly.
Vik :v)
Labels: casting, lost, pewter, plaster, reprap, ring, wax
Friday, December 04, 2009
RepRap Goes To School

The boys & girls of Mrs Cornwell's class at Oratia School in Waitakere were kind enough to invite me along today to help with their topic of inventors and inventions. Hello room 16! I took the RepRap Child along for its first day at school, and we made a Mighty RepRap Power Ring. I left them with lots of small samples, some Polymorph to create their own inventions with, and a Christmas Angel to put on their Christmas tree. I'm sure I spotted one or two budding inventors and inventrixes there!
Vik :v)
Labels: oratia, reprap, school
Wednesday, December 02, 2009
Soluble Support Material
The paste we came up with was based on chalk (we actually used pottery Whiting from the local pottery suppliers that cost a massive £0.67/kg), Ethanol and some PVA Glue. We also used some fancy additives (PEG and Methyl Cellulose) that are typically used in making pastes, but we think we can get rid of these as they didn’t have a massive effect.
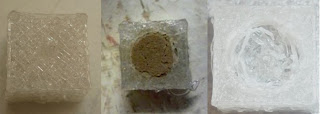
Anyway, the final mixture seemed to take a while (at least 15 minutes) to set, but I wondered whether the surface tension and viscosity of the paste would be sufficient to support the usual build material. I created a small block with a shallow hole that didn’t travel through the complete extent of the part, and then built the part with the orientation such that support was needed. I stopped the build at the appropriate point, deposited some paste in the hole before continuing the build. Here is the result:
The paste washed away after about a minute when being held under cold water, and it looks like the heat of the plastic was sufficient to cure at least the outer layers of the paste. It’s hard to tell in the photos, but the inside of the hole looks a little messy. I’m not sure if PLA is slightly soluble in the fumes of the Ethanol as the paste sets. It definitely smelt a little weird but I can’t find any data to prove or contradict this suspicion.
A massive thanks goes out to Andrew Dent from the University of Bath materials lab for giving me a hand with all of this.
Edit:
Nophead rightly points out in the comments that this test wasn't entirely fair. The above part could be created anyway by adjusting various parameters. Here is something a bit more fancy:D


It’s apparent that the paste was not completely set as the overhang sags a little bit.
Higher quality pics are available here
Tuesday, December 01, 2009
The March of the Mendels

There are two machines coming together in the Bath University RepRap Lab, and I am building a third at home. Here they all are together with the Mendel prototype that made many of their parts (the rest were made in our Darwins). It's almost as if they are reproducing or something...
![]()