Friday, January 16, 2009
Pinch Wheel Extruder Prototype v1.1
Update on the pinch wheel extruder v1.1 design: It works! It works really really well. I'm a happy little daddy.
I posted the initial design a few days ago, which was just the filament drive portion. Thanks to the wonderful RepRap community, I received a bunch of very excellent design suggestions! I've implemented as many as I can, and updated the design with a whole bunch of improvements. The result is an extruder that is much more powerful, easy to operate, and safer than the standard designs. Here are a few of the changes:
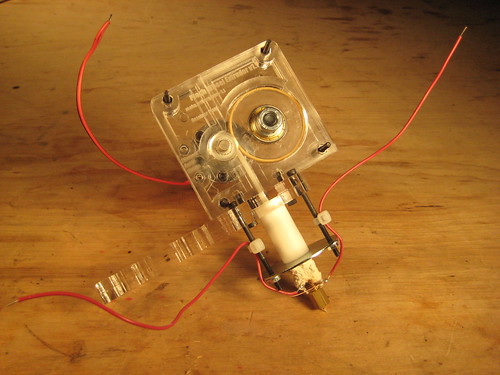
1. Complete Extruder Design
I borrowed the mounting design / heater assembly from my modification of Ian's lasercut extruder. This makes it easy to mount the extruder on a reprap, and easy to mount the heater to it. It is now a fully functional, complete extruder design!

2. New Gear Source
Thanks to Corwin, I found pretty much the perfect drive component from sdp-si.com: It's 10.3mm OD, 6mm bore and it fits *perfectly* on the motor shaft. It even has flanges to guide the filament! Additionally, the teeth are much sharper and deeper than the pulleys that I got from McMaster. What a nice bonus! It is part #A 6A51M017DF0306 if you're interested.

3. Lighter Design
I lightened the design and added cut-outs of non structural components, so the whole extruder clocks in at 1.25lbs, or ~560g. The bulk of this is the motor, which is about 260g, I think. I ordered a few lighter motors from 120g - 200g which should drop the weight down even more. Regardless, I hooked the extruder up to my RepRap machine and it had no problems moving that amount of weight around.
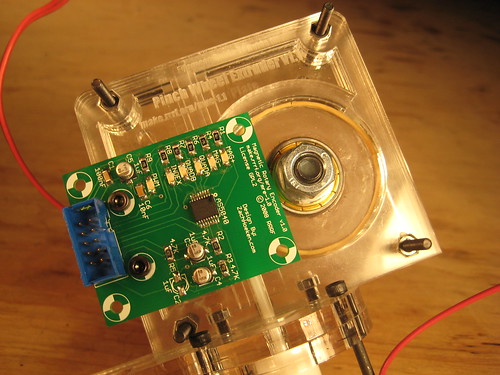
4. Easy electronics mounts!
As a super awesome added bonus, I modified the design to make mounting the electronics to it stupidly easy: First off, the magnetic rotary encoder board will mount directly to the board to give you super precision control over the motor speed. Secondly, I made the four corner bolts to be exactly the proper spacing for the new Extruder Controller v2.0 board which I'll have prototypes coming for in the next week. I don't want to leak too many details yet, but its going to kick some ass: onboard atmega168, so it'll 'be' an arduino, screw terminals for motors, pwm, etc, and RS485 for error free comms to the motherboard. It will mount directly to the extruder, and you can easily wire everything up to the board. Then the only wires you'll have trailing back to the motherboard are power and comms. Yay!

5. LED Mounting Holes
What design would be complete without the option to add some LEDs? Well, the design now has two holes that you can easily and simply press-fit some 5mm LEDs into for a nice backlit / edge lit clear acrylic action. Combined with the weight-reducing honeycombing, there will be some very gorgeous reflections going on. Beautiful and Powerful. Yay!
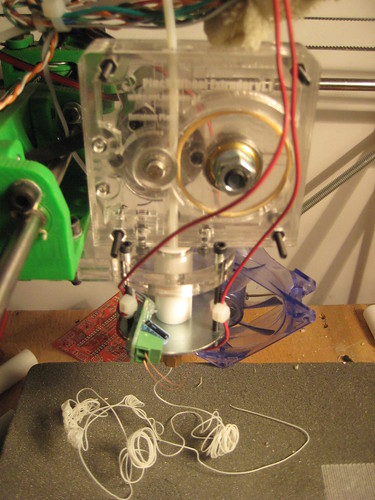
Did I mention it works?
Yeah, I fired it up last night and had a do-or-die moment where all my hard work the past 5 days was on the line. What happened, you ask? She performed flawlessly!!!!! The motor had absolutely no problem keeping up with the extrusion. The gear didn't slip a bit, and the extrusion rate was rock solid, even without an encoder to provide feedback. The fact that the motor is geared down so much means that it has a very steady speed. This translates into very steady extrusion. I went through a meter of ABS like butter. I was too excited to take measurements, but the initial test showed that I can extrude at what looks like speeds from 8mm/sec up to 15-20mm/sec. I'll be measuring extrusion rates today. Will post more info later.
Anyway, now I need to really thoroughly test it, make some prints with it, and get it ready for production. You can get the designs on Thingiverse, or in RepRap subversion. There are a TON of pictures in my flickr set as well. I'm going to Madrid for 3 weeks to run a RepRap workshop, but I'll try and get kits up as soon as I get back in mid-February. In the meantime, beg, borrow, or steal your way into a laser cutter if you want one.
Comments:
<< Home
That's pretty awesome. If only I had known about this before I spent so much time carving my screw-based extruder out of MDF :)
Have you given any thought/design importance to being able to make the parts for this on the RepRap? Mostly just the case and mounting for the gear/pulley and motor I guess.
Have you given any thought/design importance to being able to make the parts for this on the RepRap? Mostly just the case and mounting for the gear/pulley and motor I guess.

jonathan:
well, its lasercut, so technically it should be 3D printable as well: the layers are all just 2.5D objects.
realistically though, to print it on a reprap machine, you'll probably want to re-design it to be a 2 or 3 piece unit to make it easier to print.
this is something i'll probably be tackling once my RepRap machine is better / cheaper than my laser cutter. ;)
Post a Comment
well, its lasercut, so technically it should be 3D printable as well: the layers are all just 2.5D objects.
realistically though, to print it on a reprap machine, you'll probably want to re-design it to be a 2 or 3 piece unit to make it easier to print.
this is something i'll probably be tackling once my RepRap machine is better / cheaper than my laser cutter. ;)
<< Home
![]()