Saturday, January 17, 2009
Pinch Wheel Extruder Is Alive
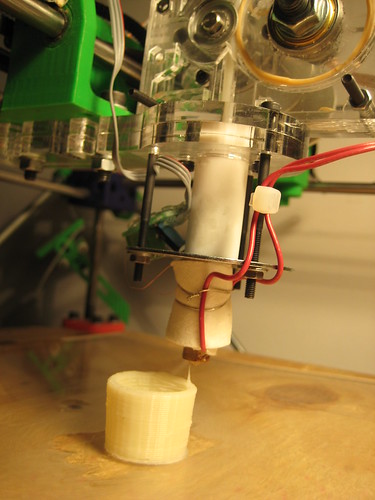 After I got the Pinch Wheel extruder working reliably, the obvious next step was to actually print something with it, right? I spent the past 2 days doing just that. I'm a big fan of Enrique's Skeinforge program, and I used that to generate the GCode for printing a minimug. It took me about 10 tries before I homed in on the proper settings, and they're still not quite right. Skeinforge is an excellent program, but there are a ton of settings that I just don't understand. Hopefully as I use it more, they will become clear to me. If anyone has some tips or tricks, please let me know.
Anyway, here was my process:
1. Use science* to get a feel for the extruder properties. I measured the ooze-rate after I turned the extruder off, and also the length of filament extruded at a certain speed for 60 seconds.
2. Put these measurements into a document to calculate extruder flowrate, etc.
3. Input these values into the Skeinforge program
4. Do a test print, tweak Skeinforge properties to improve build quality.
5. Rinse and repeat.
* for very loose definitions of science
Of course, it wasn't without its mishaps. Here is a short list of things that went wrong:
1. Don't extrude onto superglue on acrylic. The filament attaches really well. I mean really, really well. I destroyed my best print getting it off the acrylic :(
2. Don't use short lengths of filament. The new piece of filament tends to go to one side, while the other filament goes to the other side, jamming things up. Always extrude from a continuous length of filament, like from a spool. If you have to change filament, loosen the idler wheel, and pull out the old filament while its still molten so that the new stuff goes all the way to the melt zone un-impeded.
3. A good tightness is when you can see individual 'stretch' marks on the plastic from the gear teeth. This is also a good indicator of progress as they look like tick marks and the acrylic is clear. A bad tightness either produces small notches (too loose) or will creak and turn the whole filament the 'stretch mark' white (too tight).
4. The extruder *can* destroy itself. When feeding filament the first time, make sure you cut the end to a point with some wire cutters. this helps it self-feed. Watch to make sure it doesn't follow the idler wheel and that it does down its proper channel into the PTFE. If it doesn't, simply loosen the idler wheel, remove the filament, cut the 'chewed' part, and try again. I didn't destroy my extruder, but that's because I paid close attention.
5. If you haven't used your RepRap machine in a while, make sure you oil the bars and threaded rod that need to be smooth. This really makes a big difference in both noise and print quality. For example, I've been fighting with extruder designs for a couple months and have not done much printing. My machine was covered in dust and crap. Giving it a good once-over really did wonders.
6. If the extruder does jam, the teeth will carve out a little 'semi-circle' of plastic on the filament. To fix this, you simply loosen the idler wheel (notice a pattern?) and remove the filament. Cut it to a smooth place with wire cutters, re-tighten the wheel, and re-feed it into the extruder.
Anyway, today was a successful day! My extruder didn't give me any problems. It was rock solid, and very easy to use. The extrusion rate was very nice... very little variance at all. This is mostly due to the gearing and the high torque of the motor. I didn't even need to use a rotary encoder, although there is the option.
Also, the feedrate was very good! I'm using the smallest metal timing pulley that SDP-SI.com supplies, and I was getting about 16mm/sec feedrate @ 0.64mm diameter (960mm/minute). With a larger pulley, I could undoubtedly get a higher feedrate.
Yay!
Comments:
<< Home
Looking good! I used a fixed PWM reverse M code to clear extruder jams, but if you don't want to add it to the code, you can just plug the motor in backwards for a bit. :)

This looks like an simple and elagant & inexpensive solution to the extruder problem. Congratulations!
Do you have any idea of an ETA on this becoming avalible as a kit.
Do you have any idea of an ETA on this becoming avalible as a kit.
bodgeit: unfortunately for kit-making, i'm leaving for Madrid to run a 3-week RepRap workshop in a week. basically, that means we wont have kits up for another month.
in the meantime, you have a few options:
1. get the parts lasercut somehow. there are way more laser cutters than 3D printers, so it shouldn't be too hard.
2. cut the motor mount plate yourself manually. this is actually really the only thing you need, other than the part that you mount it to your machine on. you could probably make it out of that 90 degree angle stuff pretty easily.
other than the heater barrel assembly, the rest of the parts are all off the shelf: motor, skate bearings, nuts/bolts, and timing pulley can all be purchased separately online.
cheers!
~Zach
That looks pretty damned good, Zach. Any idea how much of your high-torque is needed? I want to run one of these from a geared-down stepper...
I'm going to give this a go with a spare stepper I have too - should save on the rotary encoder hopefully, and I'm interested in Adrian Bowyer's idea of varying the flow. Do you have a template for laser cutting available?
adrian: no idea. this is something that needs testing. i ordered some smaller, low RPM motors for testing though.
jiminizer: yes. i do all my development in RepRap subversion, so you can always see what i'm up to at reprap/trunk/users/hoeken
i generally make releases on sourceforge, but i've started to put designs like this up on Thingiverse: http://www.thingiverse.com/thing:293
Post a Comment
jiminizer: yes. i do all my development in RepRap subversion, so you can always see what i'm up to at reprap/trunk/users/hoeken
i generally make releases on sourceforge, but i've started to put designs like this up on Thingiverse: http://www.thingiverse.com/thing:293
<< Home
![]()