Thursday, July 31, 2008
An affordable alternative to JB-Weld and BBQ paint?
Cheaper alternatives to Cerastil for securing nichrome heater wire to extruder barrels may be in the offing... read more
Tuesday, July 29, 2008
TSA Really Wreck The RepRap Child
On the return journey from OSCON, baggage handling found themselves outclassed. Instead of simply smacking the box around a few times as had happened on the outbound trip, the TSA dismantled the custom hard-case for the RepRap by removing the 16 bolts securing the top panel rather than undoing the 8 bolts marked "Open".
Unable to fit the panel back on again - it was not meant to come off so the nuts were not captive - they simply sent it on its way with the panel detached. I retrieved it from the conveyor - as opposed from the fragile/outsize section despite clear "Fragile" stickers on every face - being shipped in the
T
h w
i a u <==
s y p
configuration. Bits were still spilling out of it. Two of our suitcases were badly damaged, my daughter's hard suitcase on a separate return flight was also destroyed. It was replaced by Air New Zealand with an apology for circumstances genuinely beyond their control.
I recommend that anyone, anywhere shipping any equipment of value by air goes out of their way to avoid having it pass through the United States of America. Otherwise their badly-trained insecurity chimps and box-throwers will wreck it for you.
Labels: airline, baggage handler, child, damage, destroy, equipment, reprap, tsa, wreck
Monday, July 28, 2008
Foundations

"Thou shalt raise up the foundations of many generations, and thou shalt be called, the repairer of the breach, the restorer of paths to dwell in." Isaiah 58:12
Well. It seemed appropriate...
Inspired by Nophead's outstanding experimental results, I've added code to the Java host software (in the repository here) optionally to put foundation layers under a build. This works particularly well with ABS (above - not yet up to Nop's quality, but servicable). I suspect it should also work with PLA, though I haven't tried that yet.
The host starts by putting down several widely-spaced hatch patterns on top of each other, then a narrower pattern, but still with horizontal gaps, then finally a hatch at the normal infill horizontal hatch gap. This last layer, though, is not the standard height-gap above the previous one, but less. This means that it is forced into the gaps in the previous layer, giving a very strong bond. The first layer of the part is then plotted where it should have been had the gap not been reduced, giving a bigger gap than normal between the part being made and the foundations. Consequently it doesn't stick that firmly to the foundations and can be separated easily with a penknife blade.
Nophead has found that this process is sensitive to ambient temperature (hot days give more stick), so we may have to allow for that. He suggests simply lowering the extruder temperature by the same amount that the ambient temperature exceeds some norm (say 20oC)
Foundations allow us to do two things:
- Build on an absorbent or rough base to give good keying. This will prevent parts separating from the base as they cool and tend to curl up. The part above (the direct-drive extruder motor mount - see that link for what it does) came out flat as a pancake, even though ABS is prone to curl.
- Experiment with layer separation strategies (like the changes in layer height that I mentioned). Once that is fully understood (or even before...) we can use the polymers as their own support for overhangs.
Saturday, July 26, 2008
Every little helps
The Darwin design has 10 diagonal tie bars across the corners of all but the top face of the cube, making it very rigid. These are attached by 20 diagonal tie brackets: -

The brackets are held onto the protruding 8mm stubs by M5 set screws through a captive nut. The diagonal bars are then held in place by M8 nuts either side of the bracket.
When fitting them I noticed that the set screws and nuts are not necessary. All the holes I make come out a little undersized and stringy so I clean these out with an 8mm drill. This makes them an interference fit onto the M8 rods. The force exerted by the M8 nuts is enough to squeeze the bracket to make it a tight fit. This is the case when they are made from ABS with 25% fill. Other plastics may be too strong or brittle.
This shortcut saves 20 grub screws and nuts and the time to fit them (inserting the nut can be quite fiddly). Not only that, the bracket can be simplified and made smaller because it does not need space for the nut and grub screw. This optimisation is well worth doing because, although these brackets are quite small, there are 20 of them so they are a significant part of the time taken to replicate.
Here is my smaller design which uses 21% less plastic and reduces the time to make 20 from 11.5 hours to 9 hours on my machine :-

I also used a truncated teardrop for the lateral hole. This relies on the fact that filament can span gaps as well as being able to build out at 45°. The drawing below illustrates that, even for an 8mm hole, the difference between a proper circle, which would require support material, and this truncated shape is very little. It also shows where the full teardrop would extend to.

Here is a picture of it installed alongside the old design: -

I think this is a beneficial mutation that will slightly increase the rate at which Darwins reproduce in the wild. The new DNA can be found here.
Labels: diagonal ties
Wednesday, July 23, 2008
A bit more about Zach's opto-endstop
A small sharing of experience in incorporating Zach's ZD1901 opto-endstop into a controller board... read more
Tuesday, July 22, 2008
Minor notes on the Zach's Opto-endstop PCB
Two minor notes on Zach's opto-endstop PCB for Darwin... read more
OSCON RepRap Butchered

Looks like the airport baggage handlers have proved the minimum 98% chimp DNA content of humans, with the result that 3 corner brackets, the Y motor bracket and one bed corner are totally smashed.
Nice people at O'Reily have provided me with some epoxy, and so I'm busily putting the jigsaw back together again.
Vik :v)
Labels: oscon, reprap, smashed
Bits from Bytes RepRap now in Subversion
As many of you will know, Ian's company Bits from Bytes sells a lasercut version of RepRap:

We have now put all the lasercutter DXF files in the RepRap subversion repository (under the GPL like the rest of RepRap) so that anyone with a lasercutter can make one. They are at:
http://reprap.svn.sourceforge.net/viewvc/reprap/trunk/reprap/mechanics/bits-from-bytes-designs/
Almost all the parts can be cut in 3mm, 5mm and 8mm acrylic; the file names give the thickness and material you need. (Just two parts are better made in acetal because they need to be slightly flexible.)
In addition we have started to upload the same parts as STL files so that, of course, RepRap machines can make them too. They are in the STLs-for-reprapping/ sub-directory from the above location. Only the extruder is in there at the moment, but we will add the other parts as soon as they have been translated.
Adrian & Ian
Labels: Bits form Bytes, lasercut
Monday, July 21, 2008
RepRap Child Now At OSCON in Portland
The RepRap Child is now in Portland for OSCON 2008, hopefully not too badly beaten up in transit. Official presentation is on Thursday afternoon (5:20, D137) but I'll try to set it up in the foyer for folks to come poke at it. Will overcome jetlag before picking up screwdriver...
Vik :v)
Vik :v)
Labels: oscon
Sunday, July 13, 2008
New Board: Magnetic Rotary Encoder v1.0
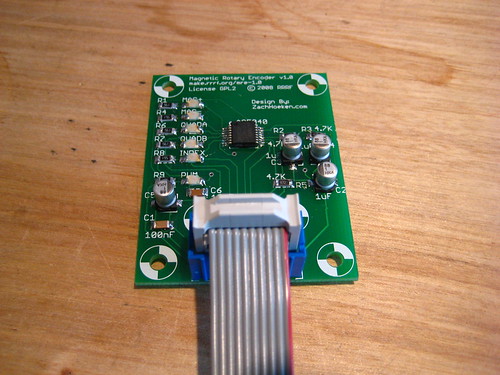 I'm very proud to announce a new board, designed and developed by the RepRap Research Foundation. Its called the Magnetic Rotary Encoder, and it uses a magnet to provide positional feedback information. It is based around the AS5040 chip, and provides 10-bits of resolution per rotation (1024 different positions!) It has 5 different output modes, a 6.1mm hole that fits the magnet for easy aligning, plenty of diagnostic LEDs for coolness, and 6 different mounting holes for ease of use, including GM3 gearmotor mounting holes.
Rotary encoding is one of the major innovations that Nophead uses in his extrusion process that has led to such high quality prints. Now, we have a standard, open source design that is intended for use with the GM3 gearmotor that we use on our extruder.
We have full documentation available on our wiki, an experimental GCode firmware for Arduino with support for it, and you can even buy a kit from the RRRF online store.
Saturday, July 12, 2008
Multilingual Host Software
Thanks to Daniel Kessel, who has done a version of the RepRap Java host software that supports different languages. This isn't in the main subversion trunk yet, but if you want to experiment with it you can find it here.
Labels: host, multilingual
Revisiting the recycling of Reprap plastics
Wednesday, July 09, 2008
Extruder instructions

Apologies for the delay, but I have finally brought the extruder assembly instructions here up to date. Please let me know of any errors and omissions.
Labels: extruder, instructions
Sunday, July 06, 2008
The fraught question of 3D modeling for Reprap
The Reprap effort has made a remarkable effort not only to pursue the development of an open source 3D prototype machine but also to use, wherever possible, open source development tools in its development. While that ideal has largely been carried out in reality, the selection and use of the open source Art of Illusion 3D modeling tool has been, perhaps, one of the more heavily contested choices in this regard... read more
Wednesday, July 02, 2008
Java Host Software
I've changed the RepRap control panel in the Java host software so that it'll work under Java 1.5. It used to require Java 1.6 (which isn't on the Mac yet), so moving it back a step was a real pain. It's checked into the svn repository.
It's mostly there, plus a little added functionality. You can now pause a build, Sto(re) the current machine coordinates in the XYZ tab, hit the Rcl (recall) button to load those stored coordinates into the destination location, move the machine about, restock the extruder, etc etc, then hit Rcl again then Go there to get back to where you left off, then resume the build. It turns the extruder off when you pause, but doesn't automatically turn it on again when you resume (as you won't always want this). Turn it on in the extruder panel before resuming if that's what you want.
You need swing-layout-1.0.3.jar in your classpath for all this to work. This requirement will go away when we finally move to Java 1.6 (as its equivalent is in there already), but for the moment it's in the lib directory for your convenience.
Labels: host software, java
Hacking the Solarbotics GM3 Gearmotor
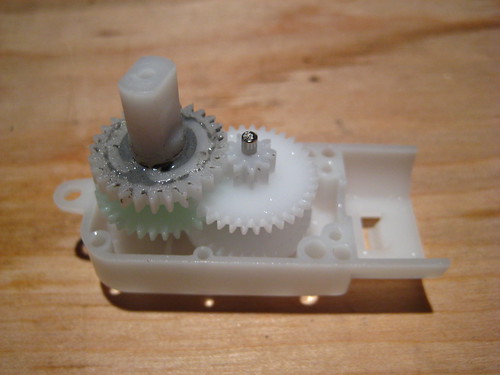 I finally got around to writing up a tutorial on how to hack the GM3 gearmotor to lock the clutch, which will prevent it from slipping when you try and torque it too much. It can definitely cause problems during printing, and this hack will make things much better.
Read the tutorial, or check out the flickr set.
![]()