Friday, April 27, 2007
i <3 aluminum
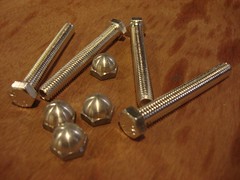
since i live practically across the river from mcmaster, i get FAST delivery times. they had my aluminum nuts and bolts here the next day. so once i got my aluminum, i went straight to the shop.
first, i started by drilling the aluminum bolts out with a long series 1/8". unfortunately my cheapo drill press only has a 2" travel, so i had to finish it with a hand drill. also, i dont have a decent clamping setup yet, so it was with a vicegrip.... not a good solution. (cross slide vice = ordered)
however, things worked great! the drilling of the aluminum was super easy, slightly slow on my part. the bit had no problem handling it. there is probably a better way to do that, but it was actually pretty simple.
after i warmed up with the bolts, i approached the main issue: the nozzle. unfortunately, i broke all my 0.5mm nozzles, so i used the random ones. first i tried 0.90. piece of cake. it made cool spirals of tiny aluminum. then came 0.7mm. also really easy. it melted like butter. i had an untouched grab bag of 0.15 - 0.40, so i decided to see how low i could go.
i loaded up the 0.40, brought it down on the aluminum, and it snapped! aargh. first try and its busted. well, i was actually just a bit over eager, because that was only one of two bits i broke drilling holes. i tried again and easily got a 0.40 nozzle.
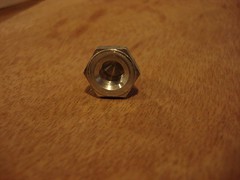
then i went down the sizes: 0.35 went well... just slow and careful. same with 0.30, 0.25. then i got to 0.15 which is an insanely small size of a hole. unfortunately the bit broke... i think my drill press is just too loose to handle it. it certainly could've drilled through the aluminum.
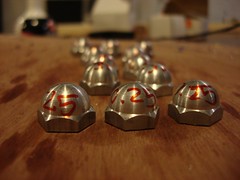
i drilled a couple of each size, just to see how it went... the nozzles were very easy to drill. infact, the acorn nozzles are practically perfect for an extruder head. heres why:
1. the inside of the nut tapers up into a point near the top. its actually very thin. thats why its so easy to drill through... i dont know how to measure it, but its very thin.
2. the bolt screws all the way in. there is only a small gap between the end of the bolt and the cone area. i dont know the physics behind polymer flow, but it seems right to me.
3. the aluminum conducts good heat, not as good as copper, but still very good.
so, after that, i rushed back to the lab at home. i had to try extrusion! i already had a steel extruder barrel worked up, so i wired it up and screwed a large mm aluminum nut on... there wasnt enough thread, so the nut only went halfway on. even with that large chamber of plastic, extrusion still worked.
i got a decent stream of 0.7, and 0.4 also came out pretty well. i got tired of manually feeding it, so i stopped for the night. i want to wait until i hook up one of the new aluminum barrels i got to see how it works.
Comments:
<< Home
To measure. Take a small cylinder of known length, and a caliper.
Measure a short piece of metal, say a straight pin, then measure that plus your cap, (pre-drilled), and subtract the first length from the second.
Think of it like tare weight for length.
Measure a short piece of metal, say a straight pin, then measure that plus your cap, (pre-drilled), and subtract the first length from the second.
Think of it like tare weight for length.

If you're having trouble drilling the small orifices, this tutorial I found might be very useful - it uses a mini lathe, but I've a feeling a drill clamped in the "Afghan lathe" configuration would work ok. If it turns out to be very useful, perhaps it would be a good idea to link to it on the main documentation pages, since the technique is crucial to the development of any reprap.
Post a Comment
<< Home
![]()