Wednesday, August 16, 2006
A hole in my theory
I missed the obvious in my RepStrap...
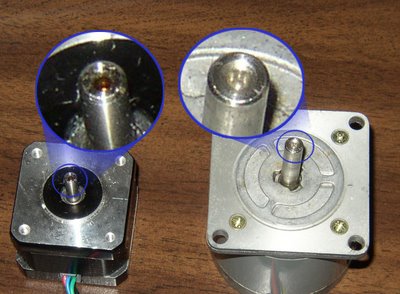
The axes wobble a bit due to the plastic sleeving used to connect the motor shaft to the studding. The sleeving slowly moves off-center from the weight of the load. Then when the motor turns it causes a wobble.
I suddenly realised the obvious. Most steppers have a little hole down the shaft. A pin inserted into the hole and then into a matching hole on the studding would keep them nicely centered and the plastic sleeving would then do a great job. The pin would be held in place by the sleeving too, so it's a very simple solution to the problem.

Comments:
<< Home

You could grind the pin out of the end of the the studding itself, kind of like the studding was ground down for the extruder.
Also, if you spin the studding/threaded rod in a drill press, and clamp a static drill bit under it, as you feed the drill press downward it will cut a nicely centered hole in the studding because it is spinning, not the drill bit.
All you need is to support the far end of the studding with a bushing or bearing so it is held true and doesn't flail. Any dirty trick will work, it only takes a moment to get the job done.
***Also, if you spin the studding/threaded rod in a drill press, and clamp a static drill bit under it, as you feed the drill press downward it will cut a nicely centered hole in the studding because it is spinning, not the drill bit.
***
That assumes that you have a fairly short piece of studding. :-(
***
That assumes that you have a fairly short piece of studding. :-(
yvan: Yes, I was thinking the same. If I hadn't been so slow to realise, I would have done just that, but unfortunately I've already turned the ends of all my threaded rod. It would be much easier to do it that way rather than making another hole afterwards.
The approach you're describing is exactly how I make my holes. It's the "Afghan Lathe" approach, as Vik calls it. More details on the Wiki. That is how I bored my extruder parts, for example, and they come out perfectly centred. I have found that if I use a drill bit that is too small, it happily wavers in a circle and can drill off-centre, but slightly larger bits work well.
I have a few simplications and modifications that I use for longer pieces of studding too. For example (I almost feel embarrassed admitting to this one), I've found that just holding the far end in your hand (with a glove on) and exerting pressure slowly gives a remarkably good result on longer pieces. In this case since there is already a machined end (rather than threading), I can use a bearing instead.
With some creativity you can cheat just long enough to get long lengths done too. If you tape a 8cm length of studding near the free end with that black electrician's tape(offset spiral wound so there is no edge or lump as it spins) and you pass this through a imobilized block of wood with a snug hole in it, you can get enough support to start the pilot hole in the studding.
Any snug fitting length of rigid plastic or metal pipe pushed onto the far end of the threaded rod to make a short lived bushing will work.
Just make sure you have the drill press on the lowest speed, you don't want the far end flailing about! Not pretty. Don't ask me how I know. ;)
Any snug fitting length of rigid plastic or metal pipe pushed onto the far end of the threaded rod to make a short lived bushing will work.
Just make sure you have the drill press on the lowest speed, you don't want the far end flailing about! Not pretty. Don't ask me how I know. ;)
Oops my previous post was in reply to Forrest.
Simon, LOL on the one about you just holding the part steady by hand! The whole RepRap needs to focus on a kind of cheater's machine shop 101 approach to things. Vic gets a big star in my book for his Afghan lathe!
As for smaller drill bits wobbling... They can be clamped (soft metals or very hard woods do the trick) so that just the very tip protrudes. I also rescue brocken ones and crudely resharpen them as short starter bits.
Post a Comment
Simon, LOL on the one about you just holding the part steady by hand! The whole RepRap needs to focus on a kind of cheater's machine shop 101 approach to things. Vic gets a big star in my book for his Afghan lathe!
As for smaller drill bits wobbling... They can be clamped (soft metals or very hard woods do the trick) so that just the very tip protrudes. I also rescue brocken ones and crudely resharpen them as short starter bits.
<< Home
![]()