Tuesday, August 08, 2006
Grids rock!
Finally got my head around how to solve the border problem. Grids rock!
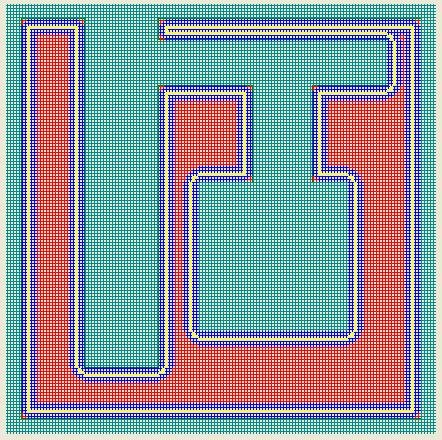
 Not only do they track the perimeters properly, but they also show you the path for the centre of the MK II extruder head, won't let you overlap and shows you the corners and blind pockets that the Mk II isn't going to be able to get into.
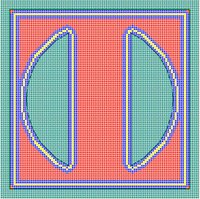
In this pic the background is cyan, the perimeter is blue with the extruder path done in yellow. The red bits comprise the rest of the slice of the object. I haven't done an infill routine yet.
You can see how the Mk II can't quite get into the corners of the slice.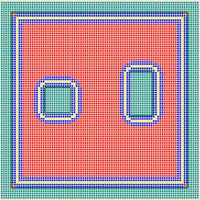
Here is a slice of a rectangular box with two holes in it. Looks pretty good for a start. :-D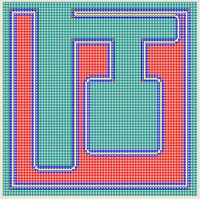
Here is a really, really non-convex slice especially for Adrian. :-D
After looking at Adrian's non-convex polygon, which took a long time to do, I felt sufficiently confident in the approach to migrate some more of the coding from the old slice and dice programme that I wrote a few days ago into the grid. This improved the execution speed of the routine by about 1.5-2 magnitudes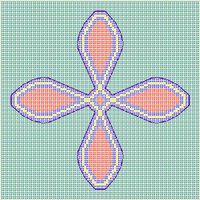 . There are a few other tricks that I can use if need be to kick that speed up another 1.5-2 magnitudes. I'm not going to do it unless execution speed really gets to be an issue again. Because PC's always get lots faster if you wait about 18 months I tend to value code reliability and simplicity a lot more than I do efficiency.
Finally, here is a perimeter trace for a 4-toothed involute profile gear. For this kind of shape I am beginning to wonder if our one-size-fits-all notion of using diagonal, 90 degree offset infills is really a good idea for all the sorts of things we'd like to make. If you look at the inner spot of infil required for this gear it would seem that a quick doubling of the perimeter depth would be more appropriate, ditto with the infills in the teeth. This requires some more thought, I suspect.
I am particularly excited about the prospect for leveraging this method with some heuristics that give the user some useful graphics feedback about whether the RepRap machine can actually make the part the user is designing. I suspect this is going to be a very big issue for the sorts of RepRap users who are using their machines to create new devices rather than simply making salad bowls and napkin rings.
 Not only do they track the perimeters properly, but they also show you the path for the centre of the MK II extruder head, won't let you overlap and shows you the corners and blind pockets that the Mk II isn't going to be able to get into.
In this pic the background is cyan, the perimeter is blue with the extruder path done in yellow. The red bits comprise the rest of the slice of the object. I haven't done an infill routine yet.
You can see how the Mk II can't quite get into the corners of the slice.

Here is a slice of a rectangular box with two holes in it. Looks pretty good for a start. :-D
Here is a really, really non-convex slice especially for Adrian. :-D
After looking at Adrian's non-convex polygon, which took a long time to do, I felt sufficiently confident in the approach to migrate some more of the coding from the old slice and dice programme that I wrote a few days ago into the grid. This improved the execution speed of the routine by about 1.5-2 magnitudes
 . There are a few other tricks that I can use if need be to kick that speed up another 1.5-2 magnitudes. I'm not going to do it unless execution speed really gets to be an issue again. Because PC's always get lots faster if you wait about 18 months I tend to value code reliability and simplicity a lot more than I do efficiency.
 Finally, here is a perimeter trace for a 4-toothed involute profile gear. For this kind of shape I am beginning to wonder if our one-size-fits-all notion of using diagonal, 90 degree offset infills is really a good idea for all the sorts of things we'd like to make. If you look at the inner spot of infil required for this gear it would seem that a quick doubling of the perimeter depth would be more appropriate, ditto with the infills in the teeth. This requires some more thought, I suspect.
I am particularly excited about the prospect for leveraging this method with some heuristics that give the user some useful graphics feedback about whether the RepRap machine can actually make the part the user is designing. I suspect this is going to be a very big issue for the sorts of RepRap users who are using their machines to create new devices rather than simply making salad bowls and napkin rings.
Comments:
<< Home
This looks good. Have you tried it on a non-convex shape?
Also, there's a memory issue that may need to be considered: in order to compute the fill material, you have to start at the top and slice all the way to the bottom, recording all the slices. Then you build them from the bottom up. That can be a lot of bitmaps (though they can go onto the disc, of course). Are you compressing them?
Also, there's a memory issue that may need to be considered: in order to compute the fill material, you have to start at the top and slice all the way to the bottom, recording all the slices. Then you build them from the bottom up. That can be a lot of bitmaps (though they can go onto the disc, of course). Are you compressing them?

Hi, I've been lurking for some time in case this issue came up. The best current standard for storing such bitmaps is 'png', however, the less popular 'mng' standard might prove beneficial. This is intended for animations and compresses redundancy between frames (or slices). These mng 'build' files could be pre-computed and optimized quite nicely for distribution.
***Have you tried it on a non-convex shape? ***
While strictly speaking the two slices I put up as pics are non-convex, I made up and sliced a really egregious non-convex polygon just for you, though. It worked beautifully. I'll add it to the blog entry as soon as the blog stops misbehaving and takes uploaded pictures again. :-)
***Are you compressing them?***
I make a practice of avoiding hanging a lot of bells and whistles onto a piece of software until I really feel comfortable with what I'm doing. I figure that RAM sticks and hard disk space are a lot cheaper than the hours required to make things like that happen reliably in software. I just bought a 320 Gbyte disk for my son's birthday for $69, so if the slice files get to be a problem I'l just add another disk drive to the 500 Gbyte I already have on this system. :-)
Hey Plaasjaapie, what do you have against salad bowls and napkin rings?! That's what -I'm- gunning for! ;)
I agree, knowing if the machine can make the part sounds like a good idea. Also think you're onto something with the "standard 90˚ infilling" issue, non-standard infill could help a lot with little parts.
I agree, knowing if the machine can make the part sounds like a good idea. Also think you're onto something with the "standard 90˚ infilling" issue, non-standard infill could help a lot with little parts.
If we're sufficiently melting the material so that it totaly and fully bonds to the material it's being layed down upon, I don't think we need the cross-hatching... However, if the material isn't totaly bonding with itself, you end up with some serious weekness in the product (as the fill seams line up with eachother)
Assuming we're heating the material well enough, and getting the right bond:
What about a 'follow the walls spiral' approach to the infil?
After you've layed the perimeter, pick a spot somewhere inside the piece, and start following the perimeter along the inside edge. When it hits itself again, just continue spiraling inward. If you can do it in 2-3 (or some threshold), then this is the way to do it, otherwise, crosshatch.
You'd have to go back and make sure you covered all the infil alreays, on some objects that would be running the routine multiple times... (for your gear, you'd probably get stuck in each of the teeth, and the center, for a total of 5 runs...)
Just ran across an interesting article that I thought about relating to the "320 GB hard drive" comment.
http://www.feynman.com/
- click on the Life & Science, then Nanotechnology in the side bar.
Even though we have a ways to go to get information density imagined here, consider this was written about 45 years ago. Look at where we are today. Imagine where we might be in another 45 years.
The increases in technology can at times can be mind boggling.
Beagle, yeah, and think that technological progress is -speeding- up, the next 45 years will be in no way comparable to the previous 45 you and I have known...
Lord Cat, you mention interesting points. Plaasjaapie says his machine will be much faster in straight line crosshatching than in contour following, due to a flexible wooden structure and big fast motors (aka Frankenmotors, ja!). I'm sure Plaasjaapie has other observations about this issue.
This is a factor with lots of the homebuilt CNC machines, theory has to bow to practical implementation.
Post a Comment
Lord Cat, you mention interesting points. Plaasjaapie says his machine will be much faster in straight line crosshatching than in contour following, due to a flexible wooden structure and big fast motors (aka Frankenmotors, ja!). I'm sure Plaasjaapie has other observations about this issue.
This is a factor with lots of the homebuilt CNC machines, theory has to bow to practical implementation.
<< Home
![]()