Wednesday, October 13, 2010
Story of simpler Mendel: Y and Z axes
My Mendel redesign is slowly reaching first milestone. I have completed a fully working prototype. I already fixed almost all issues that came with building it. Now, my attention turns to doing the basic documentation, then we’re ready to rock'n'roll! I foresee it’s going to be huge success for the Mendel replication rate. All the parts needed can fit and print them all on one Mendel sheet!!!
Z-axis
I chose to use two steppers wired in parallel to one driver. I know, it’s controversial, some people don’t understand it, or even like it. In testing so far, I can find only positive things to say about it vs the regular timing belt design. My hope this blog will open your mind. If you don't wish to try it, you can use older Z axis, the design is still compatible!
Motors are on top side, recessed in holders so they can't rotate, but they are free to self align in X direction. Theres a possibility to secure them with bolts, but I found the its actually much better to let them be free and "secure" them with only something flexible like tape, this together with freedom in X axis arrest really lots of wobble! You cant achieve this with older design.

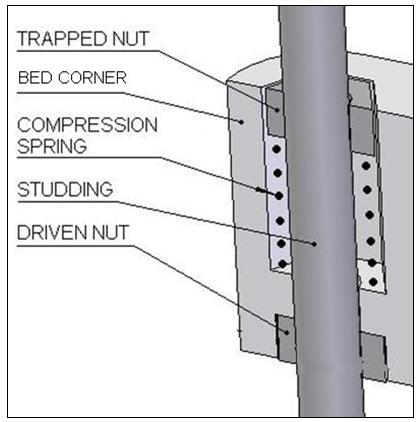
Next great thing is nut trap part of X-end parts. Its clever design I've discovered on Darwin and Im surprised that Im the first who brought it to Mendel. Theory is on picture. In practice it smooths out whole Z axis, since it keeps the nut really securely on the stud.
All together enables Z axis to go upto 260mm/min and probably even faster, but my FW cant handle more steps, since I'm using 1/16microstepping.
Y-axis
I was little scared at first about redesigning Y axis, aware of the parts count and assembly time on standard design I wasn't sure if I can do it more simple. At the end it turned out as simplest axis of all. I even get rid of need for the laser-cutted parts.

Process is very simple, after you install Y axis bars, you snap on four bushings, align them at about the size of the board (12x22cm), put some glue on them and place the board from top. There is no need to be extra precise when aligning the rods, bushings can absorb some error :-)
Rest should be obvious form picture. I've already found better solution tho. Again inspired by Vik! Just use two skate bearings as here http://www.thingiverse.com/thing:2011 , it eliminates idler part and moves half of the belt on top of the smaller board. Unfortunately I wasn't able to test this yet.
Conclusion
I can print with this machine at 50mm/s without any problem. Objects are as smooth as possible for FDM technology. I will post detailed photos soon, shame I have now only iPhone for taking pics :-(

Most recent files are at my http://github.com/prusajr/PrusaMendel dont forget to watch them. Now I will focus on documentation. Construction is really much simpler, I bet it can be built faster then Makerbot ;-)
BTW Look how awesome these parts look printed on Stratasys from Azdle.

Monday, October 11, 2010
Replicating laser-cut parts
In which your narrator confects his own idiosyncratic method of replicating laser cut parts.

Do you want to read more?
Monday, October 04, 2010
Story of simpler Mendel: PLA bushings and X-axis

Hello, I'm new here so I guess I should introduce myself first. My name is Josef Prusa, I'm 20 years old student from Prague, Czech republic and I'm in RepRap world for about a year now. You can follow me on http://twitter.com/prusajr.
2 months ago I started process of simplifying Mendel design, so far I was able to reduce parts count, assembly time, use of vitamins and also price. I introduce my simplifications in few articles here on blog. Here is wiki page http://www.reprap.org/wiki/Prusa_Mendel, its not updated yet to final state, but I'll do it soon. You can always find most recent files on my GitHub http://github.com/prusajr/PrusaMendel.
RepRappable PLA bushings
Great alternative of bearings, if you dont have huge load. VikOlliver inspired me with his set of parts, using PLA "sleds". This is radically improved, tho.
Also, it makes whole x-carriage snap on to axis rods :-) Its great if you are experimenting with extruders a lot!!


Also, it makes whole x-carriage snap on to axis rods :-) Its great if you are experimenting with extruders a lot!!


They sits really nicely on rods. With regular Igus bushings I had a problem, because I dont have bearing rods, it was all little wobbly.
I printed about half of regular Mendel with these on all three axes and they are still good as new. Quality of prints with them are also comparable with linear bearings which I have on RapMan.
They will not last forever, thats obvious, but price for us RepRappers is near $0 which makes them nice alternative. I also designed all parts to be able to change the bushings when they worn-out.
You can find files and instructions how to use them on http://www.thingiverse.com/thing:4177 and I'll soon make a Wiki page for them too.
X-axis
X-axis is where I actually started my redesign, there is originally like gazillion parts and its real mess to assemble it. My version only has three big parts, two belt clamps and few printed bushings. Parts also includes Z axis functionality. Its really easy and simple design.
Parallelnes of two main rods is ensured by the teardrop type of holes for rods plus securing bolts from bottom (there is nut bracket inside the part). By pushing the rods upside, they will self center.
You can see the principle here on cut part. (Note: its older version of x-end-motor, principle is still same tho)

X-carriage

X-end-motor

X-end-idler

I hope you like it! Next time I'll introduce Y and Z axes.
(Note: This is still development!! Not officially released.)
![]()