Sunday, November 30, 2008
Suppression
Zach kindly sent me a sample of his PCB version of the radio interference suppressor that I designed for the GM3 gearmotor.

I have tested it and am pleased to report that it works at least as well as my prototype, possibly better.
Here is the noise spectrum without it fitted.

And here is the result of fitting it: -

More details here: hydraraptor.blogspot.com/2008/11/suppression.

I have tested it and am pleased to report that it works at least as well as my prototype, possibly better.
Here is the noise spectrum without it fitted.

And here is the result of fitting it: -

More details here: hydraraptor.blogspot.com/2008/11/suppression.
Labels: DC motor suppression
Sphere


I tried an experiment in support material. The idea was to use the same extruder for both support and build. The host software allows you to do this but it's a relatively recent change. It's not available in any of the official releases (I think, correct me if I'm wrong on that) but, if you build from the SourceForge source, you can do this.
The first thing I did was create a second extruder in the host settings. I copied all the Extruder0 settings and made them Extruder1, then set NumberOfExtruders=2. Extruder1's settings differ from Extruder0's like this:
ExtrusionInfillWidth(mm)=2.4 (instead of 0.8)
NumberOfShells(0..N)=0 (instead of 1)
ExtrusionSpeed(0..255)=175 (instead of 215)
MaterialType(name)=support (instead of ABS)
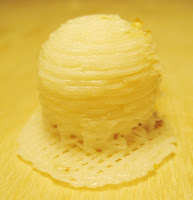
The intent here was to make a sparse and loosely-bonded mesh. The lower extrusion speed causes the ABS to be stretched into thin threads. The wider infill width creates an open weave pattern. The zero shells removes the outline around each layer. The end effect is a structure that looks a bit like a plastic pot scrubber.
To test, I used a 20mm sphere with a support object. I exported the two objects as sphere.stl and sphere-supt.stl. Now, to get the two objects to print together, you have to do this:
1. Load sphere.stl (when prompted, choose ABS)
2. Select the object (this will bond the object to the next one loaded)
3. Load sphere-supt.stl (when prompted, choose support)
4. Position and orient the (bonded) object in the build area
Note: The select-and-load thing to bond objects is a relatively new feature too.
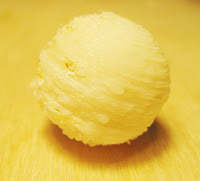
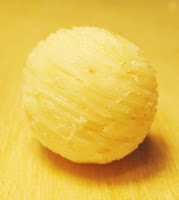
The first image above shows the object as printed. The blobiness is mostly due to not having a proper nozzle cleaner yet. The second image shows the object after picking the support material off using my fingernail. The support material crumbled off fairly easily from the lower layers but was more difficult on the upper ones. The third shows the object after cleanup using a Dremel.
The upper layers of the support object are probably unnecessary and do more harm than good. The build can support itself once it's past a 45 degree overhang. I might try again with smaller support object.
Sure, it's a long way to go to make what's essentially a marble but it was an interesting experiment. I haven't tried anything with a purely-horizontal overhang yet. Not sure how that'll turn out.
Another approach to heating the print surface
In which the adventures of your narrator in his quest to create a heated print surface are related... do you want to read more?
Granule Extruder - the sequel
I've rabbited on about granule extruders before. I think it's important to have a design for one as:

Here's my latest attempt held in a vice under test. It's a PTFE tube with a 10 mm hole down the middle containing the granules. At the left end a brass plate is (very securely) attached by being screwed in and then held with extra screws, which you can see projecting to the left. (Also note the the solid-state force transducer near the top of the picture...)
A length of M10 threaded rod is pushing against the granules in the PTFE tube and being dragged to the right by the string tied to it.
At the right end is a heated brass chamber where the granules melt and are then extruded. This has a nichrome heater embedded in fire cement with a copper tube round that for mechanical strength. The nichrome is 6 ohms, which is a bit high - it'll just about get to full temperature at 12v, but there's no leeway; the next one I do I'll make 4 ohms. The green and white wires are a K-type thermocouple.
Here it is extruding:

This is running at 243 oC. To get the same flow rate as on my conventional RepRap Extruder at the same temperature I had to hang 17 kg on the string - a force of 167 N. The flow seemed very smooth and even under constant load and - equally importantly - seemed to stop pretty quickly when I lifted the load off. As you can see, I've run the extrude nozzle off sideways so that the main axis of the device is horizontal. This reduces heat convection from the hot end to the cold end, thus keeping the granules at the cold end from melting.

Here's a close up of the device with some of the extrudate it made. The test tube (10 mm internal diameter) contains the granules that didn't melt ahead of the screw. I tipped these out at the end of the test. They form a buffer between the melt and the screw, and mean that it should be easy to withdraw the screw and recharge the device with more granules when the screw has moved inwards to the end of its travel.
Now to design a hopper, a motor drive for the screw, and a force transducer for it to push on so we can control the flow rate...
- Granules are the standard form that plastics are supplied in,
- It's easy to make granules yourself by shredding, thus RepRap becomes a home plastic recycling machine, and
- If you have a hopper full of granules as the feed, it's much more compact than a plastic filament, and also very easy to refill in mid-build.

Here's my latest attempt held in a vice under test. It's a PTFE tube with a 10 mm hole down the middle containing the granules. At the left end a brass plate is (very securely) attached by being screwed in and then held with extra screws, which you can see projecting to the left. (Also note the the solid-state force transducer near the top of the picture...)
A length of M10 threaded rod is pushing against the granules in the PTFE tube and being dragged to the right by the string tied to it.
At the right end is a heated brass chamber where the granules melt and are then extruded. This has a nichrome heater embedded in fire cement with a copper tube round that for mechanical strength. The nichrome is 6 ohms, which is a bit high - it'll just about get to full temperature at 12v, but there's no leeway; the next one I do I'll make 4 ohms. The green and white wires are a K-type thermocouple.
Here it is extruding:

This is running at 243 oC. To get the same flow rate as on my conventional RepRap Extruder at the same temperature I had to hang 17 kg on the string - a force of 167 N. The flow seemed very smooth and even under constant load and - equally importantly - seemed to stop pretty quickly when I lifted the load off. As you can see, I've run the extrude nozzle off sideways so that the main axis of the device is horizontal. This reduces heat convection from the hot end to the cold end, thus keeping the granules at the cold end from melting.

Here's a close up of the device with some of the extrudate it made. The test tube (10 mm internal diameter) contains the granules that didn't melt ahead of the screw. I tipped these out at the end of the test. They form a buffer between the melt and the screw, and mean that it should be easy to withdraw the screw and recharge the device with more granules when the screw has moved inwards to the end of its travel.
Now to design a hopper, a motor drive for the screw, and a force transducer for it to push on so we can control the flow rate...
Labels: extruder, granules, polymers
Friday, November 28, 2008
Award for RepRap?
Do you think RepRap should get an award? (I do, but then - I'm biased :-))
I just got the following e-mail:
"The Society of Manufacturing Engineers (SME) is now accepting nominations
for its RTAM Industry Achievement Award. If you know of someone that has
done fantastic work in the additive manufacturing (RP) industry, please
visit http://www.sme.org/industryaward for details on submitting nominations.
"Nominations will be accepted through January 31st, 2009, and the award will
be presented at the RAPID conference on May 12, 2009 (Schaumberg, Illinois)."
And we wouldn't dream of nominating ourselves, of course...
Labels: award
Wednesday, November 26, 2008
Heating the print surface: doing the numbers
Monday, November 24, 2008
Chemically grinding ABS scrap
It appears that acetone can be used to reduce ABS scrap to a fine powder for reprocessing into new filament... do you want to know more?
Idea for reduced cartesian structure

I've been playing with ideas on part count reduction for Darwin. Having an elevated XY table requires a fair bit of support structure. After brainstorming with Adrian we came up with this as a concept - I will try to do a feasibility on it at some point. Interestingly the rolling table concept could lend itself well to a large-batch production machine: if the table was pimped with a conveyor we'd have an infintely long work area.
Monday, November 17, 2008
Announcing Thingiverse.com
 or, "Why you need a RepRap machine"
One of the most frequent questions I get after people understand what a RepRap does, is a variant of either 'Why do you need a machine like this?' or 'What do you make once you have one?'. Well, Thingiverse.com is an answer to that. This is no ordinary object sharing website. Thingiverse.com is a home for all your digital designs. If you can represent a physical object digitally, then we want it on Thingiverse. You can upload 3D files for a RepRap machine, vector files for a lasercutter, or even a PDF of instructions on how to build a sock puppet.
One of the tricky things with digital designs for things is that your average web browser doesn't know an STL from a dodo, which is why we support automatic renderings of common digital design formats. If you give us a file, we'll try our best to generate a rendering of it so that when people come to look at it or download it, they will be able to know what it is. We support STL, DXF, SVG, AI, and many other formats including Eagle PCB design files. Even if we don't support rendering it, we'll still put it up for other people to download. Not only that, but once we add support for your file, we'll render the previously uploaded files of that type too. Yay!
The dream behind Thingiverse is that someday in the not so distant future, when everyone has a RepRap machine, they will be able to go to Thingiverse.com, find a useful/interesting/cool thing, download it, print it, and 15 minutes later be able to hold the actual thing in their hands. This is the coming revolution of digital fabrication and we want to help you make it happen. If you want to be involved, now is the time to step up and get involved.
Sunday, November 16, 2008
Multiple materials

The Java host software is now set up to handle objects made from any (reasonable) number of materials. If you load an STL file, select it with the mouse, then load another the system keeps the relative position and orientation that the two had when they were created. Thus you can design something in several materials, save each as an STL, and then load them all together.
As you can see, the sectioning software distinguishes between the two and creates the correct outline and hatch patterns for each.
So far I have tested this on an Arduino-controlled RepRap with LEDs in the place of the extruder motor and valve (because I only have one extruder here at the moment). The LEDs all seem to light up and go out at the right times.
This is cheating slightly, as the Arduino only has enough pins for one extruder, but if you have two, one of which just needs a motor like our plastic extruder, and the other of which just needs a valve, like our prototype paste extruder, then you can control both.
Next I'll update the paste extruder design and get that working again, and see what we can make.
Then I'll upgrade the Sanguino (more pins...) software so it can genuinely handle two extruders.
This, of course, will allow us to use different support materials, and also fun stuff like silicone rubber and Field's metal.
Tuesday, November 11, 2008
DIY PLA
Forrest has just reminded me that I should have blogged this ages ago.
Bath undergraduate Nick Grudgings did some experiments on making polylactic acid. Here's his setup:

The flask contains lactic acid, and is resting in a heater. The tube is feeding in dry nitrogen to eliminate moisture. There's a magnetic stirrer flea under the lactic acid that you can't see. We also put in a thermometer. The whole thing was in a fume cupboard, as you don't want to breathe lactic acid vapour...
We warmed it up gradually, with the stirrer turned on. When the lactic acid started to melt we added 1/600 by weight of tin octoate as a polymerisation catalyst. The melt became quite viscous at around 140oC as polymerization started. You can control the mechanical properties of the result by the amount of catalyst: the polymer chains form from each catalyst molecule, so more catalyst means shorter chains.
Here's the result:

At the bottom of the flask is a cool solid clear lump of polylactic acid, with - it turned out - a little residual lactic acid embedded in it.
After a while (weeks) that lactic acid started to absorb atmospheric water vapour and thereby to disrupt the polymer, from which we learned that we needed to cook it for longer (we used about half an hour) to complete polymerisation. Obviously the longer the polymer chains you go for, and thus the less catalyst you use, the longer the polymerisation will take.
Bath undergraduate Nick Grudgings did some experiments on making polylactic acid. Here's his setup:

The flask contains lactic acid, and is resting in a heater. The tube is feeding in dry nitrogen to eliminate moisture. There's a magnetic stirrer flea under the lactic acid that you can't see. We also put in a thermometer. The whole thing was in a fume cupboard, as you don't want to breathe lactic acid vapour...
We warmed it up gradually, with the stirrer turned on. When the lactic acid started to melt we added 1/600 by weight of tin octoate as a polymerisation catalyst. The melt became quite viscous at around 140oC as polymerization started. You can control the mechanical properties of the result by the amount of catalyst: the polymer chains form from each catalyst molecule, so more catalyst means shorter chains.
Here's the result:

At the bottom of the flask is a cool solid clear lump of polylactic acid, with - it turned out - a little residual lactic acid embedded in it.
After a while (weeks) that lactic acid started to absorb atmospheric water vapour and thereby to disrupt the polymer, from which we learned that we needed to cook it for longer (we used about half an hour) to complete polymerisation. Obviously the longer the polymer chains you go for, and thus the less catalyst you use, the longer the polymerisation will take.
Labels: make plastic, pla
Friday, November 07, 2008
About !*$!*&! time...

I have (finally... sorry) updated the documentation on how to use the Java host software. It's linked from the left menu bar of the RepRap website under Using a RepRap and from that link too.
I've also put in a few tweaks, like a 20mm grid on the build base to make it easier to position things.
Comments and abuse welcome...
Labels: Host software documentation
Thursday, November 06, 2008
Lasercut RepRap Extruder Instructions on Wiki

I've put the instructions up for assembling the lasercut Ponoko RepRap Extruder here:
http://reprap.org/bin/view/Main/PonokoExtruderAssembly
It's a fairly basic design, but copes with a range of motors. The instructions include some directions on improvised lathing techniques for those of you who do not have access to a lathe.
Feedback welcomed.
Vik :v)
Labels: extruder, instructions