Saturday, May 29, 2010
Major New Scientist RepRap Article

The New Scientist is running a feature article by Tom Simonite on RepRap and its derivatives this week. Tom visited the RepRap Lab at Bath University, the London Hackspace and other places a few weeks ago to research his article.
To read it, go to this link.
Labels: press
Tuesday, May 25, 2010
RepRap Talk - Bogota
If you're a reprapper in Colombia, you should know that Cristian Peñaranda is giving a talk and demo of RepRap at the Campus Party Colombia, which runs from 28 June to 4 July.
Details are at: http://www.campus-party.com.co/Software_Libre.html
Details are at: http://www.campus-party.com.co/Software_Libre.html
Labels: talks
Saturday, May 22, 2010
Mendel Variations and Lasers!!!
I've been having fun watching the cambrian explosion of variations on Mendel.
This one is particularly significant.
LaserCut_Mendel by Kimberly and Lambert Andrus of TechZoneCommunications.com llc.
LaserCut Mendel has the same metal hardware and other paraphernalia as vanilla Mendel. But now you can make one in the privacy of your own home using your laser cutter!!! (If you don't happen to have a laser cutter, you can buy a LaserCut Mendel from Kimberly in the RepRap For Sale Forum, or come out this weekend to the Bay Area Maker Faire, and buy one from her in person).
Kimberly Anders also sells a version of the RepRap Gen 3 Electronics, the Generation_3_Electronics - Tech_Zone_Remix. These boards have generated quite a bit of interest in the community and you can buy them in this thread in The RepRap For Sale Forum. In the best RepRap traditions, our fellow users are helping document them here: Generation_3_Electronics/Tech_Zone_Remix/How_to. (Discussion/Support)
This one is particularly significant.

LaserCut_Mendel by Kimberly and Lambert Andrus of TechZoneCommunications.com llc.
LaserCut Mendel has the same metal hardware and other paraphernalia as vanilla Mendel. But now you can make one in the privacy of your own home using your laser cutter!!! (If you don't happen to have a laser cutter, you can buy a LaserCut Mendel from Kimberly in the RepRap For Sale Forum, or come out this weekend to the Bay Area Maker Faire, and buy one from her in person).
Kimberly Anders also sells a version of the RepRap Gen 3 Electronics, the Generation_3_Electronics - Tech_Zone_Remix. These boards have generated quite a bit of interest in the community and you can buy them in this thread in The RepRap For Sale Forum. In the best RepRap traditions, our fellow users are helping document them here: Generation_3_Electronics/Tech_Zone_Remix/How_to. (Discussion/Support)
Labels: generation 3 electronics, lasercutter, Mendel, techzone
Thursday, May 20, 2010
An Open-Source Scanning Tunneling Microscope

Yesterday I ran into Jochen Klingelhoefer of Lab Minds. He introduced me to the SXM Project - a project to distribute an open-source scanning tunneling microscope (already working) and a scanning force microscope (under development).
How cool is that? Many of the parts are eminently reprappable too.
For details follow this link.
Just to whet your appetite, here is a picture of a 4 nm square area on the surface of a piece of graphite made with the microscope:

Note the atoms...
Labels: scanning tunneling microscope
Saturday, May 15, 2010
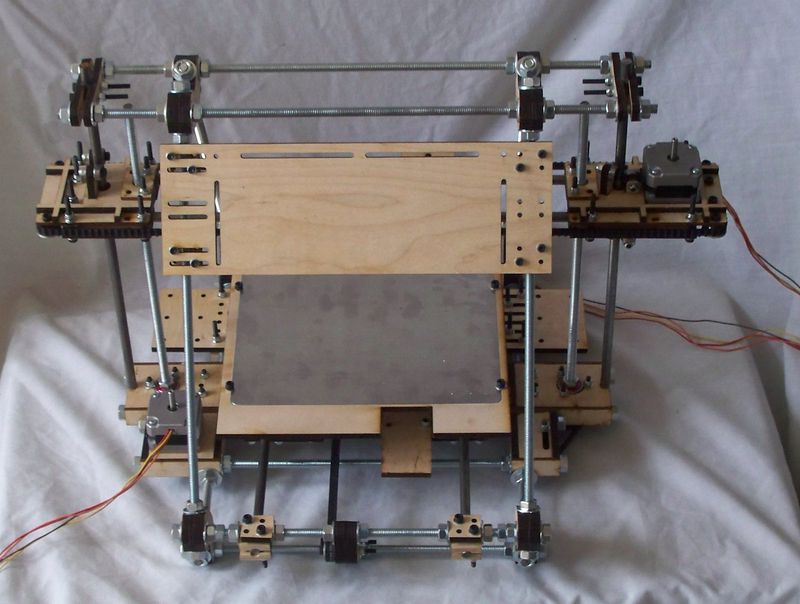
Quick hot bed temperature controller...
I received some aluminum plates (one for my rapman and other for my mendel) and some 50W resistors (still waiting for the 100W ones) tied it all together and it worked just like Chris shown on his super cool blog :), anyhow using the max power (~12A ~500W) I can push to the bed it can overshoot the max temperature those resistors are specified to handle so I needed some way to control it. Initially I used the simple thermal switch (like you can see in TA oven) but as I want to be able to change the temperature from the motherboard I decided to replace it with small electronics.
I do not have a SSR lying around but I have bunch of "no name / no marking" 25A 600V triac's that are perfect for the job, I used the MOC3043 (optocoupler with triak output and zero crossing detection) to separate the electronics from the AC going in to heat bed (I'm using 41VAC), the microchip PIC16F819 is used to drive the LCD, read NTC and work as I2C slave. NTC is connected with 10K resistor to maximize reading range between 20 and 180C. NTC used is same one from BFB hot end's (GT-204).

I do not have a SSR lying around but I have bunch of "no name / no marking" 25A 600V triac's that are perfect for the job, I used the MOC3043 (optocoupler with triak output and zero crossing detection) to separate the electronics from the AC going in to heat bed (I'm using 41VAC), the microchip PIC16F819 is used to drive the LCD, read NTC and work as I2C slave. NTC is connected with 10K resistor to maximize reading range between 20 and 180C. NTC used is same one from BFB hot end's (GT-204).
"firmware" is written in PICC C, it takes ~70% ROM and ~40% RAM so there's room for more functionality if needed. I2C slave address is 0xAB but it can be changed, first 2 addresses (0 and 1) are read/write and contain target temperature for the heat bed while second 2 (2 and 3) are read only and here you can read current temperature of the heat bed. To avoid float math, the temperature is stored as *100 value. When turned on - the controller reads last stored temperature from the EEPROM (locatio 0 and 1), when both key's are pressed the current target temperature is stored in EEPROM. You can both change the target temp via i2c or using key's (whatever happens last).
Source (PICC C file) is available here.
Source (PICC C file) is available here.
Labels: controller, heated bed, I2C, Mendel, PIC, RapMan
Wednesday, May 12, 2010
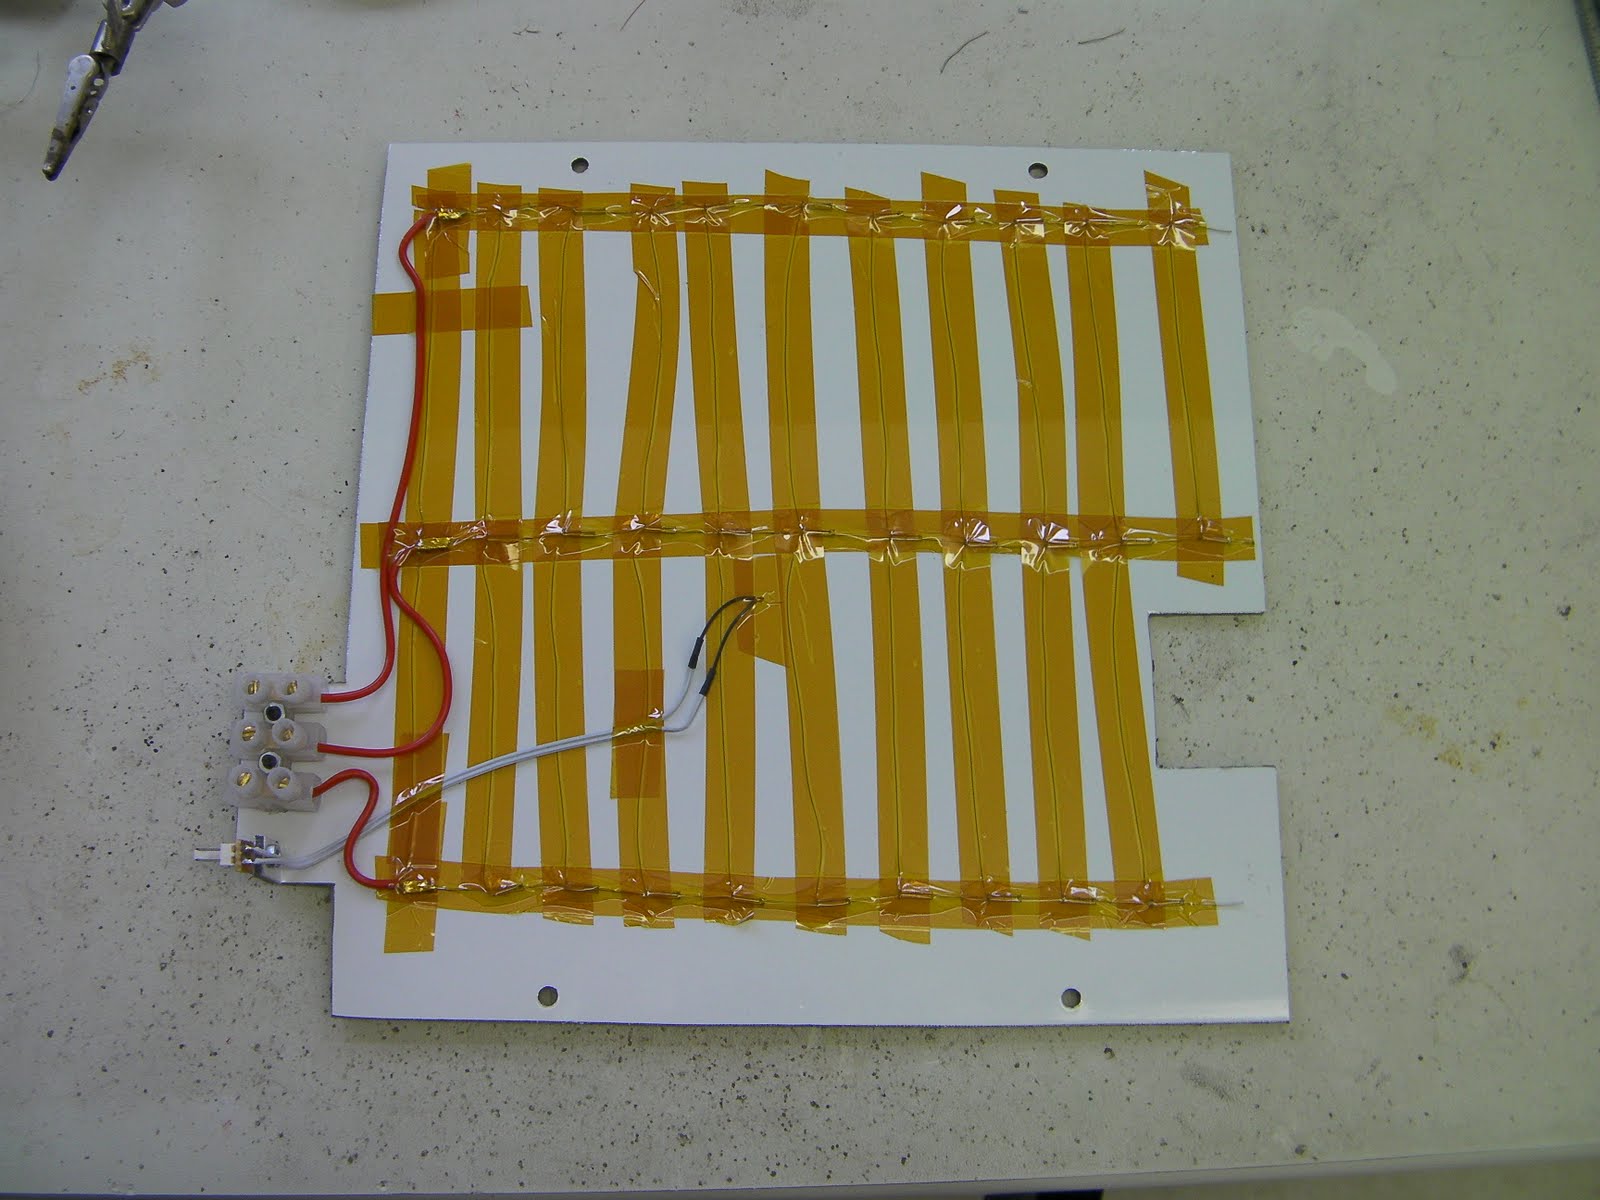
A Heated Bed for Mendel
A little while ago, Nophead made a Dibond heated bed. Dibond is a sandwich of LDPE between two aluminium sheets, and is very flat.
I thought I'd have a go too. Instead of the TO220 resistors he used, I used nichrome wire taped down with Kapton on the back.

Then I insulated that with crack-filler foam, cut down to about 10mm thick with a bread knife.

It seems to work well. Here are the larger Mendel parts printed on it in PLA with it set to 50oC. Their bottoms are f. as pancakes.

I used a piece of ordinary aluminium sheet clipped on the top with bulldog clips to give me a removable tray with good thermal conductivity. That is what has the blue tape on here. The tray is flexible, but the Dibond holds it flat.
I thought it'd be clever to use the 5v supply out of my PC PSU, as that's not being used for anything else. But the current (16A) is a bit silly - connectors and so on get warmish. For the next one I'll run it at 12v and about 7A.
Dibond is rated up to 80oC, which means it's fine for PLA, but might not get hot enough for ABS.
I've integrated it into the host software, the G Codes, and the firmware and updated the copies in the repository. I have to go to Cardiff tomorrow to give a RepRap talk to the British Computer Society, but I hope to put all the details on the wiki over the weekend.
I thought I'd have a go too. Instead of the TO220 resistors he used, I used nichrome wire taped down with Kapton on the back.
Then I insulated that with crack-filler foam, cut down to about 10mm thick with a bread knife.

It seems to work well. Here are the larger Mendel parts printed on it in PLA with it set to 50oC. Their bottoms are f. as pancakes.

I used a piece of ordinary aluminium sheet clipped on the top with bulldog clips to give me a removable tray with good thermal conductivity. That is what has the blue tape on here. The tray is flexible, but the Dibond holds it flat.
I thought it'd be clever to use the 5v supply out of my PC PSU, as that's not being used for anything else. But the current (16A) is a bit silly - connectors and so on get warmish. For the next one I'll run it at 12v and about 7A.
Dibond is rated up to 80oC, which means it's fine for PLA, but might not get hot enough for ABS.
I've integrated it into the host software, the G Codes, and the firmware and updated the copies in the repository. I have to go to Cardiff tomorrow to give a RepRap talk to the British Computer Society, but I hope to put all the details on the wiki over the weekend.
Labels: dibond, heated bed, Mendel
Sunday, May 02, 2010
Board Supports

I got irritated by the thought of a large chunk of wood that could be replaced by printing. So I'm tinkering with these modular panels about 100mm a side, scaled to fit the frame 3 abreast using the same fittings as their wooden counterpart.
Here you can see an Arduino with a simple prototype board on it. This holds 2 of TIP122 drivers for the heater and an experimental DC extruder. Alternatively it can hold 2 EasyDriver stepper controllers. Basic, but hopefully reliable.
 They interconnect with 2xM4 16mm screws and trapped nuts. Objects can be anchored on pillars with 40mm M3 or M4 screws, or against the module's surface with 30mm ones. Here are some preliminary prototypes. I've attached them to the current "Simplified Kiwi Mendel" known more affectionately as Lemon Slice.
Speaking of slices, I caught my hand on a falling mandoline and have to rest my left hand. fortunately thumb works so I can sneakily enter blogs from bed on my phone...
Vik :v)
Labels: kiwi, mandoline, Mendel, module, panel, printed, reprap
![]()