Monday, March 28, 2011
Extending OpenSCAD

I spent the weekend hacking on openSCAD, and I thought people might be interested in the results. The most visible one is syntax highlighting, but I've also done a few language extensions:
- Dot/Cross Product (* and %)
- length function for lengths of vectors and strings
- accessing characters in a string via []
Labels: OpenSCAD
Saturday, March 26, 2011
Best of the RepRap Wiki 3/25/11
Garyhodgson has uploaded a Prusa Mendel completely redrawn in Sketchup, and then used that drawing to create some really nice instructions. I can't describe these instructions in any way but gorgeous, they put all prior RepRap documentation to shame in it's simplicity. As most of you know RepRap has always suffered from poor documentation. These looks like something out of a computer hardware quick install guide. It also really shows off how flat out mechanically simple Prusa Mendel is.
He has uploaded the file to the wiki, and is maintaining a git for it. He has even made the document completely open licence, so you are free to evolve this document in any way you need.
Garyhodgson aka Gary Hodgson, my hat off to you for some amazingly useful work.

Many in our community "felt the pain" when Pololu ran out of the A4983, This is the stepper controler most of our electronics uses, and it stayed out of stock for many weeks. Joem the Sanguinololu guy is also working on an equivalent open source version of the A4983. More details in the wiki page.
ErikDeBruijn, of Ultimaker is at it again, he is now working on a pick and place machine. Given that he already has shown is RepStrap doing 300mm/s I am almost scared to see how fast it will do Pick - Place. Good job Erik!

HeliumFrog has a lot of really amazing projects over at his website. But my favorite has to be his printable Delta Robot. I mean really, even if it didn't even run, who wouldn't want that sexy beast in there shop? The great thing is it DOES RUN:
He has also very recently updated the software to run it, so it's by no stretch a dead project.
Updates without pretty pictures
Both the Generation_7_Electronics and the Sanguinololu electornics pages have had a lot of documentation added, both of these electronics are very quickly becoming real options.
Powder_Printer_Recipes: Sebastien_Bailard uploaded a huge set of recipes for powder printing.
M-codes_for_EEPROM_config: AlexRa did a large update to the EEPROM tables
Wednesday, March 23, 2011
Print a Vacuum Cleaner!

Ever wanted to print a vacuum cleaner? Well, now you can! I've designed a printable hand-held vacuum cleaner that works (to some extent, at least!).
Build instructions are on my blog here with lots of pictures. You can also skip to the youtube video or github.
Update: I've also posted to thingiverse and the RepRap wiki.
Labels: household applience
Friday, March 18, 2011
Best of the RepRap Wiki 3/18/11
A few not so new items this week, but I have not seen some of these project get a very large audience yet.

The Sanguino was developed by Zack Hoeken, and rests at the heart of Makerbot's Gen3 Electronics. The Pololu Electronics where developed by Adrian Bowyer, and is what inspired the Ramps electronics by Ultimachine. Joem has combined the idea of these two two electronics into a truly tiny set of electronics. He is on version .7 of the board, and quickly approaching a 1.0.
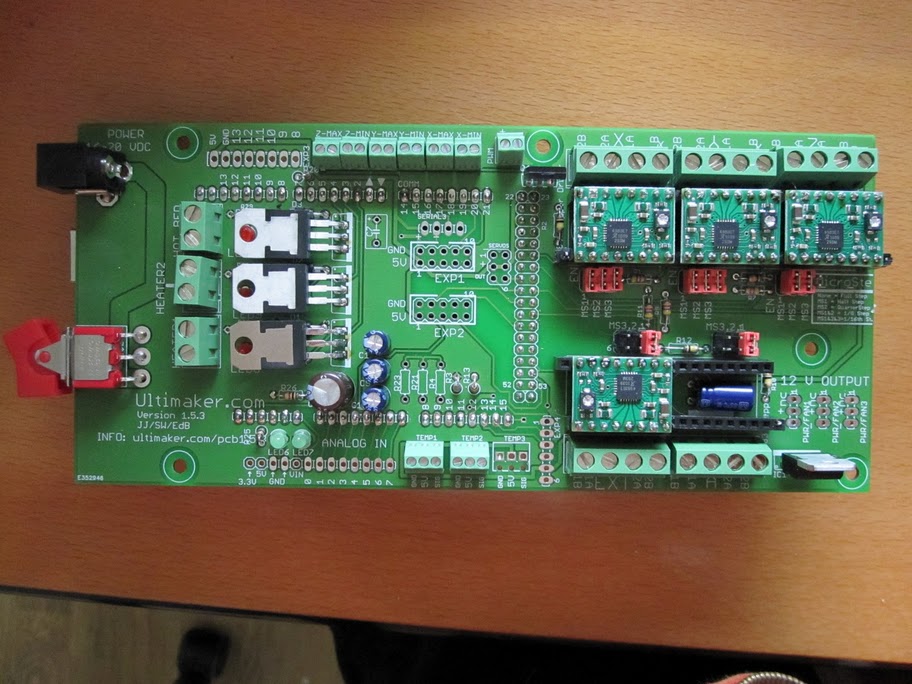
Ultimaker's_v1.5.3_PCB
Erik De Bruijn, one of the original RepRap Devs is coming along nicely on his version of the Arduino Pololu Electronics. He has been quite busy updating the RepRap Wiki, and his own Ultimaker Wiki. These are the electronics that are at the core of his UltiMaker. If your as much of a Wiki nerd as I am becoming, his wiki is worth checking out, he already has most of the build instructions posted for the Ultimaker.
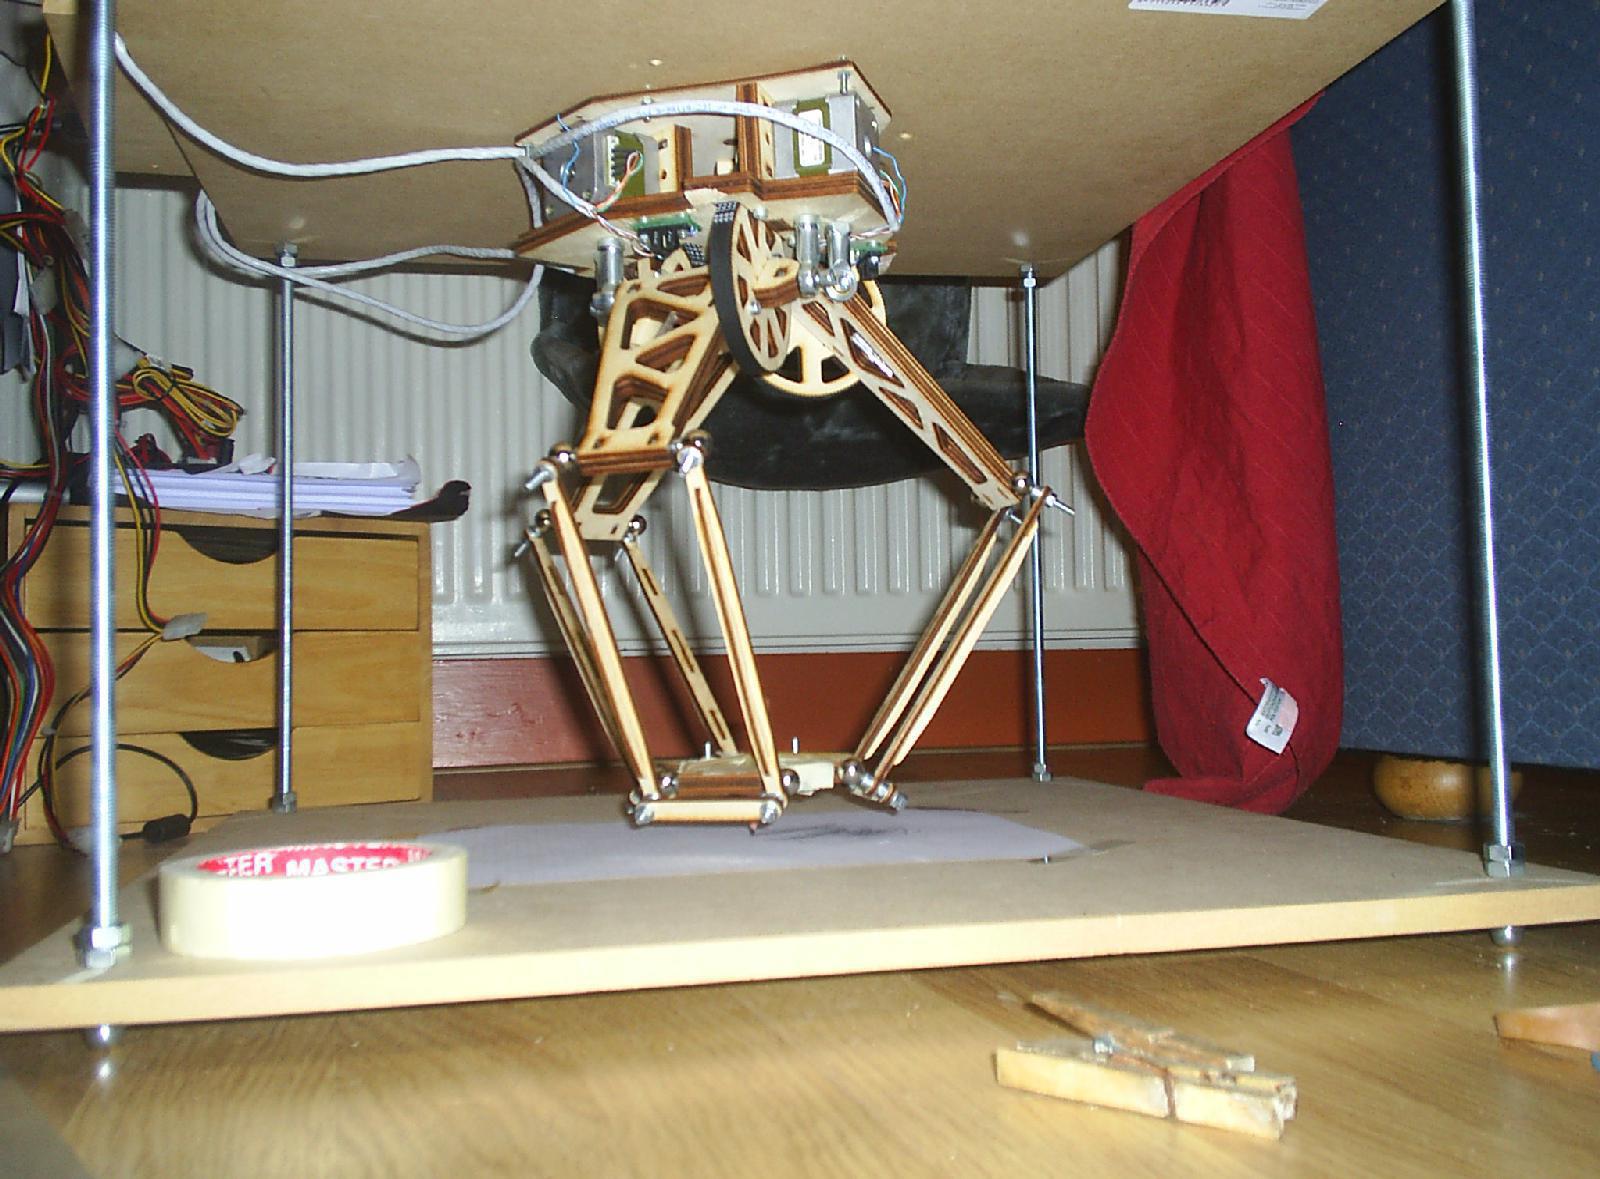
Delta
There are some really amazing Delta bots in the Wiki, this one has been receiving a lot of edit love here lately. Will need to bring some of the others forward in the coming weeks. This wonderful example is known as Clavel and is already on it's second prototyping.
Kiwi M5 Mendel Battle Tank
This beast of a machine is the work RepRot, and as you can tell from the machine's name, it's another one of those crazy folk from New Zealand. This beast earns the name "Battle Tank".
-Make from bullet resistant plastic (I know I get shot at allot while I print)
-24 Volt steppers (In case you decide to do 3d printing on Saturn)
-Over 700 Watts worth of Power Supplies (563 for the Cartesian, 150 for the HBP)
Good job RepRot, you just made 99% of the RepRap in the world look like wusses. :)
The Sanguino was developed by Zack Hoeken, and rests at the heart of Makerbot's Gen3 Electronics. The Pololu Electronics where developed by Adrian Bowyer, and is what inspired the Ramps electronics by Ultimachine. Joem has combined the idea of these two two electronics into a truly tiny set of electronics. He is on version .7 of the board, and quickly approaching a 1.0.
Erik De Bruijn, one of the original RepRap Devs is coming along nicely on his version of the Arduino Pololu Electronics. He has been quite busy updating the RepRap Wiki, and his own Ultimaker Wiki. These are the electronics that are at the core of his UltiMaker. If your as much of a Wiki nerd as I am becoming, his wiki is worth checking out, he already has most of the build instructions posted for the Ultimaker.
Delta
There are some really amazing Delta bots in the Wiki, this one has been receiving a lot of edit love here lately. Will need to bring some of the others forward in the coming weeks. This wonderful example is known as Clavel and is already on it's second prototyping.
Kiwi M5 Mendel Battle Tank
This beast of a machine is the work RepRot, and as you can tell from the machine's name, it's another one of those crazy folk from New Zealand. This beast earns the name "Battle Tank".
-Make from bullet resistant plastic (I know I get shot at allot while I print)
-24 Volt steppers (In case you decide to do 3d printing on Saturn)
-Over 700 Watts worth of Power Supplies (563 for the Cartesian, 150 for the HBP)
Good job RepRot, you just made 99% of the RepRap in the world look like wusses. :)
Wednesday, March 16, 2011
Automatic documentation and project evolution
While designing my Mendel, I found out that I really hate to write documentation. Thankfully, I met Kliment who did such an amazing job on documenting the entire Prusa Mendel build! But this is not a long term solution and I started to realize that changing the documentation with every commit to the repository is boring, so I tend to not to do it. :-/
One solution would be to mark one commit as somewhat stable and optimize the documentation to this point. Unfortunately this would slow down the adoption to the new features by community, so I dumped that idea.
Then I finally realized, that I need to generate it automatically. By that time we just included the makefile into the repository, and I found out that OpenSCAD, my software of choice, has ability to output stuff with an echo statement.
Example of catching output:
OpenSCAD -s test.stl test.scad > test.txt 2>&1
I immediately thought, “This is it! I can easily output what these parts use!!” And possibly create bills of materials (BOM), etc. For example: You have module called M8Nut() which will generate an M8Nut object for cutting out nut traps, etc. With every use it would output “m8nut” to the file ‘test.txt’. After some experimenting I found a few problems:
Then I got stuck for few days. Finally, I remembered the JavaDOC comments, even though I hate Java. :-D Basically, I borrowed the style of syntax and comment blocks and started creating ThingDOC! I was writing the documentation for a few weeks in my Prusa Mendel files the way I found to be most natural, then writing of the ThingDOC itself began much later. Basically, I started after all files were already commented. Basic ThingDOC comments looks like this:
/**
* Slides on the x-axis with extruder.
*
* @name X carriage
* @category Printed
* @using 4 m3x10
* @using 4 m3washer
* @using 4 m3nut
* @using 4 bushing
*/
I don’t want to talk about syntax here, there is already a wiki page about it. Let’s talk more about what it can do now and what I will do in the future.
ThingDOC looks for these comments in files with .scad and .tdoc extension. It doens’t matter where you put them. This allows use for non-OpenSCAD things. Now its in stage where it can make a BOM for full project, recursively. For example, when you need 8 M8 nuts for one frame-vertex and mendel uses 6 vertices, it will add 64 M8 nuts to the final bill of materials.
Even this alone is very useful, since you will at least have all the needed parts for the commit of repository you actually have, and you won’t be missing something.
It also generates nice summary of parts with their descriptions.
What does documentation look like from actual files in Prusa Mendel repository.
A more important thing, which is not as obvious is that it has a full tree of parts. This is more valuable then it looks like, since later on we can generate assembly documentation.
As I mentioned in above, my ultimate goal is to make the full assembly files automatically generated, in the quality you can find now on the wiki. I already have a plan how to do it. Of course it can’t be fully automatic, but you will have at least hyperlocal assembly instructions, which would be structured and more easily recognized.
An example of why this is still beneficial even though it seems as same amount of work as now: Imagine that nophead wants to fork my Mendel, if he doesn’t like one part (for example, the carriage) it would have completely different mounting etc. etc. So he forks the repository and does all the changes he wants to do, including documentation changes in the carriage.scad. He changed only one single file, but he’s still able to generate documentation for full printer, and the documentation will make sense!
Hyperlocal documentation for the win!
Every commit will then have its own documentation. I know it sounds like science fiction but I really love this idea.
Project can be more living thing then rapid jumps every few months when new release is published.
Again I can show small example how this in connection with GIT is huge game changer!
Once Original Mendel (as now community calls Sells) was released it became more or less untouchable thing. Only changes I remember in SVN was repairing STLs. At first because the SVN is bad for forking branching and even if someone wants he cant express his ideas there, its not open for everyone. And second, the release was so huge that everyone excepts its final thing. In opposite, in my repository, things are changing on daily basis and community accept these changes fluently!! When I browse flickr and internet I can see how quickly community is using updated files etc. In repo is now many great changes by Spacexula, soon from GregFrost. I try to encourage guys to change and tweak. Prusa Mendel will never have something like ‘stable release’ or ‘version 0.1’, never!
‘You have and idea? Go FORK yourself!!’ And it works!!
Back to assembly instructions. How I want to do it: Since we already have the tree of parts it’s easy to know where to start, from the roots, generating one subassembly after another, going up and up until full documentation is ready. Let me show it by example:
/**
* Printer
*
* @root
* @name RepRap
* @assembly Make sure you have [frame] ready.
* @assembly Second you make the [x-axis].
*/
/**
* Printer base
*
* @name frame
* @using 6 frame-vertex
* @assembly Do the side triangles.
* @assembly Connect triangles into frame.
*/
/**
* x axis
*
* @name x-axis
* @using 1 x-end-motor
* @using 1 x-end-idler
* @assembly Prepare [x-end-motor]
* @assembly Prepare [x-end-idler]
* @assembly Put both together with rods.
*/
So first it will generate the frame assembly instructions, since there are no other subassemblies, it will write it out. Second is the X axis but it has some things which logically must be assembled sooner then the x-axis itself, so x-end-motor part goes first, since its mentioned sooner, then the x-end-idler and so on with other instructions.
If you want to play with it, you can clone Prusa Mendel repository switch to development branch and run
git submodule init; git config -l; git submodule update
for initialization of submodules (ThingDOC is submodule). Then you need to install Python and LaTeX (sorry we love the output, but switching to mediawiki etc should be easy). Last you run shell scrip generate-documentation.sh and you are done!
I’m looking for other developers willing to help me with this. I find myself having less time for this then I would love to have, but I think it’s an even more important thing than the Prusa Mendel itself. Or even if you don’t want to help with development and have some ideas what this meta data could be useful for other than the BOM and Assembly instructions, leave a comment.
Jo
One solution would be to mark one commit as somewhat stable and optimize the documentation to this point. Unfortunately this would slow down the adoption to the new features by community, so I dumped that idea.
Then I finally realized, that I need to generate it automatically. By that time we just included the makefile into the repository, and I found out that OpenSCAD, my software of choice, has ability to output stuff with an echo statement.
Example of catching output:
OpenSCAD -s test.stl test.scad > test.txt 2>&1
I immediately thought, “This is it! I can easily output what these parts use!!” And possibly create bills of materials (BOM), etc. For example: You have module called M8Nut() which will generate an M8Nut object for cutting out nut traps, etc. With every use it would output “m8nut” to the file ‘test.txt’. After some experimenting I found a few problems:
- It could be used only for OpenSCAD files. I found this really bad ‘bug’, what if we have AOI or DXF stuff in our project?
- It would get really ridiculous, when you would be doing lock nuts, washers etc. There would be simply ‘dumb’ objects doing nothing, just outputting themselves to command line. Confusing, right? :-)
- It would be much harder to associate parts with each sub-assembly in full project tree.
Also, you cannot use the OpenSCAD to generate the output, not even do the recursive counting, you still have to use another tool. !!!!!
Then I got stuck for few days. Finally, I remembered the JavaDOC comments, even though I hate Java. :-D Basically, I borrowed the style of syntax and comment blocks and started creating ThingDOC! I was writing the documentation for a few weeks in my Prusa Mendel files the way I found to be most natural, then writing of the ThingDOC itself began much later. Basically, I started after all files were already commented. Basic ThingDOC comments looks like this:
/**
* Slides on the x-axis with extruder.
*
* @name X carriage
* @category Printed
* @using 4 m3x10
* @using 4 m3washer
* @using 4 m3nut
* @using 4 bushing
*/
I don’t want to talk about syntax here, there is already a wiki page about it. Let’s talk more about what it can do now and what I will do in the future.
ThingDOC looks for these comments in files with .scad and .tdoc extension. It doens’t matter where you put them. This allows use for non-OpenSCAD things. Now its in stage where it can make a BOM for full project, recursively. For example, when you need 8 M8 nuts for one frame-vertex and mendel uses 6 vertices, it will add 64 M8 nuts to the final bill of materials.
Even this alone is very useful, since you will at least have all the needed parts for the commit of repository you actually have, and you won’t be missing something.
It also generates nice summary of parts with their descriptions.
What does documentation look like from actual files in Prusa Mendel repository.
A more important thing, which is not as obvious is that it has a full tree of parts. This is more valuable then it looks like, since later on we can generate assembly documentation.
As I mentioned in above, my ultimate goal is to make the full assembly files automatically generated, in the quality you can find now on the wiki. I already have a plan how to do it. Of course it can’t be fully automatic, but you will have at least hyperlocal assembly instructions, which would be structured and more easily recognized.
An example of why this is still beneficial even though it seems as same amount of work as now: Imagine that nophead wants to fork my Mendel, if he doesn’t like one part (for example, the carriage) it would have completely different mounting etc. etc. So he forks the repository and does all the changes he wants to do, including documentation changes in the carriage.scad. He changed only one single file, but he’s still able to generate documentation for full printer, and the documentation will make sense!
Hyperlocal documentation for the win!
Every commit will then have its own documentation. I know it sounds like science fiction but I really love this idea.
Project can be more living thing then rapid jumps every few months when new release is published.
Again I can show small example how this in connection with GIT is huge game changer!
Once Original Mendel (as now community calls Sells) was released it became more or less untouchable thing. Only changes I remember in SVN was repairing STLs. At first because the SVN is bad for forking branching and even if someone wants he cant express his ideas there, its not open for everyone. And second, the release was so huge that everyone excepts its final thing. In opposite, in my repository, things are changing on daily basis and community accept these changes fluently!! When I browse flickr and internet I can see how quickly community is using updated files etc. In repo is now many great changes by Spacexula, soon from GregFrost. I try to encourage guys to change and tweak. Prusa Mendel will never have something like ‘stable release’ or ‘version 0.1’, never!
‘You have and idea? Go FORK yourself!!’ And it works!!
Back to assembly instructions. How I want to do it: Since we already have the tree of parts it’s easy to know where to start, from the roots, generating one subassembly after another, going up and up until full documentation is ready. Let me show it by example:
/**
* Printer
*
* @root
* @name RepRap
* @assembly Make sure you have [frame] ready.
* @assembly Second you make the [x-axis].
*/
/**
* Printer base
*
* @name frame
* @using 6 frame-vertex
* @assembly Do the side triangles.
* @assembly Connect triangles into frame.
*/
/**
* x axis
*
* @name x-axis
* @using 1 x-end-motor
* @using 1 x-end-idler
* @assembly Prepare [x-end-motor]
* @assembly Prepare [x-end-idler]
* @assembly Put both together with rods.
*/
So first it will generate the frame assembly instructions, since there are no other subassemblies, it will write it out. Second is the X axis but it has some things which logically must be assembled sooner then the x-axis itself, so x-end-motor part goes first, since its mentioned sooner, then the x-end-idler and so on with other instructions.
If you want to play with it, you can clone Prusa Mendel repository switch to development branch and run
git submodule init; git config -l; git submodule update
for initialization of submodules (ThingDOC is submodule). Then you need to install Python and LaTeX (sorry we love the output, but switching to mediawiki etc should be easy). Last you run shell scrip generate-documentation.sh and you are done!
I’m looking for other developers willing to help me with this. I find myself having less time for this then I would love to have, but I think it’s an even more important thing than the Prusa Mendel itself. Or even if you don’t want to help with development and have some ideas what this meta data could be useful for other than the BOM and Assembly instructions, leave a comment.
Jo
Tuesday, March 15, 2011
Double Wade sighted in the workshop

This is a Double Wade extruder http://www.thingiverse.com/thing:6989 being wired up for testing. This assembly saddles across the X axis with one extruder overhanging. With the use of the Prusa-style X carriage http://www.thingiverse.com/thing:6805 with PLA bushings running at 6000mm/min I can now span more of the X axis than I could with the standard Sells-style carriage, and Mendels tend to have more room on the Y axis for me to take up with extra extruder.
Note the twin terminal strip blocks for a head disconnect mechanism. They're clamped around some small nails, and loosening the screws on one side will allow you to remove the whole row of spikes at once like a plug. But this one won't shake loose :)
This is using FiveD/Teacup firmware on a single Arduino Diecemila to control "Custard Slice" (yes I name my RepRaps too).
Vik :v)
Labels: reprap
Friday, March 11, 2011
Best of the RepRap Wiki 3/11/11
The RepRap Wiki is a great tool to host your project, but for too long we have allowed some of these great updates to the Wiki to go unsung. From here forward I will be doing a weekly recap of the new content of interest to me in the wiki. Remember these call outs are based around the things I found interesting, if you feel I overlooked your update in error, please speak up in the RepRap user email list, and I will try to add you to the blog next week.
Now for updates of note this week in our Wiki:

They have been doing wonderful updates for each of their machines, and some of the most detailed build logs for the Laser Cut Mendel that I have seen to date. Go over there and check out their 4 Mendels, 1 Huxley, and 1 Fab@Home.
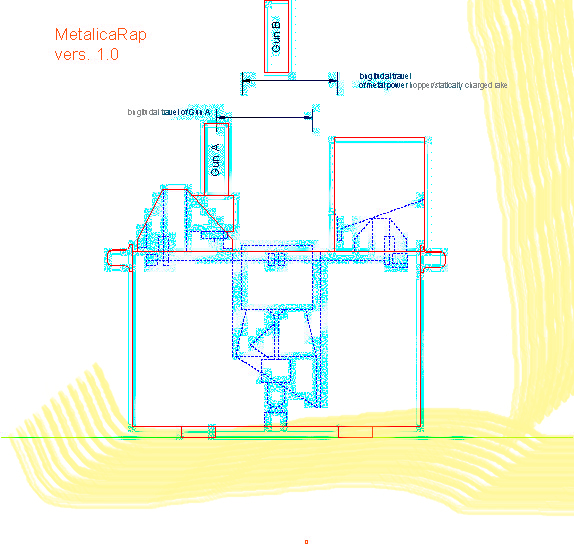
Rapatan is an almost feverish updater of the wiki on his MetalicRap project. In the last week he has added a huge amount of content to his already prolific documentation on the wiki, and has started to reach out to the community for help in MetalicRap's development. I even saw Prometious Fusion has joined his team. Awesome work guys!
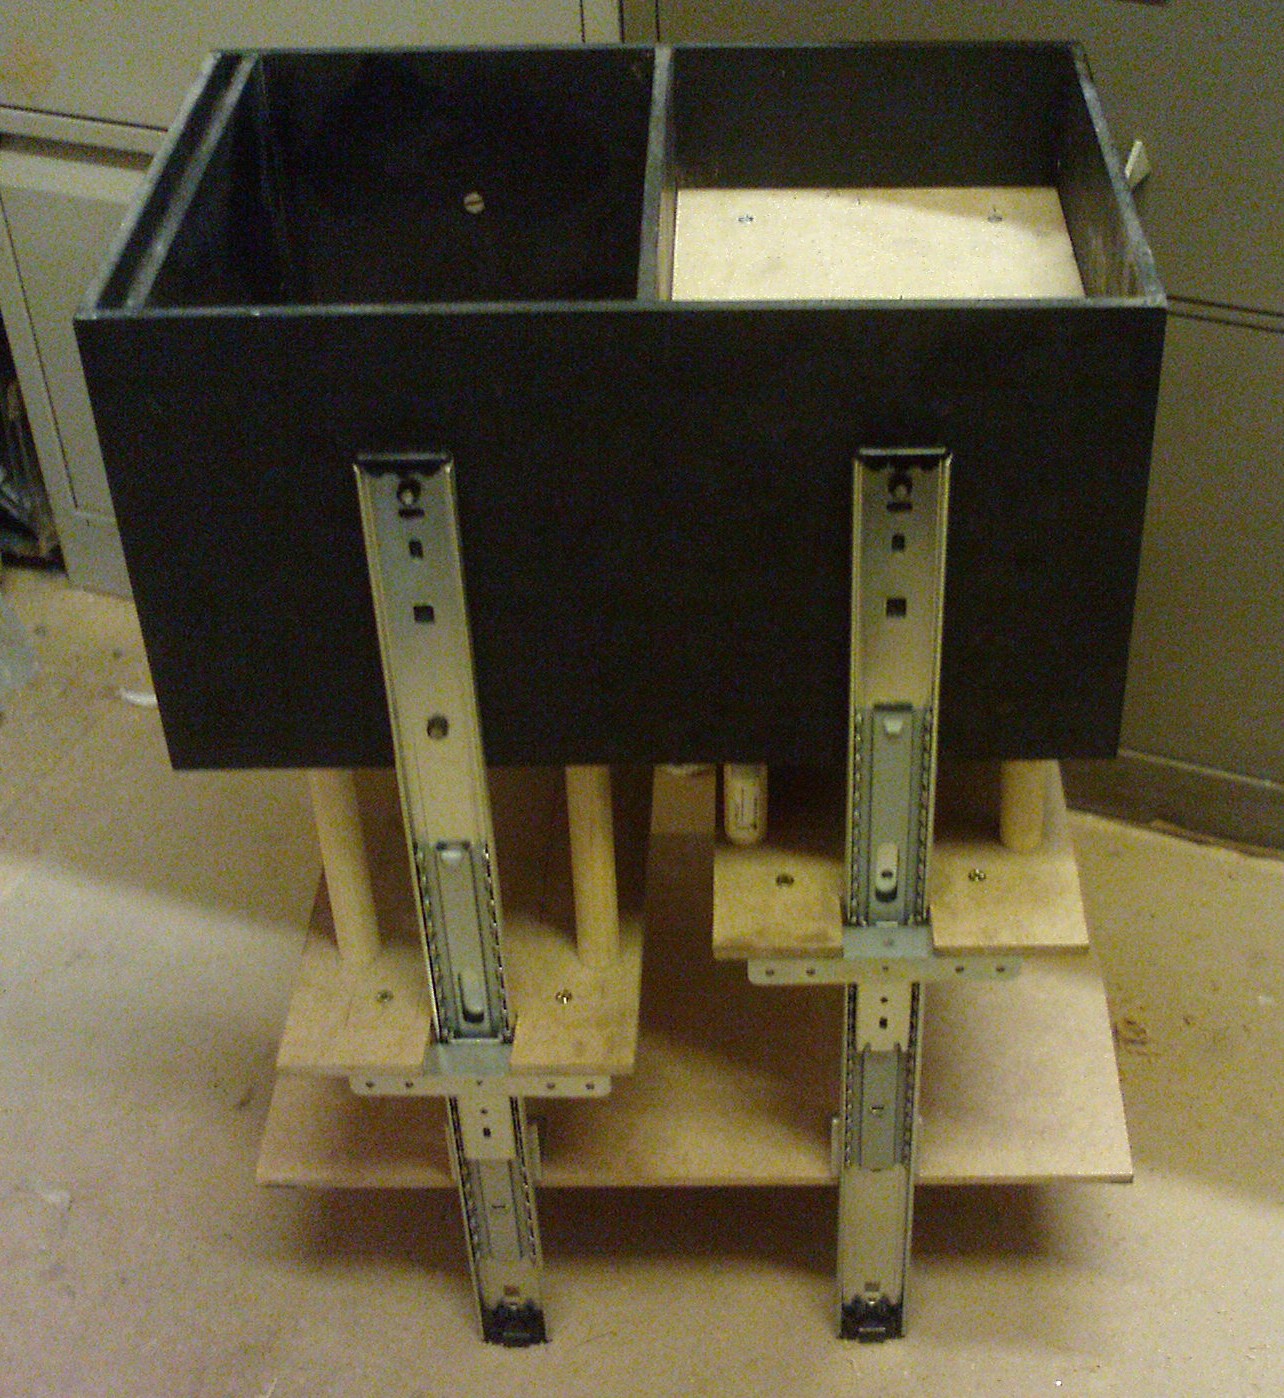
Johnrpm has been doing a lot of design work, and real hardware work on his powder bed printer. I am a sucker for pictures of real world hardware, especially when it is this awesome!

Traumflug has really been putting some work into his Gen 7 electronics in the last week. He now has 4 different Mendels running off his boards. For those that have not been following this development is a hybrid of RAMPS and Gen2 on a board.

Volumetric Dimension settings
With the new Skeinforge 40 you calibrate based off how much plastic, by volume, is entering the top of the extruder per step, and therefore how much plastic is being pushed out the nozzle per step. Several folks have added setups for some of our most common extruders, cutting down a lot on the difficulty of setting skeinforge 40 up.
That’s it for Best of RepRap Wiki this week, please comment below if you think I should continue this project, and if you want to get into next weeks blog post, be sure to update the wiki, post pictures, and keep being awesome.
Aha! RepRap appears do be doing MakerFaire!
My spies at google tell me we're going to
Maker Faire UK in Newcastle this weekend!
Maker Faire UK 12-13 March 2011
is part of Newcastle Science Faire 2011

We've got a number of different folk doing up a number of different booths for a number of different Makerfaires. If you are running one of the numerous Official RepRap Booth(s)™, please let the rest of us know so we can show up and help self-replicate and so on! Helpful secret mailing list discussion thread for people organizing / attending booths
(Disclaimer: RepRap doesn't really do "official". As far as we can tell.
There may even be a rule about it.)
* Maker Faire UK
March 12th & 13th, 2011
http://www.makerfaireuk.com/
* Robot Fest/ Mid-Atlantic Mini Maker
April 30, 7am – 12pm
http://www.robotfest.com/
* Toronto Mini Maker Faire
May 6-8
http://makerfairetoronto.ca/makers/
* Montreal, Libre Graphics Meeting (LGM)
May 10-13
http://www.libregraphicsmeeting.org/2011/
* Maker Faire Bay Area
May 21st & 22nd, 2011
http://makerfaire.com/bayarea/2011/
* Mini Maker Faire Ann Arbor
June 4th, 2011
http://www.a2makerfaire.com/
* Maker Faire:North Carolina
Saturday, June 18
http://makerfairenc.com/
* Maker Faire: Kansas City
Friday June 24 - Saturday 25, 2011
http://www.makerfairekc.com
* Vancouver Maker Faire
June 25 - June 26
http://vancouver.makerfaire.ca
* Maker Faire Detroit
July 30th & 31st, 2011
http://makerfaire.com/detroit/2011/
* Maker Faire New York
September 17th & 18th, 2011
http://makerfaire.com/newyork/2011/
Maker Faire UK in Newcastle this weekend!
Maker Faire UK 12-13 March 2011
is part of Newcastle Science Faire 2011
We've got a number of different folk doing up a number of different booths for a number of different Makerfaires. If you are running one of the numerous Official RepRap Booth(s)™, please let the rest of us know so we can show up and help self-replicate and so on! Helpful secret mailing list discussion thread for people organizing / attending booths
(Disclaimer: RepRap doesn't really do "official". As far as we can tell.
There may even be a rule about it.)
* Maker Faire UK
March 12th & 13th, 2011
http://www.makerfaireuk.com/
* Robot Fest/ Mid-Atlantic Mini Maker
April 30, 7am – 12pm
http://www.robotfest.com/
* Toronto Mini Maker Faire
May 6-8
http://makerfairetoronto.ca/makers/
* Montreal, Libre Graphics Meeting (LGM)
May 10-13
http://www.libregraphicsmeeting.org/2011/
* Maker Faire Bay Area
May 21st & 22nd, 2011
http://makerfaire.com/bayarea/2011/
* Mini Maker Faire Ann Arbor
June 4th, 2011
http://www.a2makerfaire.com/
* Maker Faire:North Carolina
Saturday, June 18
http://makerfairenc.com/
* Maker Faire: Kansas City
Friday June 24 - Saturday 25, 2011
http://www.makerfairekc.com
* Vancouver Maker Faire
June 25 - June 26
http://vancouver.makerfaire.ca
* Maker Faire Detroit
July 30th & 31st, 2011
http://makerfaire.com/detroit/2011/
* Maker Faire New York
September 17th & 18th, 2011
http://makerfaire.com/newyork/2011/
Development board arrived
In which your narrator's quest for a next generation printer continues...

Do you want to read more?>
Tuesday, March 08, 2011
Impartial reivew of the Clonedel Cast parts by Metrix Create Space
Open3DP was nice enough to send me some of the cast parts being sold by Metrix Create Space. I wanted to see the part quality in person, and to give them a impartial look.
I have seen the Techzone Lasercut wooden Mendel, the CNC milled Issac Mendel, and wanted to see if these cast parts where usable. I was very surprised at how strong they where and the their quality.
To use them you will need a drill press, and the parts are a bit weaker than ABS, but I think they seem usable.
Below is a video of a Mendel assembled with these parts printing a cube.
That's one of the issues with disruptive technology like RepRap, every time you think you have a handle on how things are going, it surprises you.
18 Months ago the plastic parts for a Mendel where going for $700+, 12 Months ago the price settled down to $250-$400, 3 Months Ago Prusa Mendel dropped the price for the RP parts to $125-$150. Now the Clonedel cast RP parts are going for $50 (I personally know of 3 shops gearing up to start selling them).
I wrote a blog post over at my personal Blog a few weeks ago describing how to put a Prusa Mendel together if you don't have access to a 3d printer for around $510, I guess I need to update it to $410 now. Amazing times.
Monday, March 07, 2011
3D Printed Adult's Bicycle

Lifted from a Eureka Magazine Article. "The 'Airbike' is made of nylon but, according to EADS, is strong enough to replace steel or aluminium and requires no conventional maintenance or assembly. It is 'grown' from powder, allowing complete sections to be built as one piece; the wheels, bearings and axle being incorporated within the 'growing' process and built at the same time. Because it can be built to rider specification, it requires no adjustment."
Vik :v)
Labels: 3d, airbike, bicycle, printed, reprap
Saturday, March 05, 2011
High Impact Test
I've been printing little green targets from PLA and white(ish) ones from IMPLA. The IMPLA needs an extra 10C heating, layers thinner than 0.4 and inter-layer cooling. In other words it is no fun to print with.
So, frustrated I took the whole lot outside, lined them up against the wall:

and shot them:

You can see in the aftermath, both green PLA targets have chunks missing from them. One white IMPLA target is split but holding together. The 3 BBs embedded in the wood on the left show the level of impact.

Useful stuff, but I'm not sure if it's worth offering for sale as it is so tricky to print with.
Vik :v)
Labels: filament, impact, modified, pla, plastic, reprap
Friday, March 04, 2011
First Dutch Reprap Build-Party
Just in case you haven't caught it elsewhere, there's a brilliant video of the first Dutch Reprap Build Party on YouTube:
Thanks to Ruben Lubbes and all at IkMaak.nl for organizing this amazing event.
They plan more...
Thanks to Ruben Lubbes and all at IkMaak.nl for organizing this amazing event.
They plan more...
High-Impact PLA
One of the problems with PLA is that it shatters when stressed, rather than bending gracefully. This problem is solved in ABS by adding impact modifiers - basically synthetic rubber blends - to give some flexibility under stress. Luckily, I found an impact modifier that is compatible with PLA and does not significantly alter the melting point. At about 1/3 it makes PLA this flexible without fracturing:

I've got to run a few more printing tests on it, but it's looking promising as a material that offers the durability of ABS with the reduced environmental footprint and ease of extrusion of PLA. Oh, I suppose I'd better figure out what it'll cost me too :)
Update: I flexed some back & forth 100+ times and got bored trying to break it.
Printing with it is much trickier than plain PLA. It wants to coalesce into one lump, and you really need cooling between layers.
Vik :v)
Labels: ABS, filament, impact, modifier, pla, plastic
Thursday, March 03, 2011
RepRap Universal Mini Extruder

I have been designing a new printable extruder. It is primarily intended to be small and light enough to mount directly on Huxley, but it should work on virtually any RepRap or similar 3D printer.
It features:
- 1.75 mm filament
- Adaptable mounting plate to attach it to virtually any 3D printer
- Very compact high-torque NEMA 11 motor
- Wade-style hobbed bolt filament transport
- Wing-nut drive to spread the torque loading on the plastic gears
- Push-fit hot-end parts - no thread cutting
- Lightweight: 335g (about half the weight of the usual Mendel extruder)
- Compact design (74 mm x 83 mm x 100 mm)
RepRap Universal Mini Extruder from Adrian Bowyer on Vimeo.
Documentation and full details being written up here...
Labels: extruders
Wednesday, March 02, 2011
Printing People

Fabricate Yourself is a project that documented the Tangible, Embedded and Embodied Interaction Conference. They used a kinect to capture 3D scans of lots of people then printed them all in miniature.
How cool is that?
Tuesday, March 01, 2011
Going for 32 bit embedded processors
In which your narrator begins to cobble a next-generation Reprap controller board together out of much bigger vitamins than has previously been possible.

Do you want to read more?
Do you want to read more?
![]()